考前须知
kiosk用户,密码为redhat
root用户,密码为Asimov
一、RHCSA8
安装考试环境
进入界面之后首先使用kiosk用户进行登录,将ex200v8-1.0.0-1912042133.x86_64软件包上传到/tmp目录,然后切换到root用户进行安装
# cd /tmp/
# rpm -ivh ex200v8-1.0.0-1912042133.x86_64.rpm
安装完成后再次切换成kiosk用户,执行以下命令生成考试环境
$ exam-setup
重要配置信息
在考试期间,除了您就坐位置的台式机之外,还将使用多个虚拟系统。您不具有台式机系统的根访问权,但具有对虚拟系统的完全根访问权。
系统信息
| 系统 | IP地址 |
|---|---|
| servera.domain250.example.com | 172.25.250.100 |
| serverb.domain250.example.com | 172.25.250.200 |
您使用的系统属于DNS域domain250.example.com。该域中的所有系统都位于172.25.250.0/255.255.255.0子网中,该子网中的所有系统都位于domain250.example.com中。
针对这些系统列出的IP地址是应该分配给系统的地址。您可能需要为一个或两个系统配置网络,以便能够通过上述地址访问您的地址。
账户信息
servera的根密码已经设置为flectrag。
除非另有指定,否则这将是用于访问其他系统和服务的密码。此外,除非另有指定,否则应将该密码用于您创建的帐户或者需要设置密码的任意服务。
其他信息
您可以通过SSH或控制台访问考试系统(参见下文所述)。请注意,SSH访问权可能取决于您解答其他考试项目的情况。
如果您需要在系统上安装其他软件,可以使用位于以下地址的存储库:
·http://content/rhe18.0/x86_64/dvd/Baseos
·http://content/rhe18.0/x86_64/dvd/Appstream
重要评测信息
您的系统会在重新引导后进行评测,因此务必确保您实施的的所有配置和服务在重新引导后仍然保留。服务必须在没有人工干预的情况下启动。
同样,本次考试使用的所有虚拟实例都必须能够重新引导至适当的多用户目标,而无需任何人工辅助。在无法引导或无法进行无人干预引导的系统上完成的所有操作都将为零分。
考试要求
在servera.domain250.example.com上执行以下任务。
一、将servera配置为具有以下网络配置:
-
主机名:servera.domain250.example.com
-
IP地址:172.25.250.100
-
子网掩码:255.255.255.0
-
网关:172.25.250.254
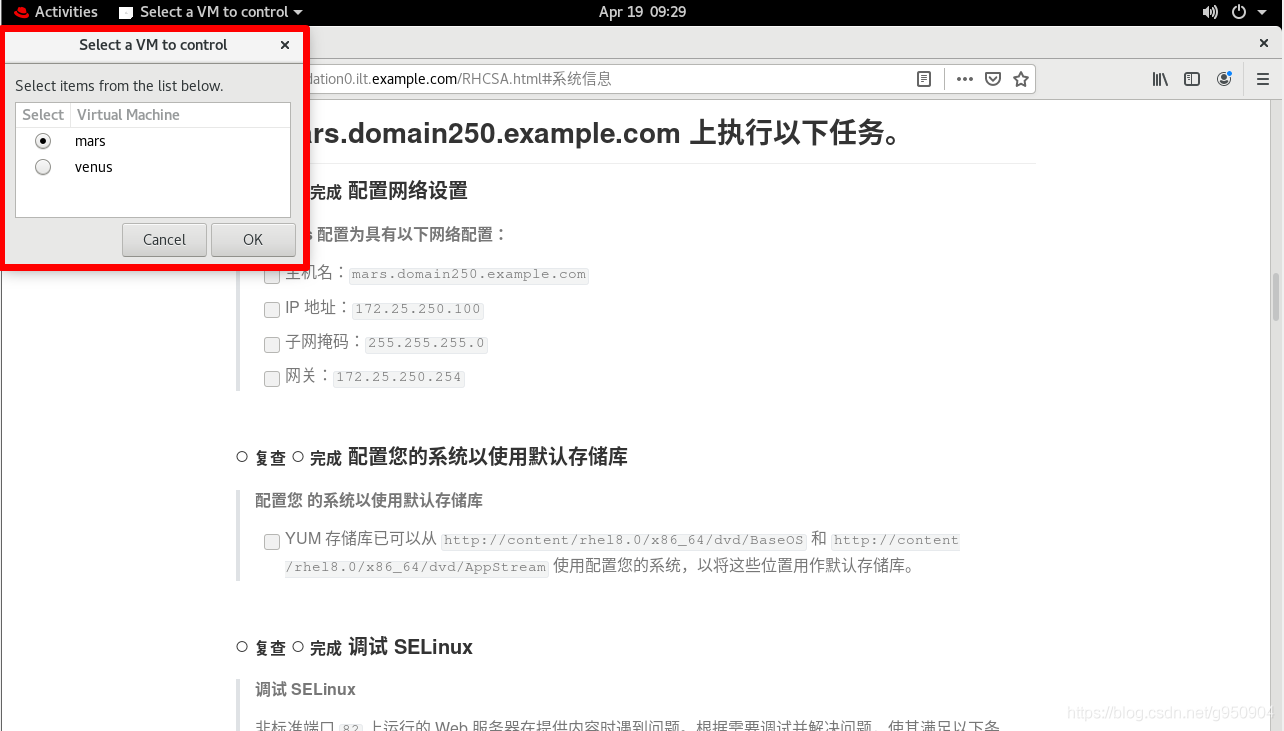
打开虚拟机控制台
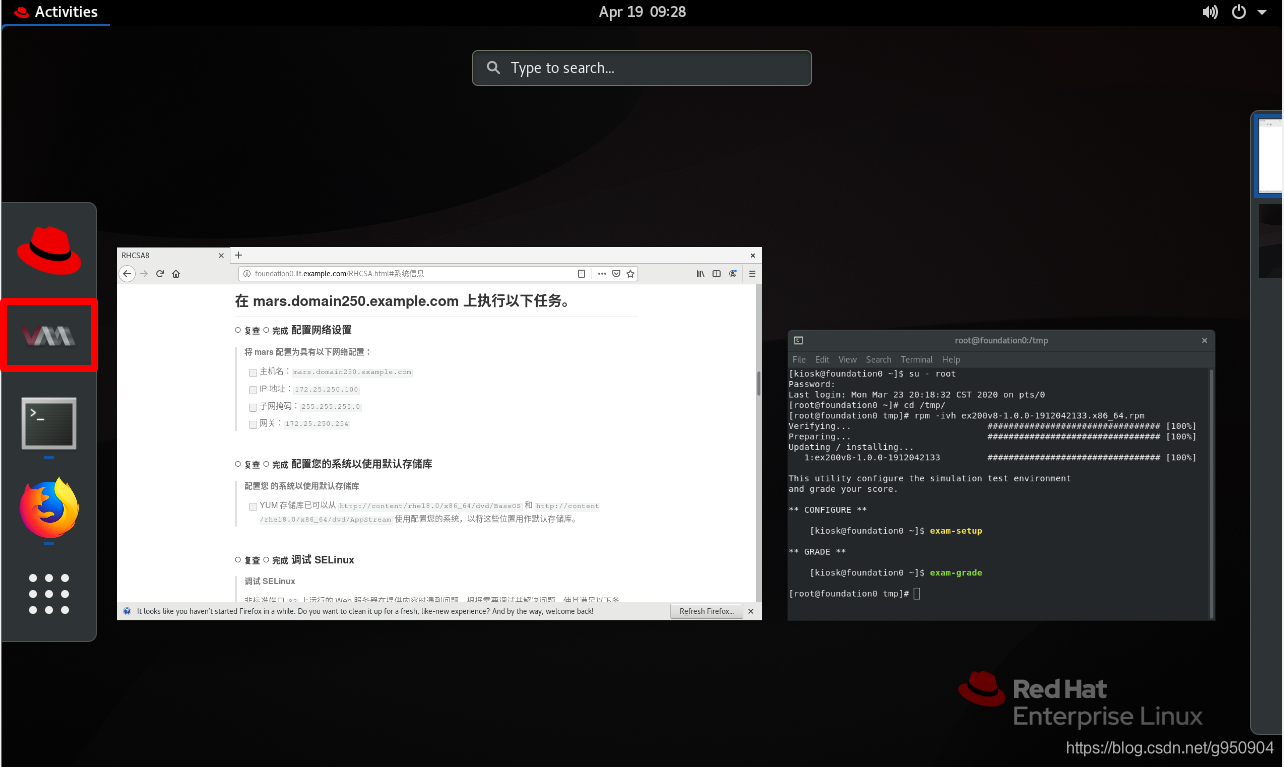
启动servera
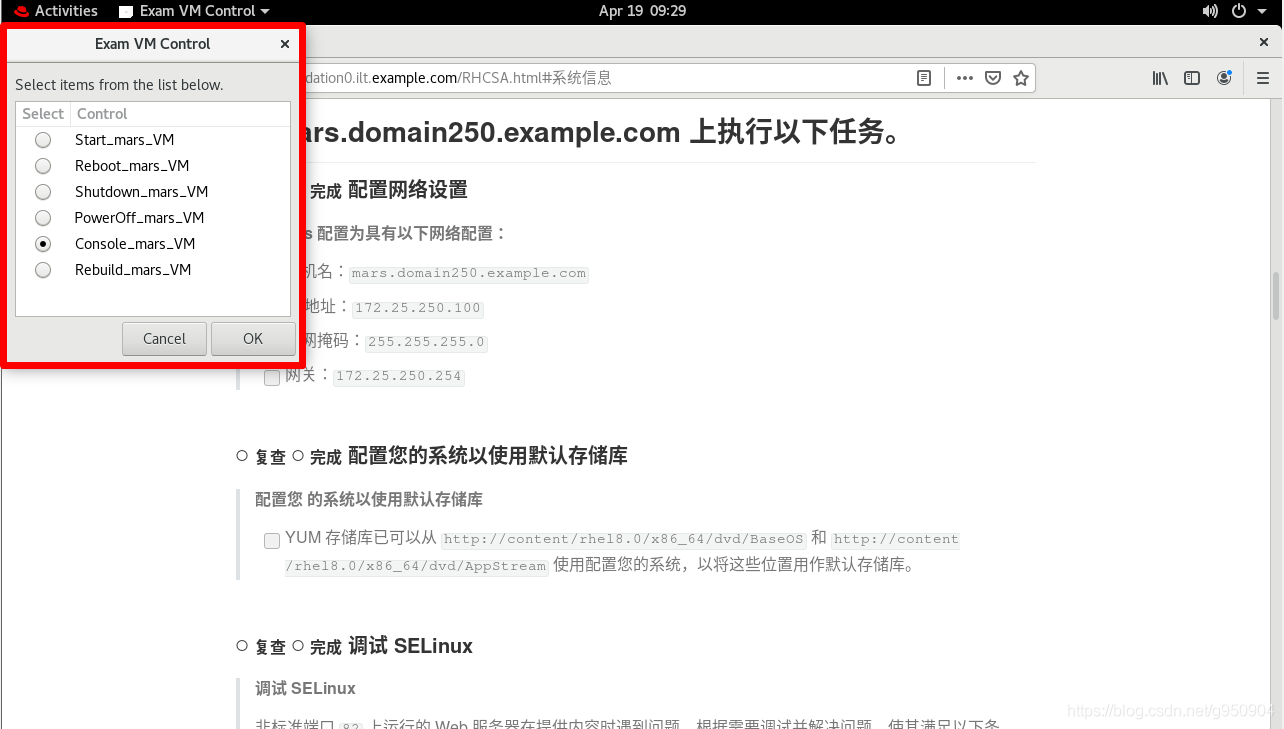
clear login : root
Password
Last failed login: Mon Apr 19 09:30:26 CST 2821 on tty1
There was 1 failed login attempt since the last successful login .
Last login:Mon Apr 19 08:56:48 from 172.25.250.250
# nmcli connection modify "Wired connection 1" ipv4.address 172.25.250.100/24 ipv4.gateway 172.25.250.254 ipv4.method manual connection.autoconnect yes
# nmcli connection up "Wired connection 1"
如果默认connection没有⾃动连接还需要加上选项 connection.autoconnect yes
⽹络配置完成后,后续的题⽬就可以通过ssh远程操作完成。
如果题⽬要求配置DNS,则还需要指定ipv4.dns选项
配完IP后就可以使用ssh客户端进行连接了
$ ssh -X root@172.25.250.100
# hostnamectl set-hostname servera.domain250.example.com
# bash
二、配置您的系统以使用默认存储库
###yum-config-manager没有安装,所以只能⼿写
# cd /etc/yum.repos.d/
# vi base.repo
[Base]
name=Base
baseurl=http://content/rhel8.0/x86_64/dvd/BaseOS
gpgcheck=0
enabled=1

[Stream]
name=Stream
baseurl=http://content/rhel8.0/x86_64/dvd/AppStream
gpgcheck=0
enabled=1
# yum list
为使用方便,安装vim
# yum -y install vim-en*
三、调试SELinux
非标准端口82上运行的Web服务器在提供内容时遇到问题。根据需要调试并解决问题,使其满足以下条件:
-
系统上的Web服务器能够提供/var/www/html中所有现有的HTML文件(注:不要删除或以其他方式改动现有的文件内容)
-
Web服务器在端口82上提供此内容
-
Web服务器在系统后动时自动启动
# semanage port -a -t http_port_t -p tcp 82
# systemctl enable httpd
# systemctl restart httpd
四、创建用户帐户
创建下列用户、组和组成员资格:
-
名为sysmgrs的组
-
用户natasha,作为次要组从属于sysmgrs
-
用户harry,作为次要组还从属于sysmgrs
-
用户sarah,无权访问系统上的交互式she11且不是sysmgrs的成员
-
natasha、harry和sarah的密码应当都是flectrag
# groupadd sysmgrs
# useradd -G sysmgrs natasha
# useradd -G sysmgrs harry
# useradd -s /sbin/nologin sarah
# echo "flectrag" | passwd --stdin natasha
# echo "flectrag" | passwd --stdin harry
# echo "flectrag" | passwd --stdin sarah
五、配置cron作业
配置cron作业,该作业每隔2分钟运行并执行以下命令:
- logger "EX200 in progress",以用户natasha身份运行
# crontab -u natasha -e
*/2 * * * * logger "EX200 in progress"
六、创建具有以下特征的协作目录/home/managers
目录应当可被sysmgrs的成员读取、写入和访问,但任何其他用户不具这些权限。(当然,root用户有权访问系统上的所有文件和目录)
/home/managers中创建的文件自动将组所有权设置到sysmgrs组
# mkdir /home/managers
# chgrp sysmgrs /home/managers/
# chmod 2770 /home/managers/
七、配置NTP
配置您的系统,使其成为materials.example.com的NTP客户端。(注:materials.example.com是classroom.example.com的DNS别名)
# vim /etc/chrony.conf
server materials.example.com iburst
# systemctl enable chronyd
# systemctl restart chronyd
八、配置autofs
配置autofs,以按照如下所述自动挂载远程用户的主目录:
-
materials.example.com(172.25.254.254)NFS导出/rhome到您的系统。此文件系统包含为用户remoteuser1预配置的主目录
-
remoteuser1的主目录是materials.example.com:/rhome/remoteuser1
-
remoteuser1的主目录应自动挂载到本地/rhome下的/rhome/remoteuser1
-
主目录必须可供其用户写入
-
remoteuser1的密码是flectrag
# yum -y install autofs
# vim /etc/auto.master
/rhome  /etc/auto.misc
# vim /etc/auto.misc
remoteuser1     -rw,sync        materials.example.com:/rhome/remoteuser1
# systemctl enable autofs
# systemctl start autofs
# su - remoteuser1
[remoteuser1@servera ~]$ pwd
/rhome/remoteuser1
[remoteuser1@servera ~]$ exit
logout
# echo "flectrag" | passwd --stdin remoteuser1
九、配置/var/tmp/fstab权限
将文件/etc/fstab复制到/var/tmp/fstab。配置/var/tmp/fstab的权限以满足如下条件:
-
文件/var/tmp/fstab自root用户所有
-
文件/var/tmp/fstab属于组root
-
文件/var/tmp/fstab应不能被任何人执行
-
用户natasha能够读取和写入/var/tmp/fstab
-
用户harry无法写入或读取/var/tmp/fstab
-
所有其他用户(当前或未来)能够读取/var/tmp/fstab
# cp /etc/fstab /var/tmp/fstab
# setfacl -m u:natasha:rw- /var/tmp/fstab
# setfacl -m u:harry:--- /var/tmp/fstab
# ll /var/tmp/fstab
-rw-rw-r--+ 1 root root 427 Apr 19 10:26 /var/tmp/fstab
十、配置用户账号
配置用户manalo,其用户ID为3533。此用户的密码应当为fletrag。
# useradd -u 3533 manalo
# echo "flectrag" | passwd --stdin manalo
十一、查找文件
查找jacques所有的所有文件并将其副本放入/root/findfiles目录
# find / -user jacques -type f -exec cp -p {} findfiles/ \;
十二、查找字符串
查找文件/usr/share/xml/iso-codes/iso_639_3.xml中包含字符串ng的所有行。将所有这些行的副本按原始顺序放在文件/root/list中。/root/list不得包含空行,且所有行必须是/usr/share/xml/iso-codes/iso_639_3.xml中原始行的确切副本。
# grep ng /usr/share/xml/iso-codes/iso_639_3.xml >> /root/list
十三、创建存档
创建一个名为/root/backup.tar.gz的tar存档,其应包含/usr/local的tar存档,其应包含/usr/local的内容。该tar存档必须使用gzip进行压缩。
# tar zcf /root/backup.tar.gz /usr/local/
如果题目要求是bzip2压缩,则要使用 -j 的选项,而不是 -z。
十四、podman容器(一)
- 用registry服务器提供的r-logserver镜像创建容器,容器名为logserver
- 配置容器使其以 systemd服务形式运行,且仅面向现有用户contsvc
- 服务名为container_logserver.service,并在系统重新引导后自动启动
准备工作,考试时无需做
[student@workstation ~]$ lab containers-services start
[student@workstation ~]$ ssh root@servera
[student@servera ~]$ useradd contsve
[student@servera ~]$ echo "redhat" | passwd --stdin contsve
以上是考试环境,现在正式开始
[student@servera ~]$ mkdir /var/log/journal        # 创建日志永久存储目录
[student@servera ~]$ systemctl restart systemd-journald        # 重启journald服务
[student@servera ~]$ exit
[student@servera ~]$ ssh contsvce@servera        # 切换到题中的指定用户,不能使用su提权命令
[contsvc@servera ~]$ mkdir -p ~/.config/containers/        # 创建contsvc用户的容器服务目录
[contsvc@servera ~]$ cp /tmp/containers-services/registries.conf ~/.config/containers        # 将镜像地址配置文件复制到contsvc用户目录中
[contsvc@servera ~]$ mkdir -p ~/container_journal        # 创建contsvc用户的journald服务日志存储目录
[contsvc@servera ~]$ cp -a /var/log/journal/*/*.journal /home/contsvc/container_journal/        # 将journald服务日志复制到contsvc用户目录中
[contsvc@servera ~]$ podman login registry.domain250.example.com        # 登录到容器注册库
username:admin
Password:redhat321
[contsvc@servera ~]$ podman search registry.domain250.example.com/        # 练习环境
#[contsvc@servera ~]$ podman search httpd        # 搜索容器,考试环境
[contsvc@servera ~]$ podman run -d --name logserver -p 8080:8080 -v ~/container_journal:/var/log/journal:z registry.lab.example.com/rhel8/httpd-24
#创建一个名字为logserver的容器并启动,映射8080端口到8080,容器内的/var/log/journal目录挂载到宿主机的container_journal目录,并将selinux的container_file_t的标签值应用到宿主机的目录上,以便容器可以访问宿主机的目录(:z作用),镜像使用指定仓库的httpd-24
[contsvc@servera ~]$ podman ps        # 查看容器进程
[contsvc@servera ~]$ podman exec -it fe74abald977 /bin/bash        # 进入容器
container_journal/fe74abald977:$ ls        # 查看是否挂载成功
user-1002.journal
选项解释:
run:运行容器
-d:后台运行容器
--name:指定容器的名字
-p:指定宿主机和容器的端口映射,宿主机端口:容器端口
-v:指定挂载映射,宿主机路径:容器路径
十五、podman容器(二)
通过以下方式扩展上一个任务
- 将/var/log/joumal目录及任何子目录中的任何*journal文件复制到/home/contsvc/container_journal中
- 容器服务启动时能自动将/home/contsvc/container_journa挂载到容器中的/var/log/joumal上
[contsvc@servera ~]$ mkdir -p ~/.config/systemd/user/        # 创建systemd单元文件
[contsvc@servera ~]$ cd ~/.config/systemd/user/
[contsvc@user ~]$ podman generate systemd -f -n logserver        # 创建一个容器进程
选项解释:
--name:容器名称
--files:生成服务配置文件,不加则内容在终端显示
--new:设置服务启动时创建容器,在服务停止时删除容器,这种模式下,容器是临时的,需要配置永久存储来保存数据。如果不加,服务启动和停止时,容器也会相应启动和停止,而不会删除容器。
[contsvc@user ~]$ podman stop fe74abald977        # 停止容器
[contsvc@user ~]$ podman rm fe74abald977        # 删除容器
[contsvc@user ~]$ systemctl --user daemon-reload        # 重新加载配置文件
[contsvc@user ~]$ systenctl --user enable --now container-logserver        # 设置服务开机启动
[contsvc@user ~]$ systemctl --user restart container-logserver        # 重启创建出来的容器进程服务
[contsvc@user ~]$ loginctl enable-linger        # 设置contsvc用户的服务在开机时启动
[contsvc@user ~]$ loginctl show-user contsvc        # 查看是否设置成功
十六、远程连接其他主机时不进行提示
# vim /etc/ssh/ssh_config
33    StrictHostKeyChecking no       # ask改为no
在serverb.domain250.example.com上执行以下任务。
十七、设置root密码
将serverb的root密码设置为flectrag。您需要获得系统访问权限才能进行此操作。
启动serverb
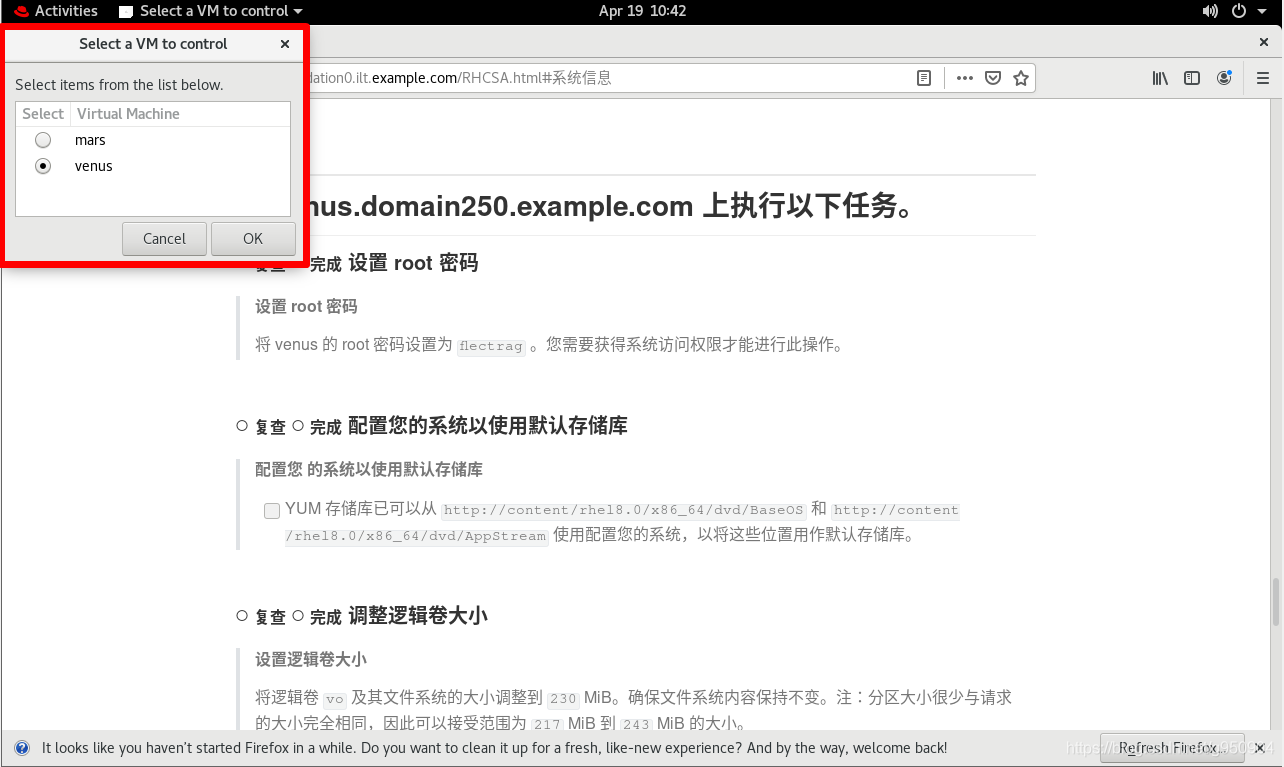
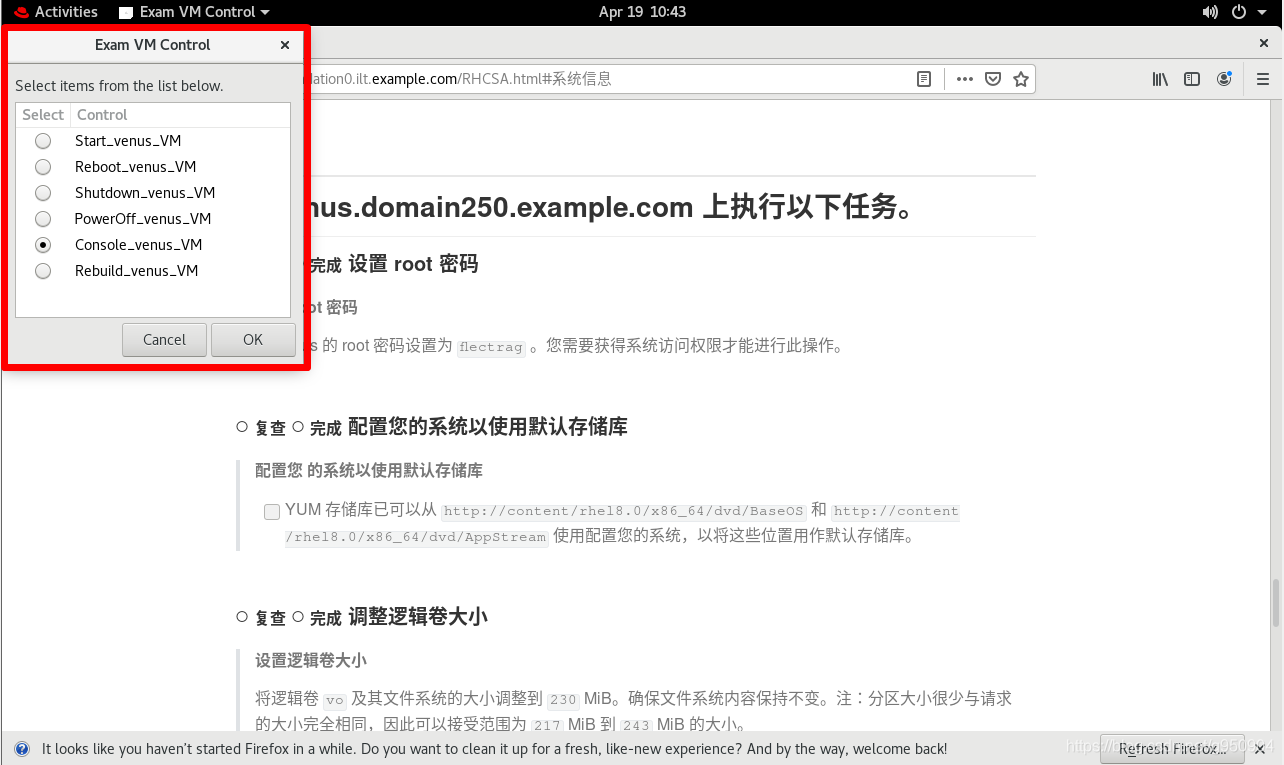
因为需要破解密码,所以进入后先重新启动系统
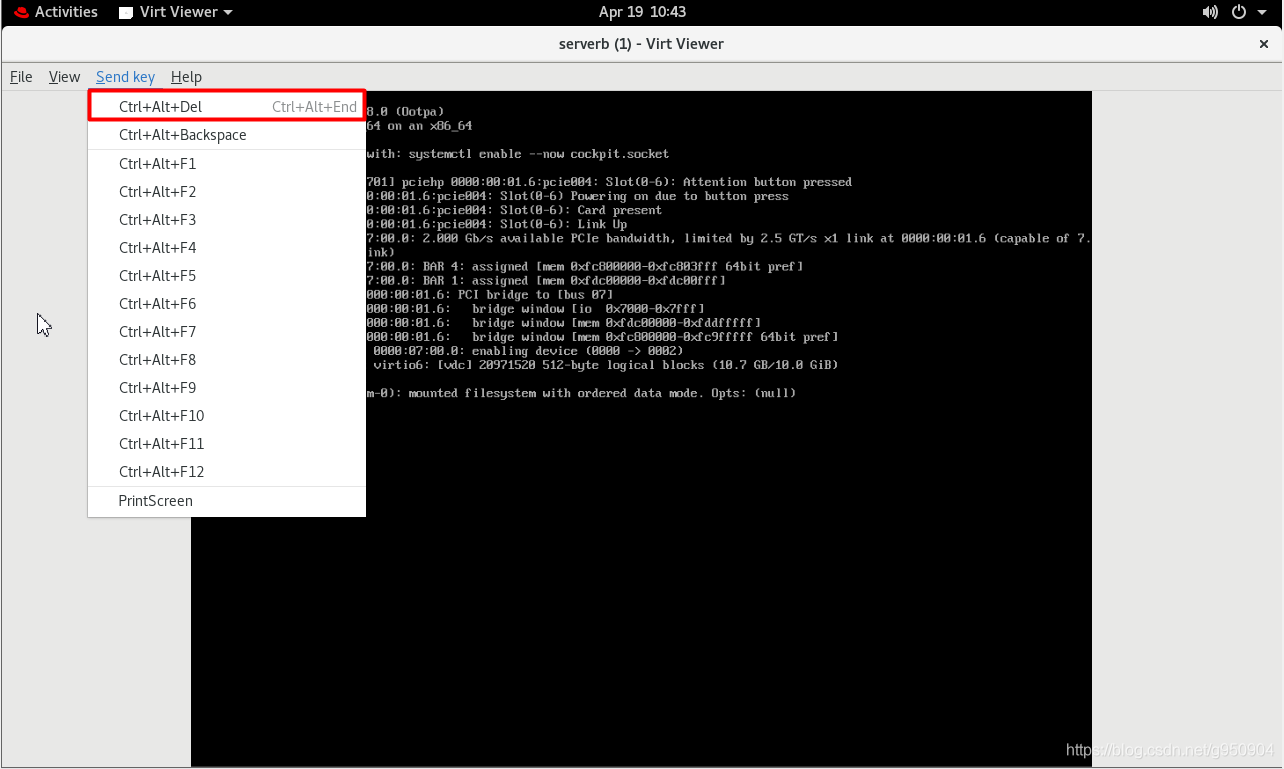
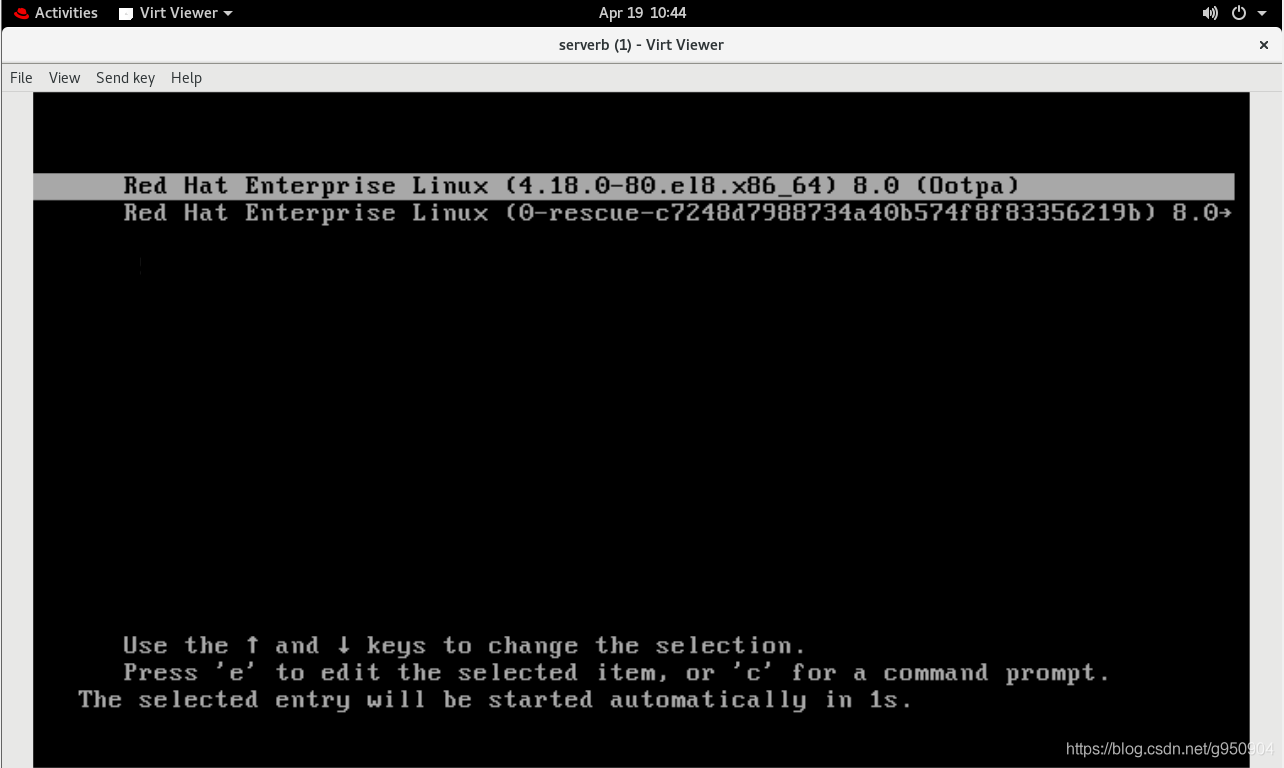
重启后同时按下↑↓键,出现以下画面后按下 e 键进⾏编辑
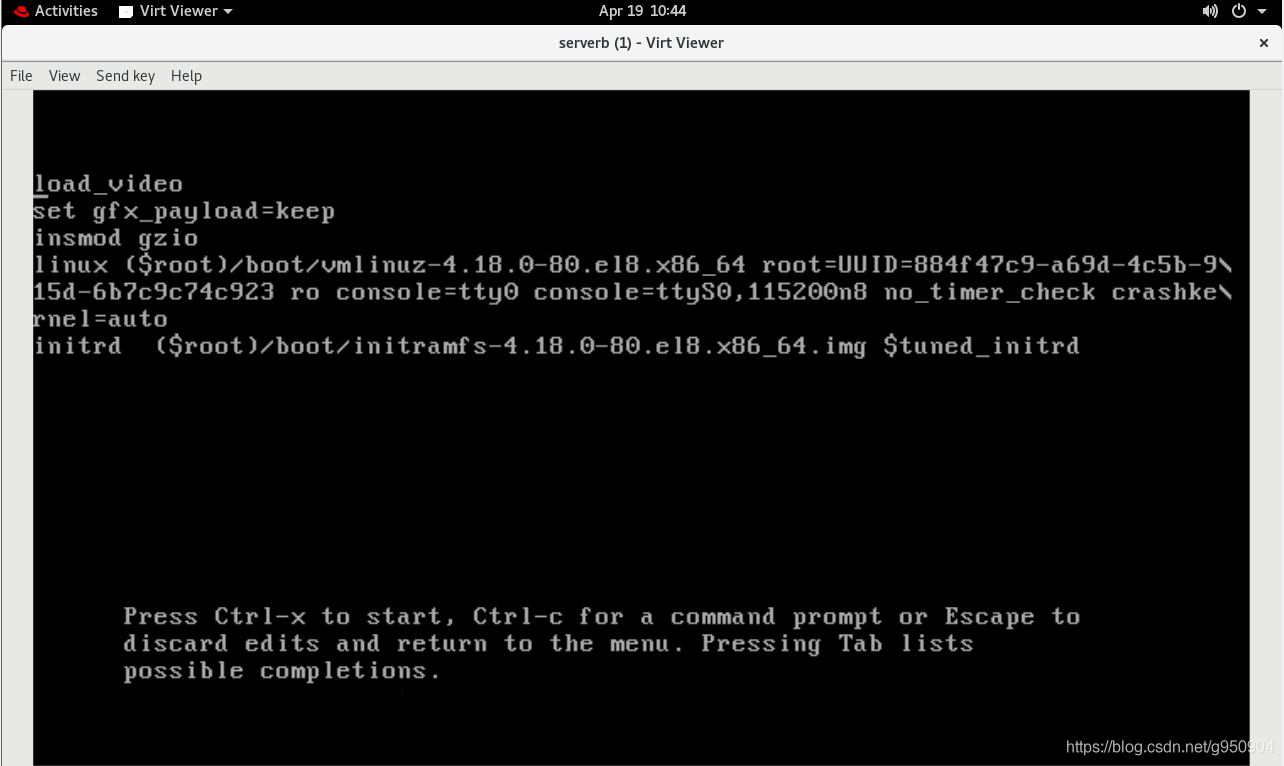
load_video
set gfx_payload=keep
insmod gzio
linux (Sroot)/boot/vmlinuz-4.18.0-80.e18.x86_64 root=UUID=884f47c9-a69d-4c5b-9\
15d-6b7c9c74c923 ro console=ttyo console=ttyso,115200n8 no_timer_check crashke\
rnel=auto
initrd (Sroot)/boot/initramfs-4.18.0-80.e18.x86_64.img Stuned_initrd
在linux这一行的最末尾输⼊rd.break,并删除console相关的内容,按ctrl+x 继续启动
更改后如下
load_video
set gfx_payload=keep
insmod gzio
linux (Sroot)/boot/vmlinuz-4.18.0-80.e18.x86_64 root=UUID=884f47c9-a69d-4c5b-9\
15d-6b7c9c74c923 ro rd.break
initrd (Sroot)/boot/initramfs-4.18.0-80.e18.x86_64.img Stuned_initrd
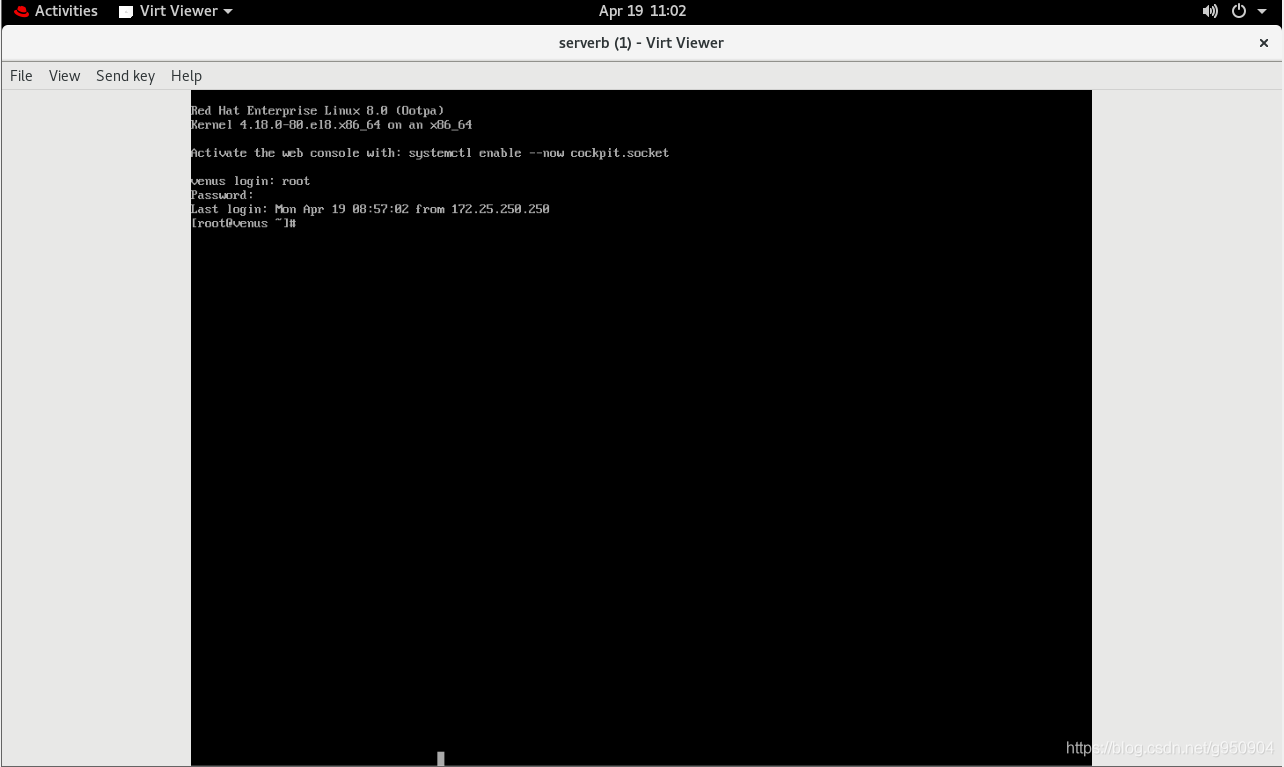
重启后,自动获得root权限,再按如下步骤修改密码,然后输入两次 exit 继续启动
suitch_root:/# mount -o rw,remount /sysroot/
suitch_root:/# chroot /sysroot/
sh-4.4# passwd
Changing passuord for user root.
Retupe new passuord:
passud : all authentication tokens updated successfully
sh-4.4# touch .autorelabel     # 下次重启系统时,它会自动重新标记SElinux的文件系统
sh-4.4# exit
ch_root:/# exit
十八、配置您的系统以使用默认存储库
###直接从servera上将yum配置scp到serverb上:
# cd /etc/yum.repos.d/
# scp base.repo root@172.25.250.200:/etc/yum.repos.d/
# ssh -X root@172.25.250.200
# yum -y install vim-en*
十九、设置逻辑卷大小
将逻辑卷vo及其文件系统的大小调整到230MiB。确保文件系统内容保持不变。注:分区大小很少与请求的大小完全相同,因此可以接受范围为217MiB到243MiB的大小。
# df -h
Filesystem            Size  Used Avail Use% Mounted on
devtmpfs              388M     0  388M   0% /dev
tmpfs                 411M     0  411M   0% /dev/shm
tmpfs                 411M   11M  400M   3% /run
tmpfs                 411M     0  411M   0% /sys/fs/cgroup
/dev/vda1              10G  1.5G  8.5G  15% /
/dev/mapper/myvol-vo  175M  1.6M  160M   1% /reports
tmpfs                  83M     0   83M   0% /run/user/0
# lvextend -L 230M /dev/mapper/myvol-vo
# resize2fs /dev/myvol/vo
# df -h
Filesystem            Size  Used Avail Use% Mounted on
devtmpfs              388M     0  388M   0% /dev
tmpfs                 411M     0  411M   0% /dev/shm
tmpfs                 411M   11M  400M   3% /run
tmpfs                 411M     0  411M   0% /sys/fs/cgroup
/dev/vda1              10G  1.5G  8.6G  15% /
/dev/mapper/myvol-vo  221M  2.1M  204M   1% /reports
tmpfs                  83M     0   83M   0% /run/user/0
二十、添加交换分区
向您的系统添加一个额外的交换分区756MiB。交换分区应在系统后动时自动挂载。不要删除或以任何方式改动系统上的任何现有交换分区。
# yum -y install gdisk
# gdisk /dev/vdb
Command (? for help): n
Partition number (2-128, default 2):
First sector (34-10485726, default = 1000448) or {+-}size{KMGTP}:
Last sector (1000448-10485726, default = 10485726) or {+-}size{KMGTP}: +756M
Current type is 'Linux filesystem'
Hex code or GUID (L to show codes, Enter = 8300): 8200
Changed type of partition to 'Linux swap'

Command (? for help): w

Final checks complete. About to write GPT data. THIS WILL OVERWRITE EXISTING
PARTITIONS!!

Do you want to proceed? (Y/N): y
OK; writing new GUID partition table (GPT) to /dev/vdb.
Warning: The kernel is still using the old partition table.
The new table will be used at the next reboot or after you
run partprobe(8) or kpartx(8)
The operation has completed successfully.
# partprobe
# mkswap /dev/vdb2
# vim /etc/fstab
/dev/vdb2       swap    swap    defaults        0       0
# swapon -a
二十一、创建逻辑卷
根据如下要求,创建新的逻辑卷:
-
逻辑卷取名为qa,属于qagroup卷组,大小为60个扩展块
-
qagroup卷组中逻辑卷的扩展块大小应当为16MiB
-
使用ext3文件系统格式化新逻辑卷。该逻辑卷应在系统后动时自动挂载到/mnt/qa下
# gdisk /dev/vdb
Command (? for help): n
Partition number (3-128, default 3):
First sector (34-10485726, default = 2548736) or {+-}size{KMGTP}:
Last sector (2548736-10485726, default = 10485726) or {+-}size{KMGTP}: +1G
Current type is 'Linux filesystem'
Hex code or GUID (L to show codes, Enter = 8300): 8e00
Changed type of partition to 'Linux LVM'

Command (? for help): w

Final checks complete. About to write GPT data. THIS WILL OVERWRITE EXISTING
PARTITIONS!!

Do you want to proceed? (Y/N): y
OK; writing new GUID partition table (GPT) to /dev/vdb.
Warning: The kernel is still using the old partition table.
The new table will be used at the next reboot or after you
run partprobe(8) or kpartx(8)
The operation has completed successfully.
# pvcreate /dev/vdb3
# vgcreate -s 16M qagroup /dev/vdb3
# lvcreate -n qa -l 60 qagroup
# mkfs.ext3 /dev/qagroup/qa
# partprobe
# mkdir /mnt/qa
# vim /etc/fstab
/dev/qagroup/qa      /mnt/qa    ext3    defaults        0       0
# mount -a
# df -h /dev/qagroup/qa
Filesystem              Size  Used Avail Use% Mounted on
/dev/mapper/qagroup-qa  929M  1.2M  880M   1% /mnt/qa
二十二、创建VDO卷
根据如下要求,创建新的VDO卷
-
使用未分区的磁盘
-
该卷的名称为vdough
-
该卷的逻辑大小为50G
-
该卷使用xfs文件系统格式化
-
该卷(在系统后动时)挂载到/vbread下
# yum -y install vdo.x86_64 kmod-kvdo.x86_64
# mkdir /vbread
# vdo create -n vdough --device /dev/vdc --vdoLogicalSize 50G
Creating VDO vdough
Starting VDO vdough
Starting compression on VDO vdough
VDO instance 0 volume is ready at /dev/mapper/vdough
# mkfs.xfs /dev/mapper/vdough
# vim /etc/fstab
/dev/mapper/vdough    /vbread   xfs    x-systemd-requires=vdo.service  0        0
# mount -a
二十三、配置系统调优
为您的系统选择建议的tuned配置集并将它设为默认设置。
# yum -y install tuned
# tuned-adm recommend
virtual-guest
# tuned-adm profile virtual-guest
# tuned-adm active
Current active profile: virtual-guest
二、RHCE8
安装考试环境
进入界面之后首先使用kiosk用户进行登录,将ex300v8-1.0.0-1912042141.x86_64软件包上传到/tmp目录,然后切换到root用户进行安装
# cd /tmp/
# rpm -ivh ex300v8-1.0.0-1912042141.x86_64
安装完成后再次切换成kiosk用户,执行以下命令生成考试环境
$ exam-setup
完成重要配置信息
在考试期间,除了您就坐位置的台式机之外,还将使用多个虚拟系统。您不具有台式机系统的root访问权,但具有对虚拟系统的完整root访问权。
系统信息
在本考试期间,您将操作下列虚拟系统:
| 系统 | IP地址 | Ansible角色 |
|---|---|---|
| bastion | 172.25.250.254 | ansible control node |
| workstation | 172.25.250.9 | ansiblemanaged node |
| servera | 172.25.250.10 | ansiblemanaged node |
| serverb | 172.25.250.11 | ansiblemanaged node |
| serverc | 172.25.250.12 | ansiblemanaged node |
| serverd | 172.25.250.13 | ansiblemanaged node |
这些系统的IP地址采用静态设置。请勿更改这些设置。
主机名称解析已配置为解析上方列出的完全限定主机名,同时也解析主机短名称。
账户信息
所有系统的root密码是flectrag。
请勿更改root密码。除非另有指定,否则这将是用于访问其他系统和服务的密码。此外,除非另有指定,否则此密码也应用于您创建的所有帐户,或者任何需要设置密码的服务。
为方便起见,所有系统上已预装了SSH密钥,允许在不输入密码的前提下通过SSH进行root访问。请勿对系统上的rootSSH配置文件进行任何修改。
Ansible控制节点上已创建了用户帐户greg。此帐户预装了SSH密钥,允许在Ansible控制节点和各个Ansible受管节点之间进行SSH登录。请勿对系统上的gregSSH配置文件进行任何修改。您可以从root账户使用su访问此用户帐户。
重要信息
除非另有指定,否则您的所有工作(包括Ansible playbook、配置文件和主机清单等)应当保存在控制节点上的目录/home/greg/ansible中,并且应当归greg用户所有。所有Ansible相关的命令应当由greg用户从Ansible控制节点上的这个目录运行。
其他信息
一些考试项目可能需要修改Ansible主机清单。您要负责确保所有以前的清单组和项目保留下来,与任何其他更改共存。您还要有确保清单中所有默认的组和主机保留您进行的任何更改。
考试系统上的防火墙默认为不启用,SELinux则处于强制模式。
如果需要安装其他软件,您的物理系统和Ansible控制节点可能已设置为指向content上的下述存储库:
·http://content/rhe18.0/x86_64/dvd/Baseos
·http://content/rhe18.0/x86_64/dvd/AppStream
一些项目需要额外的文件,这些文件已在以下位置提供:
·http://materials
产品文档可从以下位置找到:
·http://materials/docs/ansible/html
其他资源也进行了配置,供您在考试期间使用。关于这些资源的具体信息将在需要这些资源的项目中提供。
重要信息
请注意,在评分之前,您的Ansible受管节点系统将重置为考试开始时的初始状态,您编写的Ansible playbook将通过以greg用户身份从控制节点上的目录/home/greg/ansible目录运行来应用。在playbook运行后,系统会对您的受管节点进行评估,以判断它们是否按照规定进行了配置。
一、安装和配置Ansible
按照下方所述,在控制节点172.25.250.254上安装和配置Ansible:
-
安装所需的软件包
-
创建名为/home/greg/ansible/inventory的静态清单文件,以满足以下要求:
-
172.25.250.9是dev主机组的成员
-
172.25.250.10是test主机组的成员
-
172.25.250.11和172.25.250.12是prod主机组的成员
-
172.25.250.13是balancers主机组的成员
-
prod组是webservers主机组的成员
-
创建名为/home/greg/ansible/ansible.cfg的配置文件,以满足以下要求:
-
主机清单文件为/home/greg/ansible/inventory
-
playbook中使用的角色的位置包括/home/greg/ansible/roles
# ssh greg@bastion
[greg@bastion ~]$ sudo yum -y install ansible
[greg@bastion ~]$ vim ~/.vimrc
autocmd FileType yaml setlocal ai ts=2 sw=2 et
[greg@bastion ~]$ mkdir /home/greg/ansible
[greg@bastion ~]$ cd ansible/
[greg@bastion ansible]$ pwd
/home/greg/ansible
[greg@bastion ansible]$ vim ansible.cfg
[defaults]
inventory      = /home/greg/ansible/inventory
roles_path    = /home/greg/ansible/roles
host_key_checking = False
remote_user = greg

[privilege_escalation]
become=True
become_method=sudo
become_user=root
become_ask_pass=False
[greg@bastion ansible]$ vim inventory
[dev]
172.25.250.9

[test]
172.25.250.10

[prod]
172.25.250.11
172.25.250.12

[balancers]
172.25.250.13

[webservers:children]
prod
当使用root用户进行实验时,可以使用以下方案
[greg@bastion ansible]$ vim ansible.cfg
[defaults]
inventory      = /home/greg/ansible/inventory
roles_path    = /home/greg/ansible/roles
host_key_checking = False
remote_user = root

[greg@bastion ansible]$ vim inventory
[dev]
172.25.250.9

[test]
172.25.250.10

[prod]
172.25.250.11
172.25.250.12

[balancers]
172.25.250.13

[webservers:children]
prod

[all:vars]
ansible_ssh_pass=redhat
参考:
$ vim /etc/ansible/ansible.cfg
 10 [defaults]
 14 #inventory      = /etc/ansible/hosts
 68 #roles_path    = /etc/ansible/roles
 71 #host_key_checking = False
107 #remote_user = root

340 [privilege_escalation]
341 #become=True
342 #become_method=sudo
343 #become_user=root
344 #become_ask_pass=False
$ vim /etc/ansible/hosts
二、创建和运行Ansible临时命令
作为系统管理员,您需要在受管节点上安装软件。
请按照正文所述,创建一个名为/home/greg/ansible/adhoc.sh的shell脚本,该脚本将使用Ansible临时命合在各个受管节点上安装yum存储库:
存储库1:
-
存储库的名称为EX294_BASE
-
描述为EX294 base software
-
GPG签名检查为启用状态
-
GPG密钥URL为http://content/rhel8.0/x86_64/dvd/RPM-GPG-KEY-redhat-release
-
存储库为启用状态
存储库2:
-
存储库的名称为EX294_STREAM
-
描述为EX294 stream software
-
GPG签名检查为启用状态
-
GPG密钥URL为http://content/rhel8.0/x86_64/dvd/RPM-GPG-KEY-redhat-release
-
存储库为启用状态
$ vim adhoc.sh
#!/bin/bash
ansible all -m yum_repository -a 'name=EX294_BASE description="EX294 base software" baseurl=http://content/rhel8.0/x86_64/dvd/BaseOS gpgcheck=yes gpgkey=http://content/rhel8.0/x86_64/dvd/RPM-GPG-KEY-redhat-release file=EX294_BASE'

ansible all -m yum_repository -a 'name=EX294_STREAM description="EX294 stream software" baseurl=http://content/rhel8.0/x86_64/dvd/AppStream gpgcheck=yes gpgkey=http://content/rhel8.0/x86_64/dvd/RPM-GPG-KEY-redhat-release file=EX294_STREAM'
[greg@bastion ansible]$ chmod +x adhoc.sh
[greg@bastion ansible]$ ./adhoc.sh
[greg@bastion ansible]$ ansible all -a 'ls /etc/yum.repos.d/'
172.25.250.10 | CHANGED | rc=0 >>
EX294_BASE.repo
EX294_STREAM.repo

172.25.250.13 | CHANGED | rc=0 >>
EX294_BASE.repo
EX294_STREAM.repo

172.25.250.11 | CHANGED | rc=0 >>
EX294_BASE.repo
EX294_STREAM.repo

172.25.250.12 | CHANGED | rc=0 >>
EX294_BASE.repo
EX294_STREAM.repo

172.25.250.9 | CHANGED | rc=0 >>
EX294_BASE.repo
EX294_STREAM.repo
参考:
$ ansible-doc yum_repository
- name: Add multiple repositories into the same file (1/2)
  yum_repository:
    name: epel
    description: EPEL YUM repo
    file: external_repos
    baseurl: https://download.fedoraproject.org/pub/epel/$releasever/$basearch/
    gpgcheck: no
三、安装软件包
创建一个名为/home/greg/ansible/packages.yml的playbook:
-
将php和mariadb软件包安装到dev、test和prod主机组中的主机上
-
将RPM Development Tools软件包组安装到dev主机组中的主机上
-
将dev主机组中主机上的所有软件包更新为最新版本
[greg@bastion ansible]$ vim packages.yml
---
- name: install php and mariadb
  hosts: dev,test,prod
  tasks:
    - name: install php and mariadb
      yum:
        name:
        - php
        - mariadb
        state: present

- name: install Develop
  hosts: dev
  tasks:
    - name: install php and mariadb
      yum:
        name: "@RPM Development Tools"
        state: present

- name: update
  hosts: dev
  tasks:
    - name: update
      yum:
        name: "*"
        state: latest
[greg@bastion ansible]$ ansible-playbook packages.yml
参考:
$ ansible-doc yum
- name: install the latest version of Apache
  yum:
    name: httpd
    state: latest

- name: ensure a list of packages installed
  yum:
    name: "{{ packages }}"
  vars:
    packages:
    - httpd
    - httpd-tools

- name: install one specific version of Apache
  yum:
    name: httpd-2.2.29-1.4.amzn1
    state: present

- name: upgrade all packages
  yum:
    name: '*'
    state: latest
四、使用RHEL系统角色
安装RHEL系统角色软件包,并创建符合以下条件的playbook/home/greg/ansible/timesync.yml:
-
在所有受管节点上运行
-
使用timesync角色
-
配置该角色,以使用当前有效的NTP提供商
-
配置该角色,以使用时间服务器172.25.254.254
-
配置该角色,以启用iburst参数
[greg@bastion ansible]$ sudo yum -y install rhel-system-roles.noarch
[greg@bastion ansible]$ mkdir roles
[greg@bastion ansible]$ cp -r /usr/share/doc/rhel-system-roles/timesync/ roles/timesync/
[greg@bastion ansible]$ vim timesync.yml
---
- hosts: all
  vars:
    timesync_ntp_servers:
      - hostname: 172.25.254.254
        iburst: yes
  roles:
  - timesync
[greg@bastion ansible]$ ansible-playbook timesync.yml
参考:
[greg@bastion ansible]$ vim roles/timesync/README.md
73 ```yaml
 74 - hosts: targets
 75   vars:
 76     timesync_ntp_servers:
 77       - hostname: foo.example.com
 78         iburst: yes
 79       - hostname: bar.example.com
 80         iburst: yes
 81       - hostname: baz.example.com
 82         iburst: yes
 83   roles:
 84     - rhel-system-roles.timesync
 85 ```
五、使用Ansible Galaxy安装角色
使用Ansible Galaxy和要求文件/home/greg/ansible/roles/requirements.yml。从以下URL下载角色并安装到/home/greg/ansible/roles:
[greg@bastion ansible]$ vim roles/requirements.yml
---
- name: balancer
  src: http://materials/haproxy.tar

- name: phpinfo
  src: http://materials/phpinfo.tar
[greg@bastion ansible]$ ansible-galaxy install -r roles/requirements.yml -p roles/
- downloading role from http://materials/haproxy.tar
- extracting balancer to /home/greg/ansible/roles/balancer
- balancer was installed successfully
- downloading role from http://materials/phpinfo.tar
- extracting phpinfo to /home/greg/ansible/roles/phpinfo
- phpinfo was installed successfully
[greg@bastion ansible]$ ls roles/
balancer  phpinfo  requirements.yml  timesync
六、创建和使用角色
根据下列要求,在/home/greg/ansible/roles中创建名为apache的角色:
-
httpd软件包已安装,设为在系统启动时后用并后动
-
防火墙已启用并正在运行,并使用允许访问web服务器的规则
-
模板文件index.html.j2已存在,用于创建具有以下输出的文件/var/www/html/index.html
Welcome to HOSTNAME on IPADDRESS
-
其中,HOSTNAME是受管节点的完全限定域名,IPADDRESS则是受管节点的IP地址。
-
创建 playbook /home/greg/ansible/apache.yml ,使⽤apache 的⻆⾊,在 webservers 主机组运⾏
[greg@bastion roles]$ ansible-galaxy init apache
- apache was created successfully
[greg@bastion roles]$ vim apache/tasks/main.yml
---
# tasks file for apache
- name: install http
  yum:
    name: httpd
    state: latest

- name: service
  service:
    name: "{{item}}"
    state: started
    enabled: yes
  loop:
    - httpd
    - firewalld

- name: firewall
  firewalld:
    service: http
    permanent: yes
    state: enabled
    immediate: yes

- name: index
  template:
    src: index.html.j2
    dest: /var/www/html/index.html
[greg@bastion roles]$ vim apache/templates/index.html.j2
Welcome to {{ansible_facts.fqdn}} on {{ansible_facts.default_ipv4.address}}
[greg@bastion ansible]$ vim apache.yml
---
- name: apache
  hosts: webservers
  roles:
    - apache
参考:
$ ansible-doc service
- name: Start service httpd, if not started
  service:
    name: httpd
    state: started

- name: Enable service httpd, and not touch the state
  service:
    name: httpd
    enabled: yes
$ ansible-doc firewalld
- firewalld:
    service: https
    permanent: yes
    state: enabled

- name: Redirect port 443 to 8443 with Rich Rule
  firewalld:
    rich_rule: rule family=ipv4 forward-port port=443 protocol=tcp to-port=8443
    zone: public
    permanent: yes
    immediate: yes
    state: enabled
$ ansible-doc template
- name: Template a file to /etc/files.conf
  template:
    src: /mytemplates/foo.j2
    dest: /etc/file.conf
    owner: bin
    group: wheel
    mode: '0644'
七、从Ansible Galaxy使用角色
根据下列要求,创建一个名为/home/greg/ansible/roles.yml的playbook:
-
此角色配置一项服务,以在webservers主机组中的主机之间平衡Web服务器请求的负载。
-
测览到balancers主机组中的主机(例如http://172.25.250.13)将生成以下输出:
Welcom to serverb. lab. example. com on 172.25.250.11
-
重新加载浏览器将从另一Web服务器生成输出:
Welcom to serverc. lab. example. com on 172.25.250.12
-
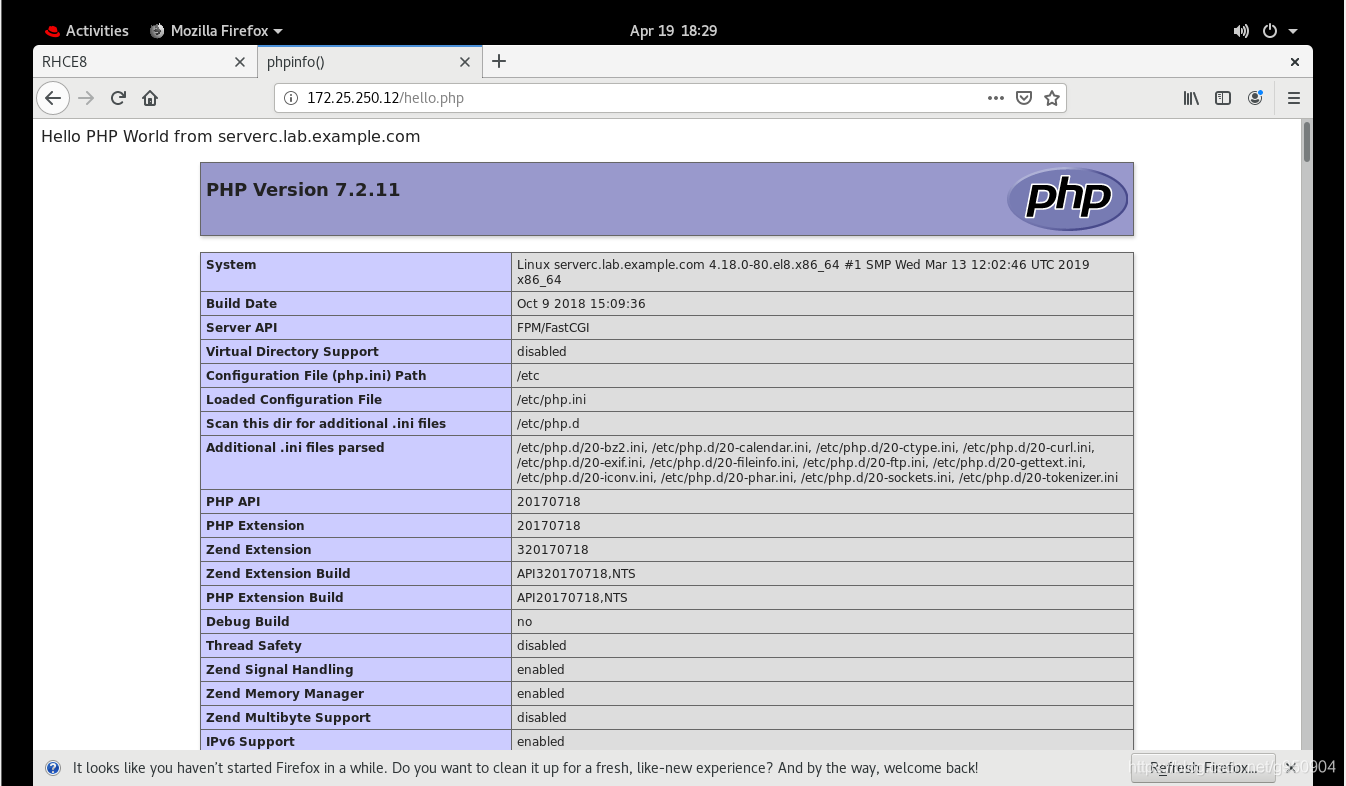
请通过URL/hello.php浏览到webservers主机组中的主机将生成以下输出:
Hello PHP World from FQDN
-
其中,FQDN是主机的完全限定名称。
Hello PHP World from serverb.lab.example.com
-
另外还有PHP配置的各种详细信息,如安装的PHP版本等。
-
同样,浏览到http://172.25.250.12/hello.php会生成以下输出:
Hello PHP World from serverc.lab.example.com
-
另外还有PHP配置的各种详细信息,如安装的PHP版本等。
本题中webserver上的index⽂件已经在上⼀题中完成,hello.php⽂件会由phpinfo role⾃⾏copy,firewall默认是没有启动的,所以只需要引⽤role就可以了。
[greg@bastion ansible]$ vim roles.yml
---
- name: phpinfo
  hosts: webservers
  roles:
    - phpinfo

- name: balancers
  hosts: balancers
  roles:
    - balancer
[greg@bastion ansible]$ ansible-playbook roles.yml
[greg@bastion ansible]$ curl http://172.25.250.13
Welcome to serverb.lab.example.com on 172.25.250.11
[greg@bastion ansible]$ curl http://172.25.250.13
Welcome to serverc.lab.example.com on 172.25.250.12
八、创建和使用逻辑卷
创建一个名为/home/greg/ansible/lv.yml的playbook,它将在所有受管节点上运行以执行下列任务:
-
创建符合以下要求的逻辑卷:
-
逻辑卷创建在research卷组中
-
逻辑卷名称为data
-
逻辑卷大小为1500MiB
-
使用ext4文件系统格式化逻辑卷
-
如果无法创建请求的逻辑卷大小,应显示错误信息
Could not create logical volume of that size
-
并且应改为使用大小800MiB。
-
如果卷组research不存在,应显示错误信息
Volume group done not exist
-
不要以任何方式挂载逻辑卷
[greg@bastion ansible]$ vim lv.yml
---
- name: create lv
  hosts: all
  tasks:
  - name: VG
    debug:
      msg: "Volume group done not exist"
    when: ansible_lvm.vgs.research is undefined
    failed_when: ansible_lvm.vgs.research is undefined

  - name: create lv
    block:
    - name: create lv
      lvol:
        vg: research
        lv: data
        size: 1500M
    rescue:
    - name: debug
      debug:
        msg: "Could not create logical volume of that size"
    - name: create 800M
      lvol:
        vg: research
        lv: data
        size: 800M
    always:
    - name: create files
      filesystem:
        fstype: ext4
        dev: /dev/research/data
[greg@bastion ansible]$ ansible-playbook lv.yml
[greg@bastion ansible]$ ansible all -m command -a 'lvs'
172.25.250.13 | CHANGED | rc=0 >>


172.25.250.12 | CHANGED | rc=0 >>


172.25.250.11 | CHANGED | rc=0 >>
  LV   VG       Attr       LSize   Pool Origin Data%  Meta%  Move Log Cpy%Sync Convert
  data research -wi-a----- 800.00m

172.25.250.10 | CHANGED | rc=0 >>
  LV   VG       Attr       LSize Pool Origin Data%  Meta%  Move Log Cpy%Sync Convert
  data research -wi-a----- 1.46g

172.25.250.9 | CHANGED | rc=0 >>
参考:
[greg@bastion ansible]$ ansible dev -m setup -a "filter=*lv*"
172.25.250.9 | SUCCESS => {
    "ansible_facts": {
        "ansible_lvm": {
            "lvs": {},
            "pvs": {},
            "vgs": {}
        },
        "discovered_interpreter_python": "/usr/libexec/platform-python"
    },
    "changed": false
}
$ ansible-doc lvol
- name: Create a logical volume of 512m
  lvol:
    vg: firefly
    lv: test
    size: 512
$ ansible-doc filesystem
- name: Create a ext2 filesystem on /dev/sdb1
  filesystem:
    fstype: ext2
    dev: /dev/sdb1
九、生成主机文件
将一个初始模板文件从http://materials/hosts.j2下载到/home/greg/ansible
-
完成该模板,以便用它生成以下文件:针对每个清单主机包含一行内容,其格式与/etc/hosts相同
-
创建名为/home/greg/ansible/hosts.yml的playbook,它将使用此模板在dev主机组中的主机上生成文件/etc/myhosts。
-
该playbook运行后,dev主机组中主机上的文件/etc/myhosts应针对每个受管主机包含一行内容:
127.0.0.1 localhost localhost.localdomain localhost4 localhost4.localdomain4::1 localhost
localhost.localdomain localhost6 localhost6.localdomain6172.25.250.9 workstation.lab.example.com workstation
172.25.250.10 servera.lab.example.com servera
172.25.250.11 serverb.lab.example.com serverb
172.25.250.12 serverc.lab.example.com serverc
172.25.250.13 serverd.lab.example.com serverd
注:清单主机名称的显示顺序不重要。
[greg@bastion ansible]$ wget http://materials/hosts.j2
[greg@bastion ansible]$ vim hosts.j2
127.0.0.1 localhost localhost.localdomain localhost4 localhost4.localdomain4
::1 localhost localhost.localdomain localhost6 localhost6.localdomain
{% for i in groups.all %}
{{ hostvars[i].ansible_default_ipv4.address}} {{ ansible_fqdn}} {{ ansible_hostname }}
{% endfor %}
[greg@bastion ansible]$ vim hosts.yml
---
- name: hosts
  hosts: all

- name: host
  hosts: dev
  tasks:
    - name: copy
      template:
        src: hosts.j2
        dest: /etc/myhosts
[greg@bastion ansible]$ ansible-playbook hosts.yml
[greg@bastion ansible]$ ansible dev -m command -a 'cat /etc/myhosts'
172.25.250.9 | CHANGED | rc=0 >>
127.0.0.1 localhost localhost.localdomain localhost4 localhost4.localdomain4
::1 localhost localhost.localdomain localhost6 localhost6.localdomain

172.25.250.9 workstation.lab.example.com workstation

172.25.250.10 servera.lab.example.com servera

172.25.250.13 serverd.lab.example.com serverd

172.25.250.11 serverb.lab.example.com serverb

172.25.250.12 serverc.lab.example.com serverc
十、修改文件内容
按照下方所述,创建一个名为/home/greg/ansible/issue.yml的playbook:
-
该playbook将在所有清单主机上运行
-
该playbook会将/etc/issue的内容替换为下方所示的一行文本:
-
在dev主机组中的主机上,这行文本显示为:Development
-
在test主机组中的主机上,这行文本显示为:Test
-
在prod主机组中的主机上,这行文本显示为:Production
[greg@bastion ansible]$ vim issue.yml
---
- name: copy
  hosts: all
  tasks:
  - name: dev
    copy:
      content: Development
      dest: /etc/issue
    when: inventory_hostname in groups.dev
  - name: test
    copy:
      content: Test
      dest: /etc/issue
    when: inventory_hostname in groups.test
  - name: prod
    copy:
      content: Production
      dest: /etc/issue
    when: inventory_hostname in groups.prod
[greg@bastion ansible]$ ansible-playbook issue.yml
参考:
$ ansible-doc copy
- name: Copy using inline content
  copy:
    content: '# This file was moved to /etc/other.conf'
    dest: /etc/mine.conf
十一、创建Web内容目录
按照下方所述,创建一个名为/home/greg/ansible/webcontent.yml的playbook:
-
该playbook在dev主机组中的受管节点上运行
-
创建符合下列要求的目录/webdev:
-
所有者为webdev组
-
具有常规权限: owner=read+write+execute , group=read+write+execute ,other=read+execute
-
具有特殊权限:设置组ID
-
用符号链接将/var/www/html/webdev链接到/webdev
-
创建文件/webdev/index.html,其中包含如下所示的单行文件:Development
-
在dev主机组中主机上浏览此目录(例如http://172.25.250.9/webdev/)将生成以下输出:Development
[greg@bastion ansible]$ vim webcontent.yml
---
- name: web
  hosts: dev
  tasks:
    - name: create file
      file:
        path: /webdev
        group: webdev
        mode: '2775'
        state: directory
        setype: httpd_sys_content_t
    - name: create index.html
      copy:
        content: "Development"
        dest: /webdev/index.html
        setype: httpd_sys_content_t
    - name: create link
      file:
        src: /webdev
        dest: /var/www/html/webdev
        state: link
    - name: start service
      service:
        name: httpd
        state: started
        enabled: yes
    - name: firewalld
      firewalld:
        service: http
        permanent: yes
        state: enabled
        immediate: yes
[greg@bastion ansible]$ ansible-playbook webcontent.yml
[greg@bastion ansible]$ curl http://172.25.250.9/webdev/
Development
参考:
$ ansible-doc file
- name: Change file ownership, group and permissions
  file:
    path: /etc/foo.conf
    owner: foo
    group: foo
    mode: '0644'

- name: Create a directory if it does not exist
  file:
    path: /etc/some_directory
    state: directory
    mode: '0755'

- name: Create a symbolic link
  file:
    src: /file/to/link/to
    dest: /path/to/symlink
    owner: foo
    group: foo
    state: link
十二、生成硬件报告
创建一个名为/home/greg/ansible/hwreport.yml的playbook,它将在所有受管节点上生成含有以下信息的输出文件/root/hwreport.txt:
-
清单主机名称
-
以MB表示的总内存大小
-
BIOS版本
-
磁盘设备vda的大小
-
磁盘设备vdb的大小
-
输出文件中的每一行含有一个key=value对。
-
您的playbook应当从http://materials/hwreport.empty下载文件,并将它保存为/root/hwreport.txt
-
使用正确的值改为/root/hwreport.txt
-
如果硬件项不存在,相关的值应设为NONE
[greg@bastion ansible]$ vim hwreport.yml
---
- name: report
  hosts: all
  tasks:
  - name: get
    get_url:
      url: http://materials/hwreport.empty
      dest: /root/hwreport.txt
      force: yes
  - name: hostname
    lineinfile:
      path: /root/hwreport.txt
      regexp: "{{item.name}}"
      line: '{{item.name}}={{item.value}}'
    loop:
      - name: HOST
        value: "{{inventory_hostname}}"
      - name: MEM
        value: "{{ansible_facts.memtotal_mb}}"
      - name: BIOS
        value: "{{ansible_facts.bios_version}}"
      - name: VDA
        value: "{{ansible_facts.devices.vda.size | default('NONE')}}"
      - name: VDB
        value: "{{ansible_facts.devices.vdb.size | default('NONE')}}"
[greg@bastion ansible]$ ansible-playbook hwreport.yml
[greg@bastion ansible]$ ansible all -m command -a 'cat /root/hwreport.txt'
172.25.250.12 | CHANGED | rc=0 >>
# Hardware report
HOST=172.25.250.12
MEM=821
BIOS=1.11.1-4.module+el8.1.0+4066+0f1aadab
VDA=10.00 GB
VDB=5.00 GB

172.25.250.11 | CHANGED | rc=0 >>
# Hardware report
HOST=172.25.250.11
MEM=821
BIOS=1.11.1-4.module+el8.1.0+4066+0f1aadab
VDA=10.00 GB
VDB=5.00 GB

172.25.250.10 | CHANGED | rc=0 >>
# Hardware report
HOST=172.25.250.10
MEM=821
BIOS=1.11.1-4.module+el8.1.0+4066+0f1aadab
VDA=10.00 GB
VDB=5.00 GB

172.25.250.13 | CHANGED | rc=0 >>
# Hardware report
HOST=172.25.250.13
MEM=821
BIOS=1.11.1-4.module+el8.1.0+4066+0f1aadab
VDA=10.00 GB
VDB=5.00 GB

172.25.250.9 | CHANGED | rc=0 >>
# Hardware report
HOST=172.25.250.9
MEM=1829
BIOS=1.11.1-4.module+el8.1.0+4066+0f1aadab
VDA=10.00 GB
VDB=NONE
参考:
$ ansible-doc get_url
- name: Download file and force basic auth
  get_url:
    url: http://example.com/path/file.conf
    dest: /etc/foo.conf
    force_basic_auth: yes
$ ansible-doc lineinfile
- name: Ensure SELinux is set to enforcing mode
  lineinfile:
    path: /etc/selinux/config
    regexp: '^SELINUX='
    line: SELINUX=enforcing
[greg@bastion ansible]$ ansible dev -m setup -a "filter=*host*"
172.25.250.9 | SUCCESS => {
    "ansible_facts": {
        "ansible_hostname": "workstation",
        "ansible_hostnqn": "",
        "ansible_ssh_host_key_ecdsa_public": "AAAAE2VjZHNhLXNoYTItbmlzdHAyNTYAAAAIbmlzdHAyNTYAAABBBFJI4l7PEUSdjiWCFNFo+gQTECEaWa5NiZz0N5rvehQUhQGuBn0LI1Dm+eD0WG7Zm/QDSjT4KJAG127868XP3mg=",
        "ansible_ssh_host_key_ed25519_public": "AAAAC3NzaC1lZDI1NTE5AAAAIAbKWZL1Y+KCI6Qk7CQcrcQ2d3pH12YMDe7iswugGoh+",
        "ansible_ssh_host_key_rsa_public": "AAAAB3NzaC1yc2EAAAADAQABAAABAQCpiBSXGIIlkntQJn+UfykmgHl0Fvkqb4Y6jBKo6SYScUrPe7sYZQi2kJYamZdgOL1X072L9s4UslPycnVqumrbt69Paa/4lJEJBEfJC6WrGcGlb8tbHO2boSepoIixLp0Hq1etDFbQ5XISivDF/kcW8t8CMDye3gEctoG+L0z/A60eK616Qj7bRApbJxm79IJQrTvaooVBU3Gs8pf0X+HRPK+eqy14EheWkLOtXrdoaYirJStIX+MpchEWqViJL8JmHEcZXmFSOK3K6ikGj02jv9QSm3UXQkubeLIiNZTzi5gaXyFgFlxSaLM/yrcd5/tE9oKho9LXk14W56tJxz1Z",
        "discovered_interpreter_python": "/usr/libexec/platform-python"
    },
    "changed": false
}
[greg@bastion ansible]$ ansible dev -m setup -a "filter=*mb*"
172.25.250.9 | SUCCESS => {
    "ansible_facts": {
        "ansible_memfree_mb": 263,
        "ansible_memory_mb": {
            "nocache": {
                "free": 1200,
                "used": 629
            },
            "real": {
                "free": 263,
                "total": 1829,
                "used": 1566
            },
            "swap": {
                "cached": 0,
                "free": 0,
                "total": 0,
                "used": 0
            }
        },
        "ansible_memtotal_mb": 1829,
        "ansible_swapfree_mb": 0,
        "ansible_swaptotal_mb": 0,
        "discovered_interpreter_python": "/usr/libexec/platform-python"
    },
    "changed": false
}
[greg@bastion ansible]$ ansible dev -m setup -a "filter=*bios*"
172.25.250.9 | SUCCESS => {
    "ansible_facts": {
        "ansible_bios_date": "04/01/2014",
        "ansible_bios_version": "1.11.1-4.module+el8.1.0+4066+0f1aadab",
        "discovered_interpreter_python": "/usr/libexec/platform-python"
    },
    "changed": false
}
[greg@bastion ansible]$ ansible dev -m setup -a "filter=*device*"
172.25.250.9 | SUCCESS => {
    "ansible_facts": {
        "ansible_device_links": {
            "ids": {},
            "labels": {},
            "masters": {},
            "uuids": {
                "vda1": [
                    "884f47c9-a69d-4c5b-915d-6b7c9c74c923"
                ]
            }
        },
        "ansible_devices": {
            "vda": {
                "holders": [],
                "host": "SCSI storage controller: Red Hat, Inc. Virtio block device (rev 01)",
                "links": {
                    "ids": [],
                    "labels": [],
                    "masters": [],
                    "uuids": []
                },
                "model": null,
                "partitions": {
                    "vda1": {
                        "holders": [],
                        "links": {
                            "ids": [],
                            "labels": [],
                            "masters": [],
                            "uuids": [
                                "884f47c9-a69d-4c5b-915d-6b7c9c74c923"
                            ]
                        },
                        "sectors": "20969439",
                        "sectorsize": 512,
                        "size": "10.00 GB",
                        "start": "2048",
                        "uuid": "884f47c9-a69d-4c5b-915d-6b7c9c74c923"
                    }
                },
                "removable": "0",
                "rotational": "1",
                "sas_address": null,
                "sas_device_handle": null,
                "scheduler_mode": "mq-deadline",
                "sectors": "20971520",
                "sectorsize": "512",
                "size": "10.00 GB",
                "support_discard": "0",
                "vendor": "0x1af4",
                "virtual": 1
            }
        },
        "discovered_interpreter_python": "/usr/libexec/platform-python"
    },
    "changed": false
}
十三、创建密码库
按照下方所述,创建一个Ansible库来存储用户密码:
-
库名称为/home/greg/ansible/locker.yml
-
库中含有两个变量,名称如下:
pw_developer,值为Imadev
pw_manager,值为Imamgr
-
用于加密和解密该库的密码为whenyouwishuponastar
-
密码存储在文件/home/greg/ansible/secret.txt中
[greg@bastion ansible]$ vim locker.yml
---
pw_developer: Imadev
pw_manager: Imamgr
[greg@bastion ansible]$ vim secret.txt
whenyouwishuponastar
[greg@bastion ansible]$ ansible-vault encrypt --vault-password-file secret.txt locker.yml
十四、创建用户账户
从http://materials/user_list.yml下载要创建的用户的列表,并将它保存到/home/greg/ansible
在本次考试中使用在其他位置创建的密码库/home/greg/ansible/locker.yml。创建名为/home/greg/ansible/users.yml的playbook,从而按以下所述创建用户账户:
-
职位描述为developer的用户应当:
-
在dev和test主机组中的受管节点上创建
-
从pw_developer变量分配密码
-
是补充组devops的成员
-
职位描述为manager的用户应当:
-
在prod主机组中的受管节点上创建
-
从pw_manager变量分配密码
-
是补充组opsmgr的成员
-
密码采用SHA512哈希格式。
-
您的playbook应能够在本次考试中使用在其他位置创建的库密码文件/home/greg/ansible/secret.txt正常运行。
[greg@bastion ansible]$ wget http://materials/user_list.yml
[greg@bastion ansible]$ vim users.yml
---
- name: user
  hosts: dev,test,prod
  vars_files:
    - user_list.yml
    - locker.yml
  tasks:
    - name: group
      group:
        name: devops
        state: present
      when: inventory_hostname in groups.dev or inventory_hostname in groups.test

    - name: user
      user:
        name: "{{ item.name }}"
        password: "{{ pw_developer | password_hash('sha512') }}"
        groups: devops
      loop:
        "{{ users }}"
      when: item.job == 'developer' and (inventory_hostname in groups.dev or inventory_hostname in groups.test)

    - name: group for prod
      group:
        name: opsmgr
        state: present
      when: inventory_hostname in groups.prod

    - name: user
      user:
        name: "{{ item.name }}"
        password: "{{ pw_manager | password_hash('sha512') }}"
        groups: opsmgr
      loop:
        "{{ users }}"
      when: item.job == 'manager' and inventory_hostname in groups.prod
[greg@bastion ansible]$ ansible-playbook --vault-password-file secret.txt users.yml
十五、更新Ansible库的密钥
按照下方所述,更新现有Ansible库的密钥:
-
当前的库密码为insecure8sure
-
新的库密码为bbs2you9527
-
库使用新密码保持加密状态
[greg@bastion ansible]$ wget http://materials/salaries.yml
[greg@bastion ansible]$ ansible-vault rekey salaries.yml
Vault password: insecure8sure
New Vault password: bbs2you9527
Confirm New Vault password: bbs2you9527
Rekey successful


评论区