一、Nexus 概述
Nexus是Sonatype公司出的一款目前最为流程的构件仓库管理软件,主要用于局域网内部的构件管理,代理访问外部仓库等。例如对于公司私有的Java制品Jar包,可上传至Nexus的Maven类型仓库中进行集中管理;代理访问阿里云Maven仓库,缓存加速获取互联网上的Java制品。Nexus使用Lucene提供了强大的构件搜索功能,拥有丰富的RestFul API接口用于管理控制,支持WebDAV和LDAP安全身份认证,基于RBAC的权限访问控制等功能。市面上同类产品有Apache的Archiva和JFrog的Artifatory。
Nexus分为免费开源版OSS和收费商业版Professional
二、仓库类型
Proxy类型仓库主要用于代理缓存访问外网上其他公开的仓库,将每次从代理仓库拉取的制品缓存到nexus文件系统中,下次再拉取相同版本制品时就不需再次从外网拉取,起到代理访问缓存的功能Hosted类型的仓库主要用于存放各个项目组产出的、用于共享、不能放到公网上、私有的制品。有两种版本策略,一种是Snapshots版本策略类型的,对于相同版本制品的上传,nexus会自动追加时间戳加以区分;一种是Release版本策略类型的,对于相同的制品,要明确版本,不能存放相同版本。可以理解为snapshots仓库存放一些内容变更频繁的制品,这样不管上传还是使用时不用频繁变更版本号就能拉取到最新版本。而release仓库存放一些内容稳定变更少的制品,使用时指定好版本就行,无需经常变动Group类型仓库主要用于组合其他仓库,统一对外使用方式。可设置组仓库组合其他仓库的顺序。例如组合顺序为先拉取maven格式aliyun代理仓库中的制品,如果其中没有想要的制品,再去拉取maven格式Central代理仓库中的制品。如果还没有,就去maven格式hosted类型仓库中拉取,直到遍历完所有的组合仓库。同时,拉取使用时不需要配置那么多的仓库地址,只需要配置group仓库地址就行
三、安装Nexus
# mkdir nexus
# cd nexus
# vim docker-compose.yaml
version: '3'
services:
  nexus3:
    restart: unless-stopped
    image: sonatype/nexus3:3.38.1-plugin-apk
    build: .
    container_name: nexus3
    environment:
      - TZ=Asia/Shanghai
    ports:
      - 8081:8081
    volumes:
      - /data/nexus-data:/nexus-data
# vim Dockerfile
FROM alpine as apk-dep
WORKDIR /deps
RUN apk update \
 && apk add --no-cache \
        wget
RUN wget --content-disposition "https://search.maven.org/remotecontent?filepath=org/sonatype/nexus/plugins/nexus-repository-apk/0.0.25/nexus-repository-apk-0.0.25-bundle.kar"
FROM sonatype/nexus3:3.38.1
copy --from=apk-dep /deps/nexus-repository-apk-0.0.25-bundle.kar /opt/sonatype/nexus/deploy/
# mkdir /data/nexus-data && chmod 777 /data/nexus-data
# docker-compose up -d
四、仓库基础配置
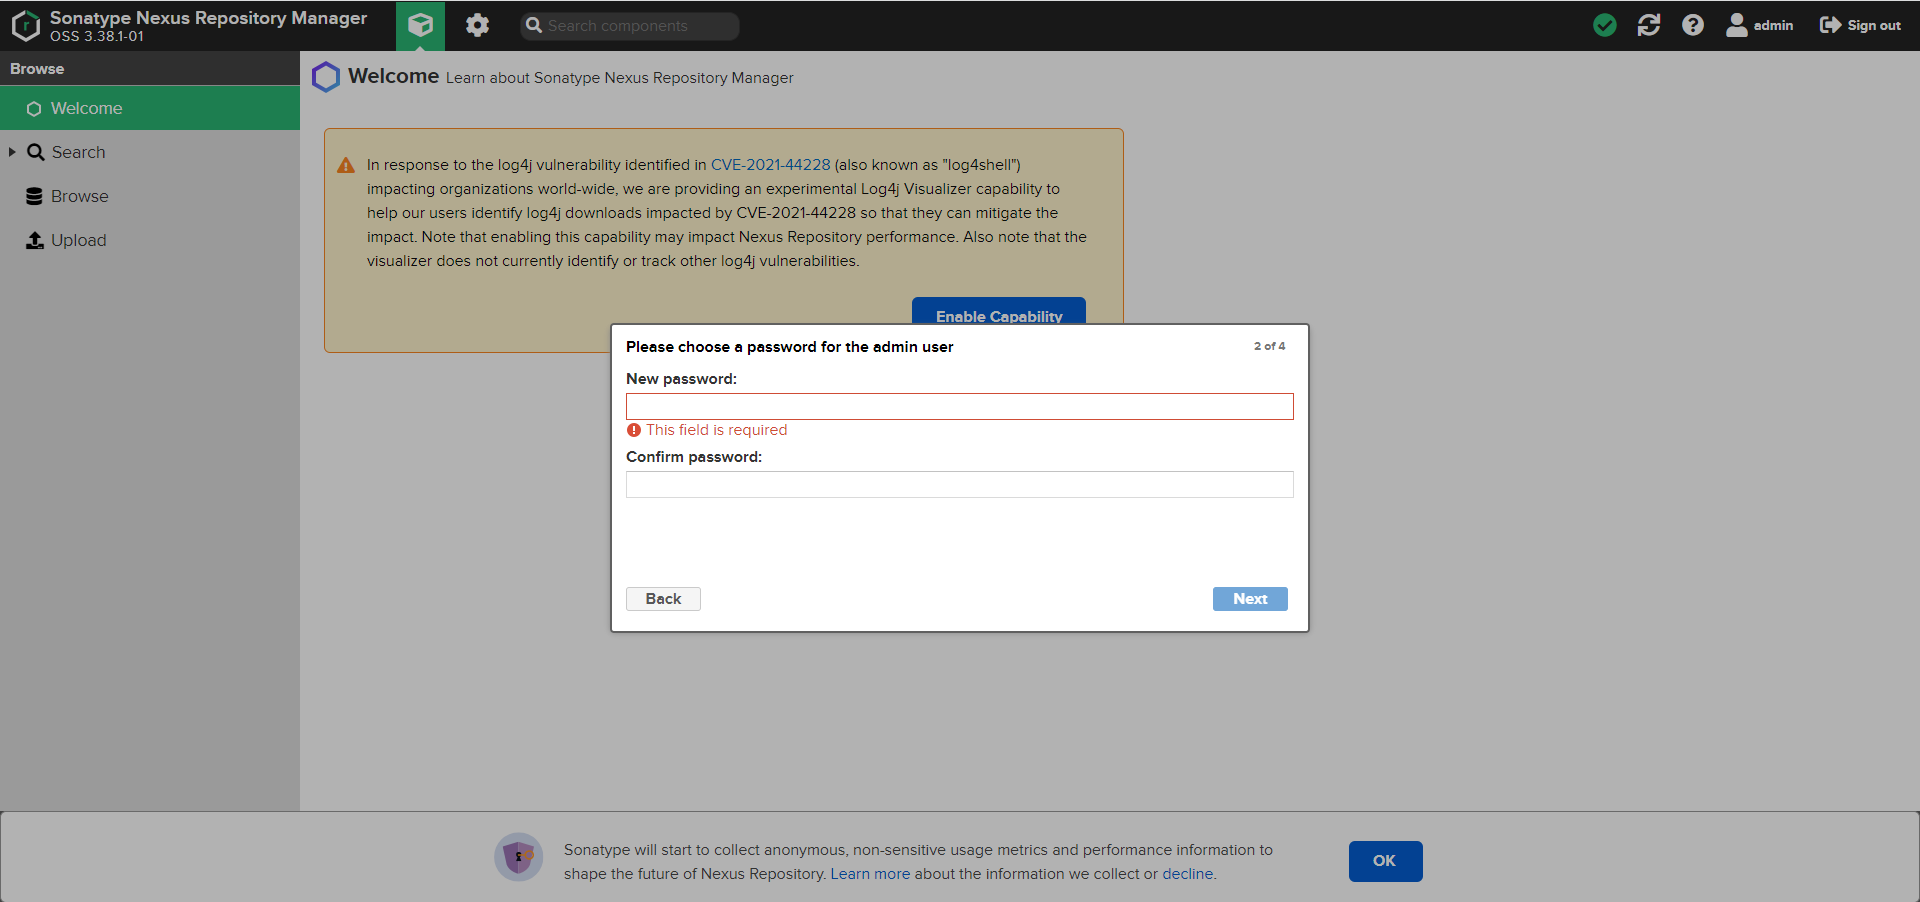
1、修改密码
查看nexus的admin用户密码,使用admin用户登录
# docker exec -it nexus3 cat /nexus-data/admin.password
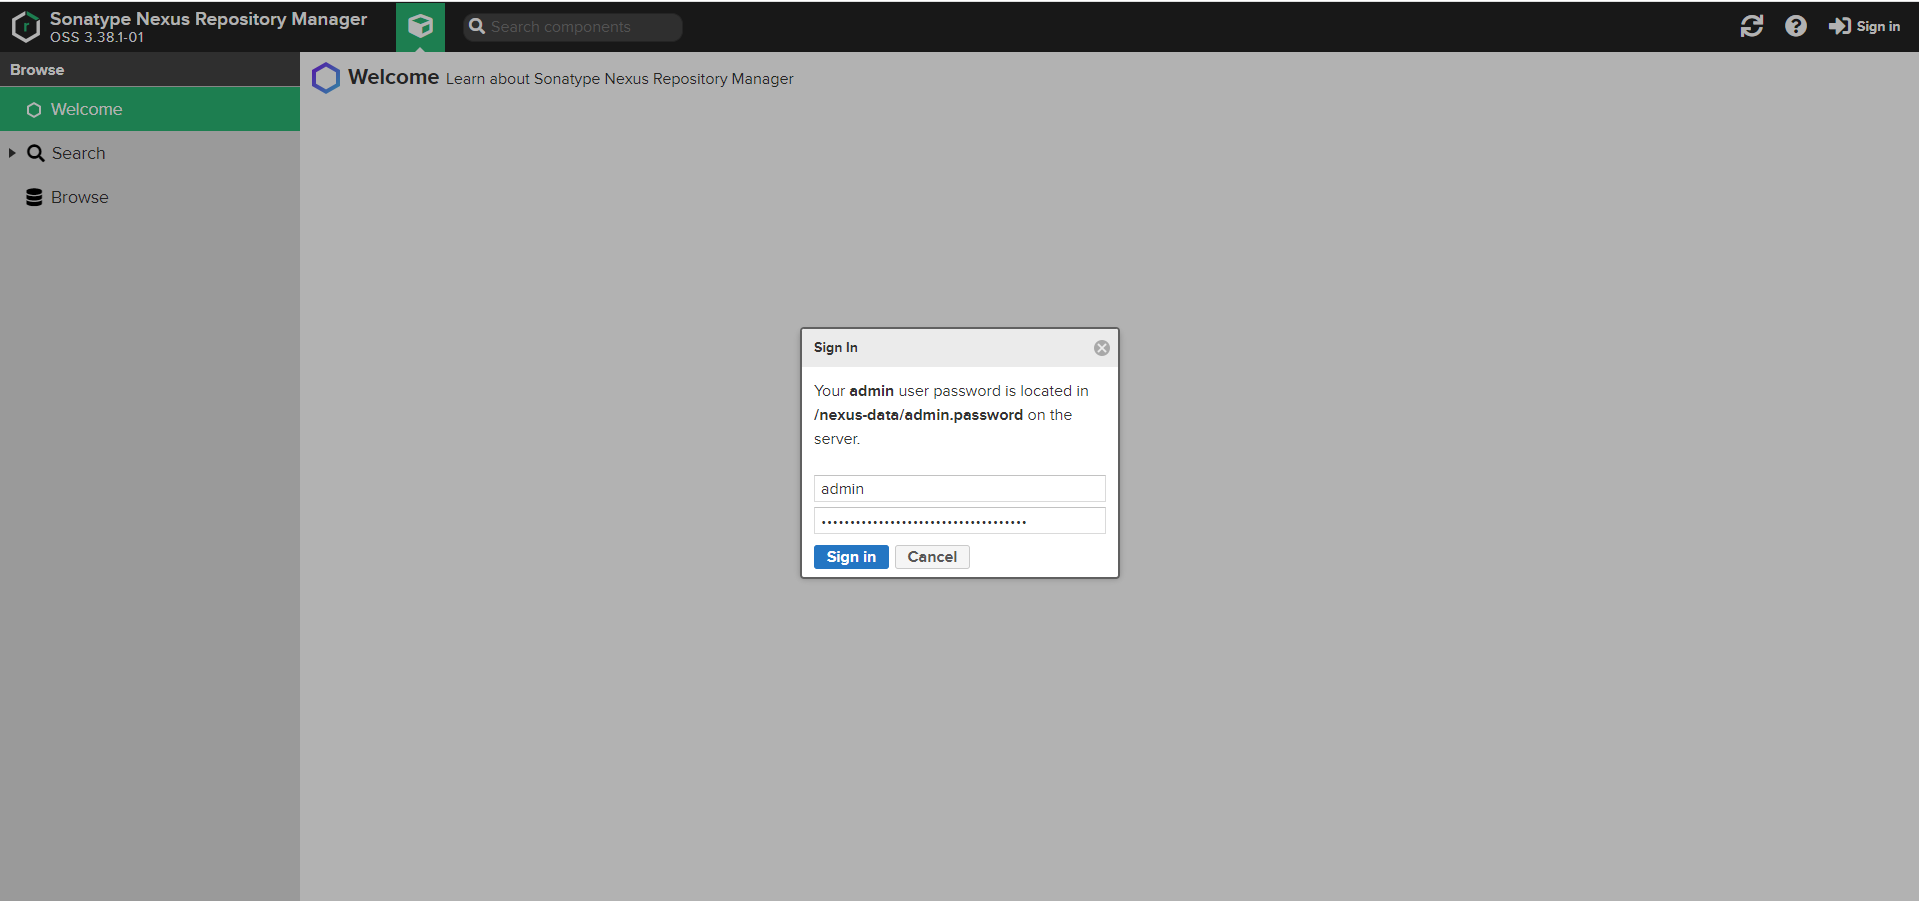
设置新密码
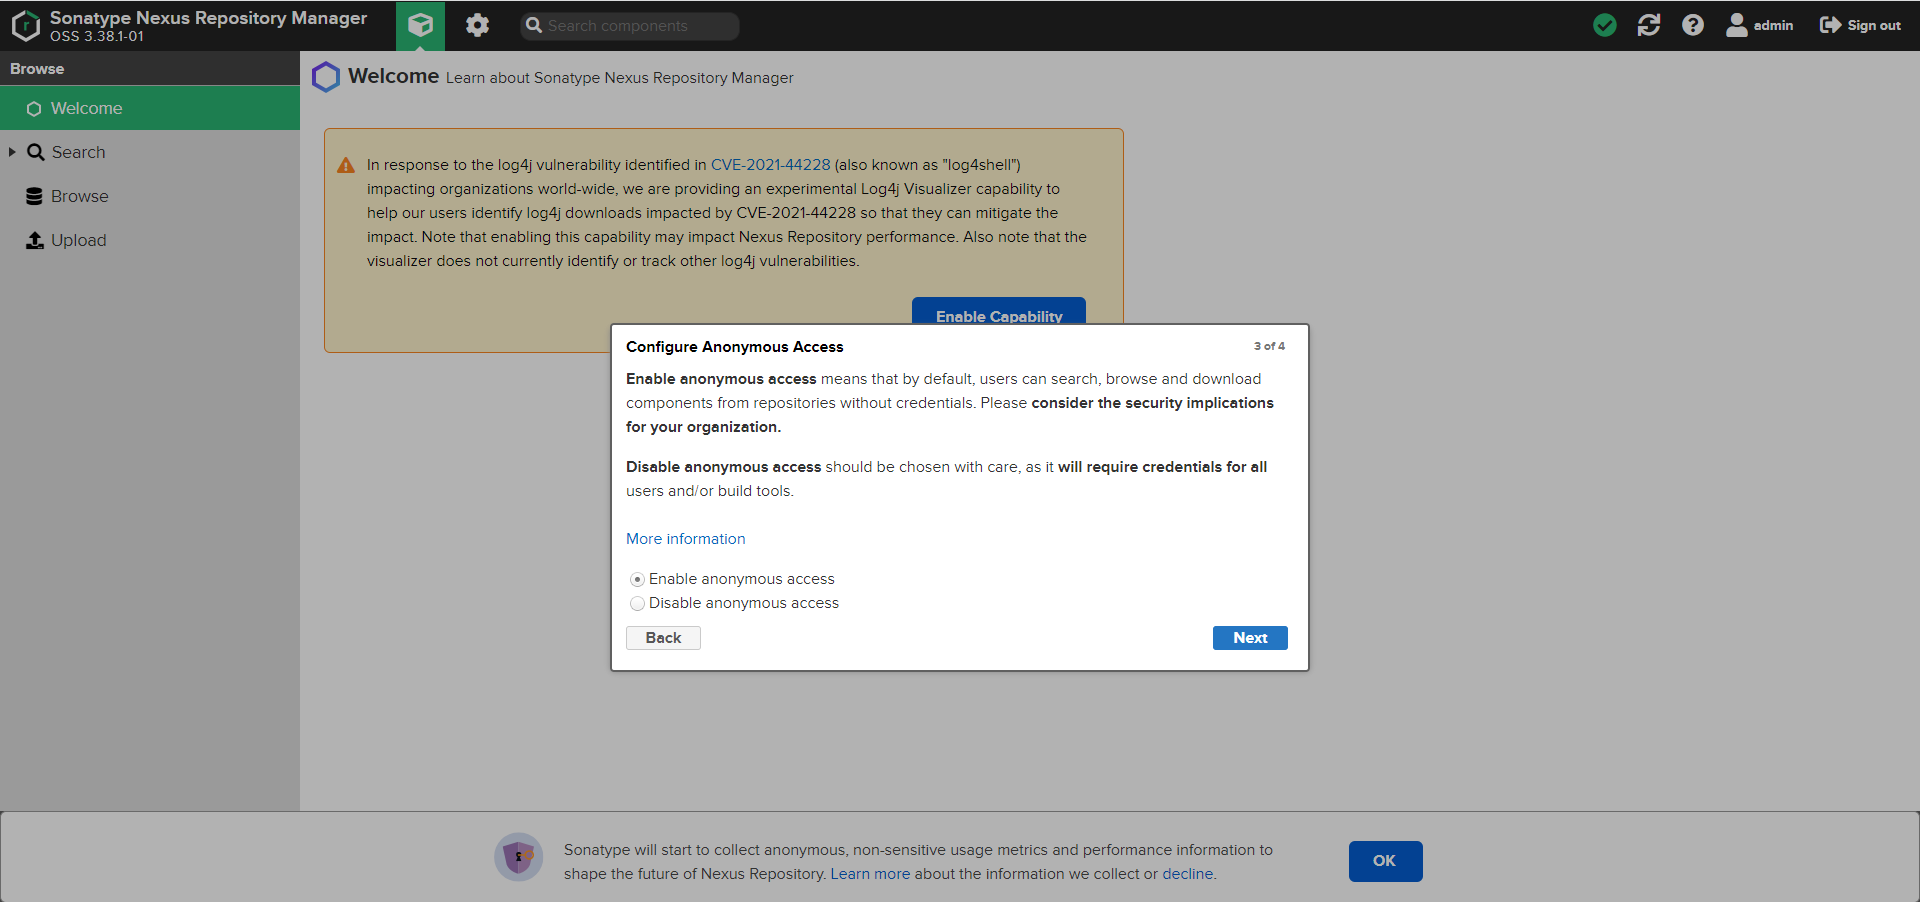
2、启用匿名访问
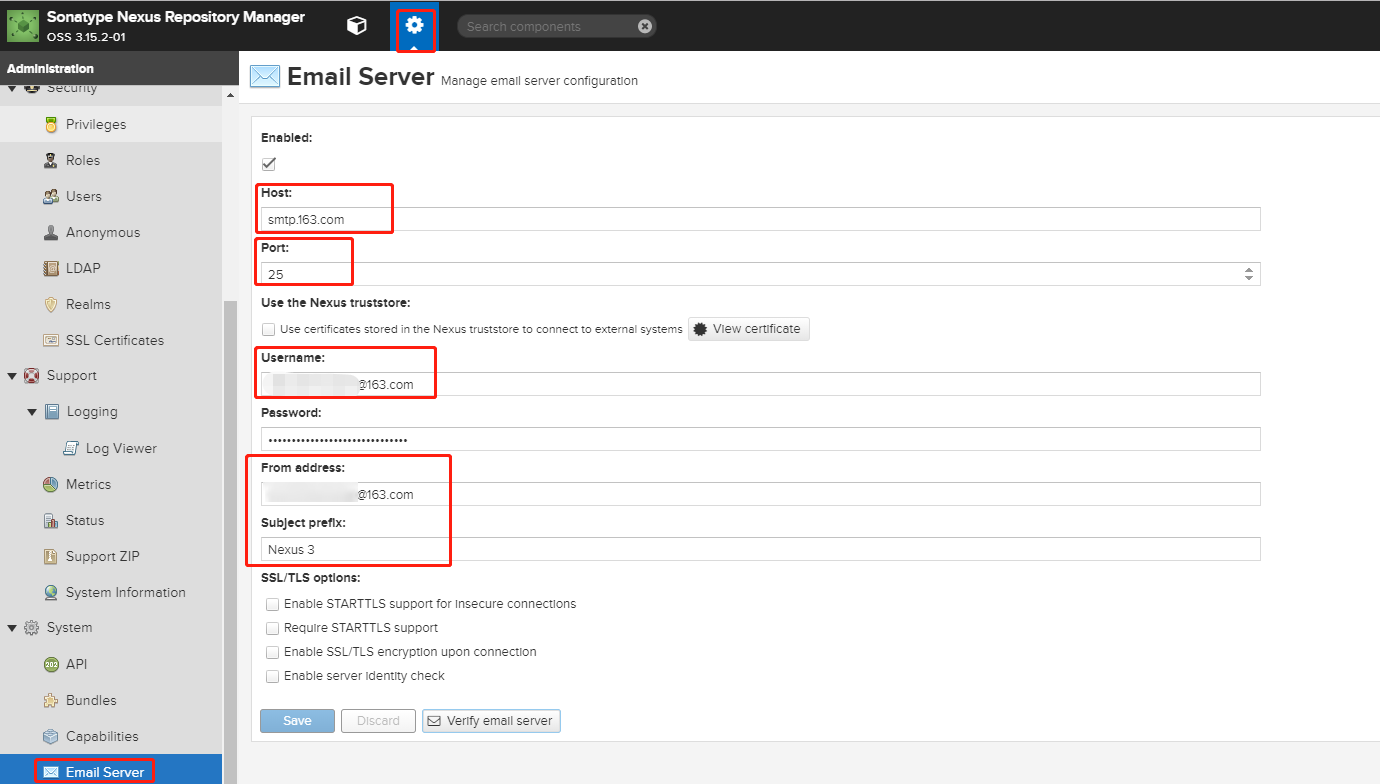
3、设置SMTP邮件服务
五、设置私有仓库
1、设置MAVEN 私有仓库
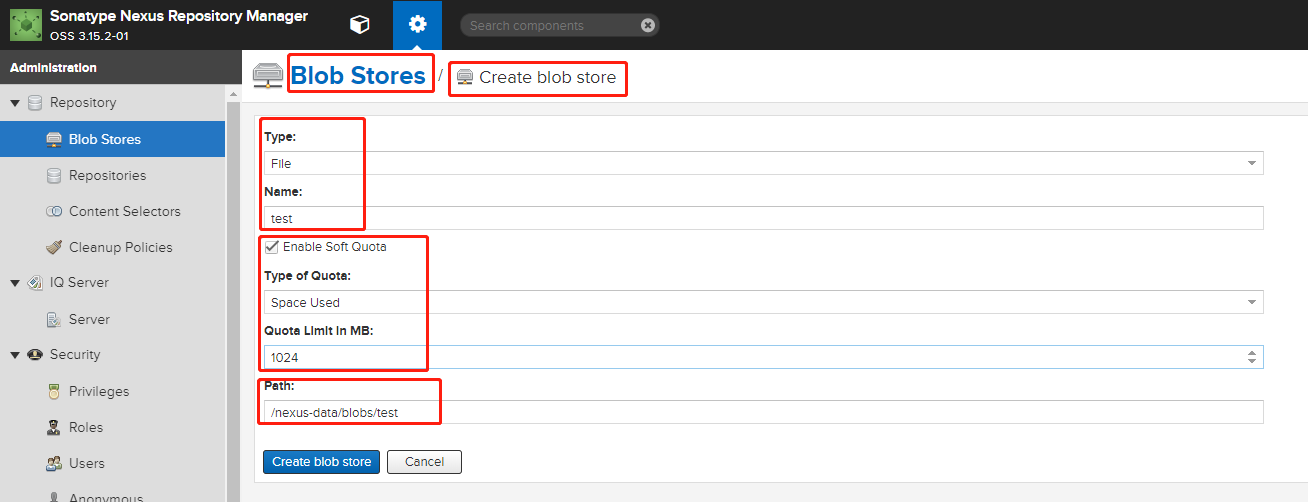
1、新建Blob Stores

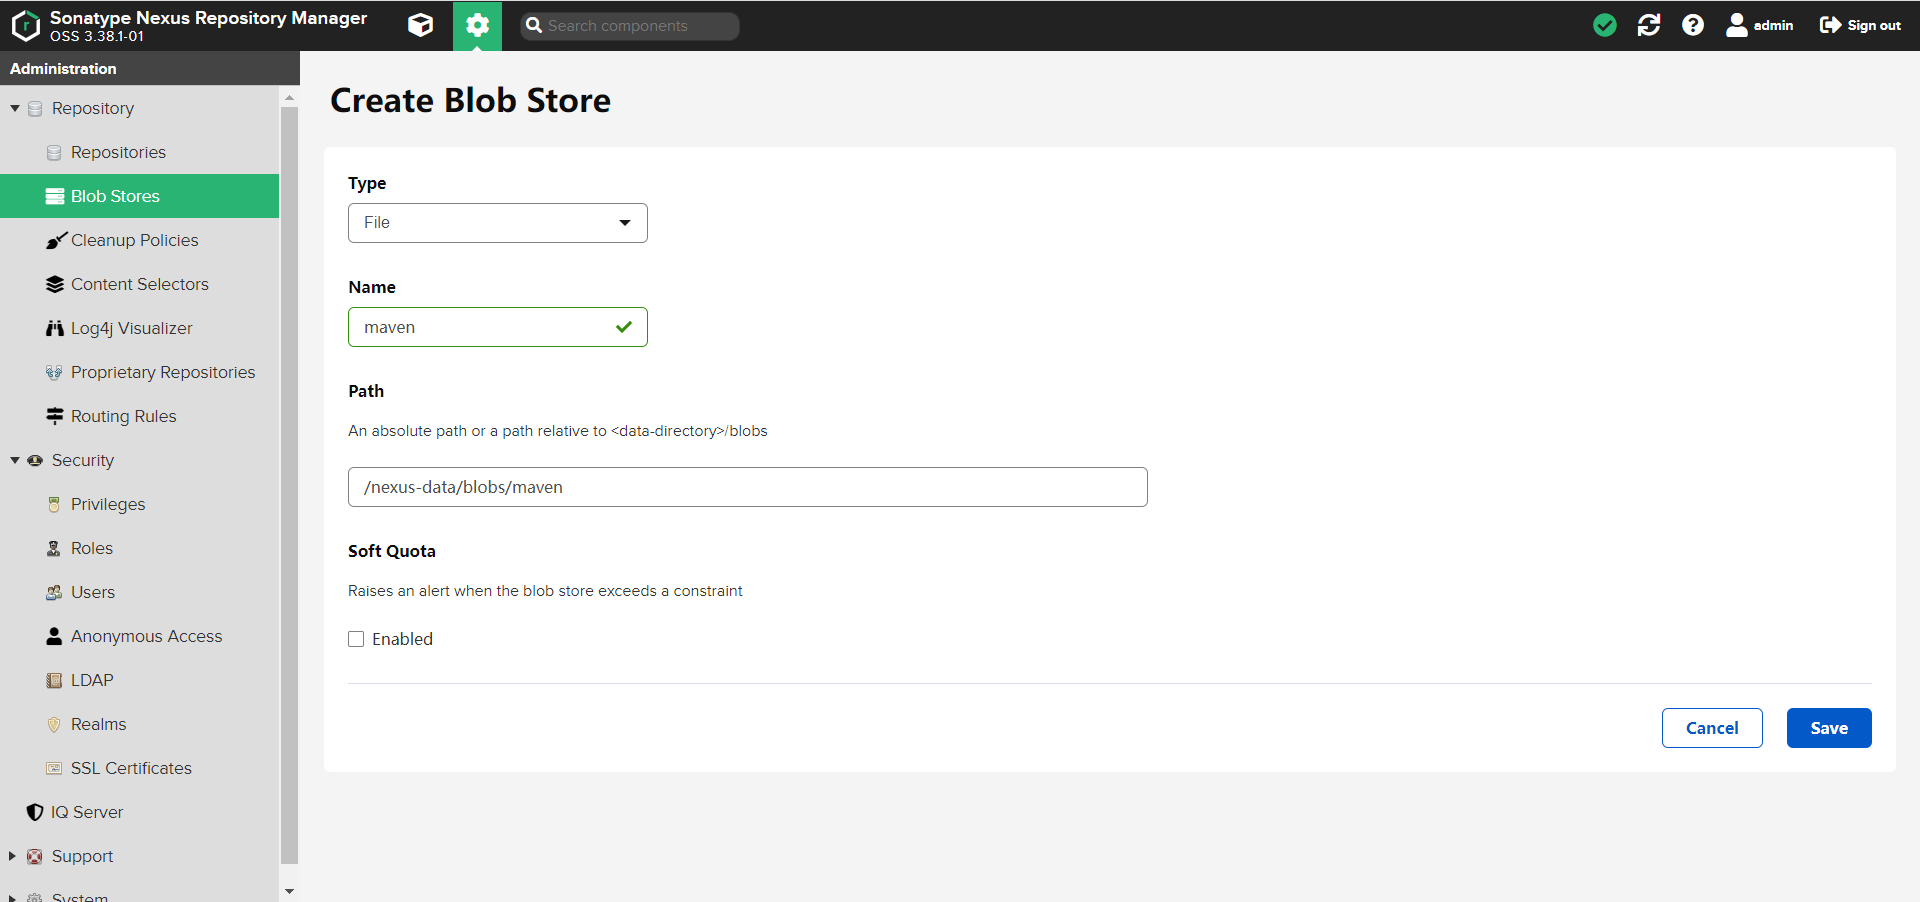
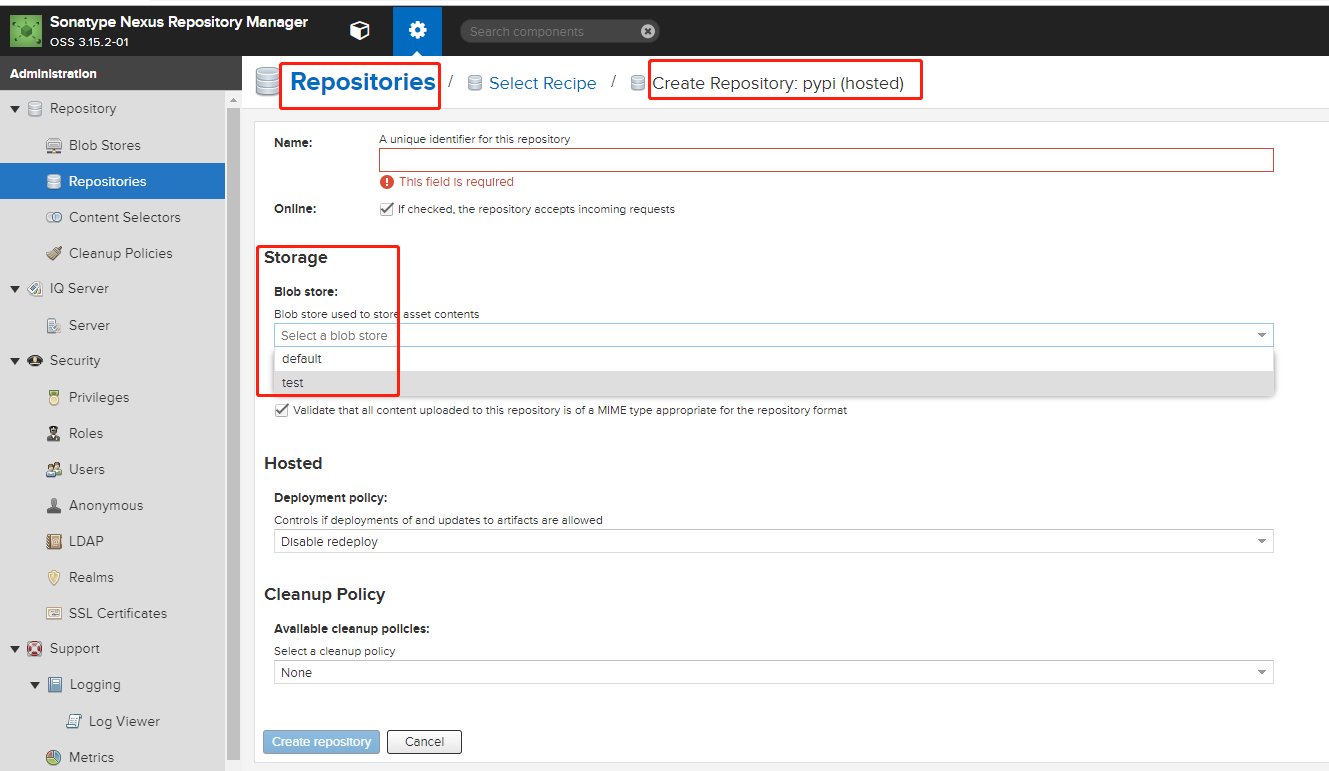
2、添加仓库
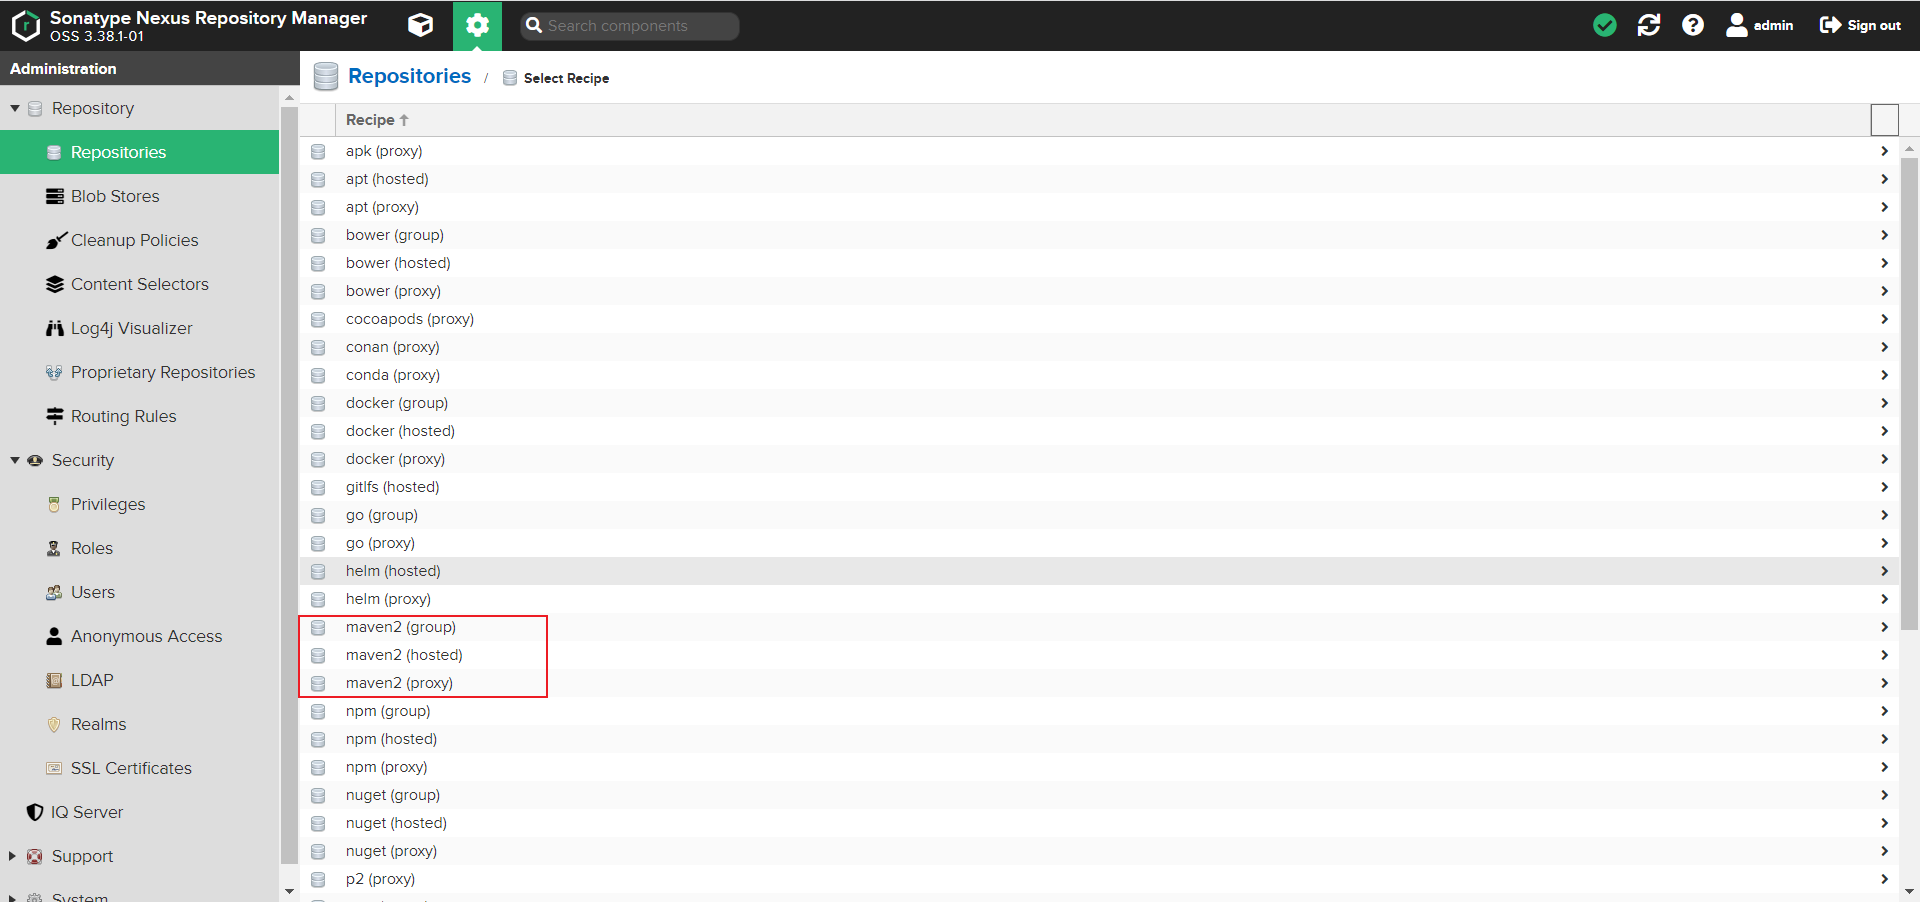
1、添加官方源
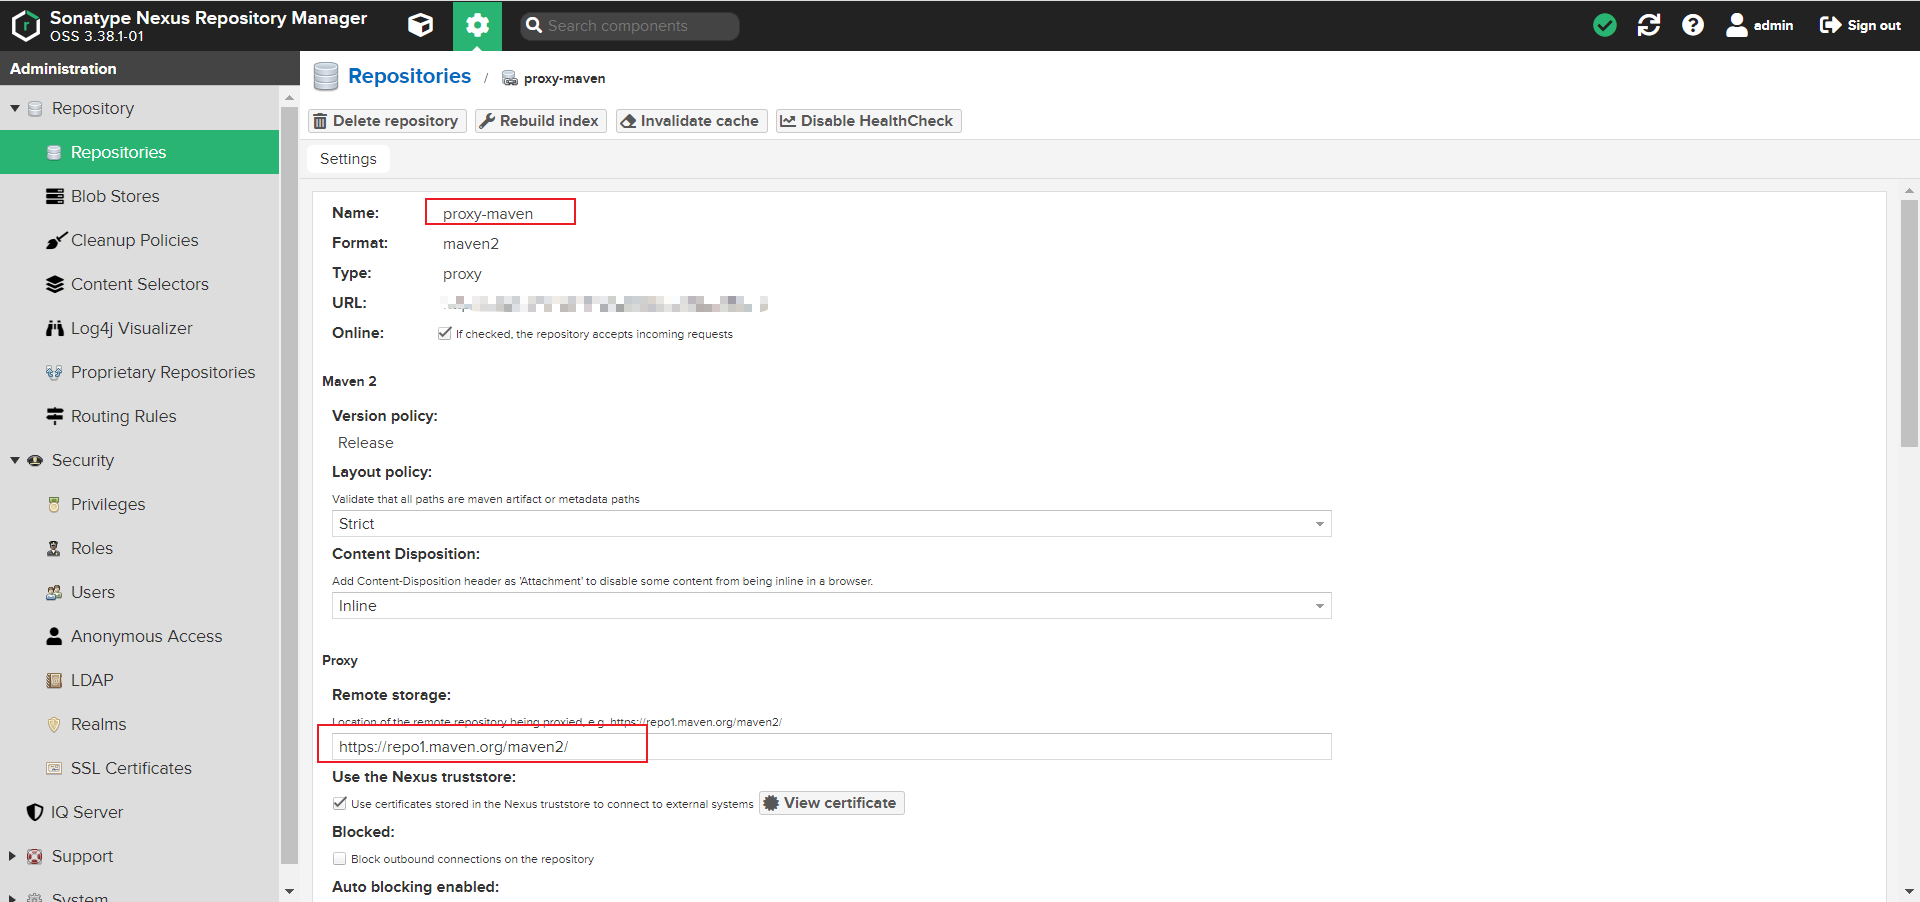
| name | proxy-maven |
|---|---|
| Remote storage | https://repo1.maven.org/maven2/ |
| Type | proxy |
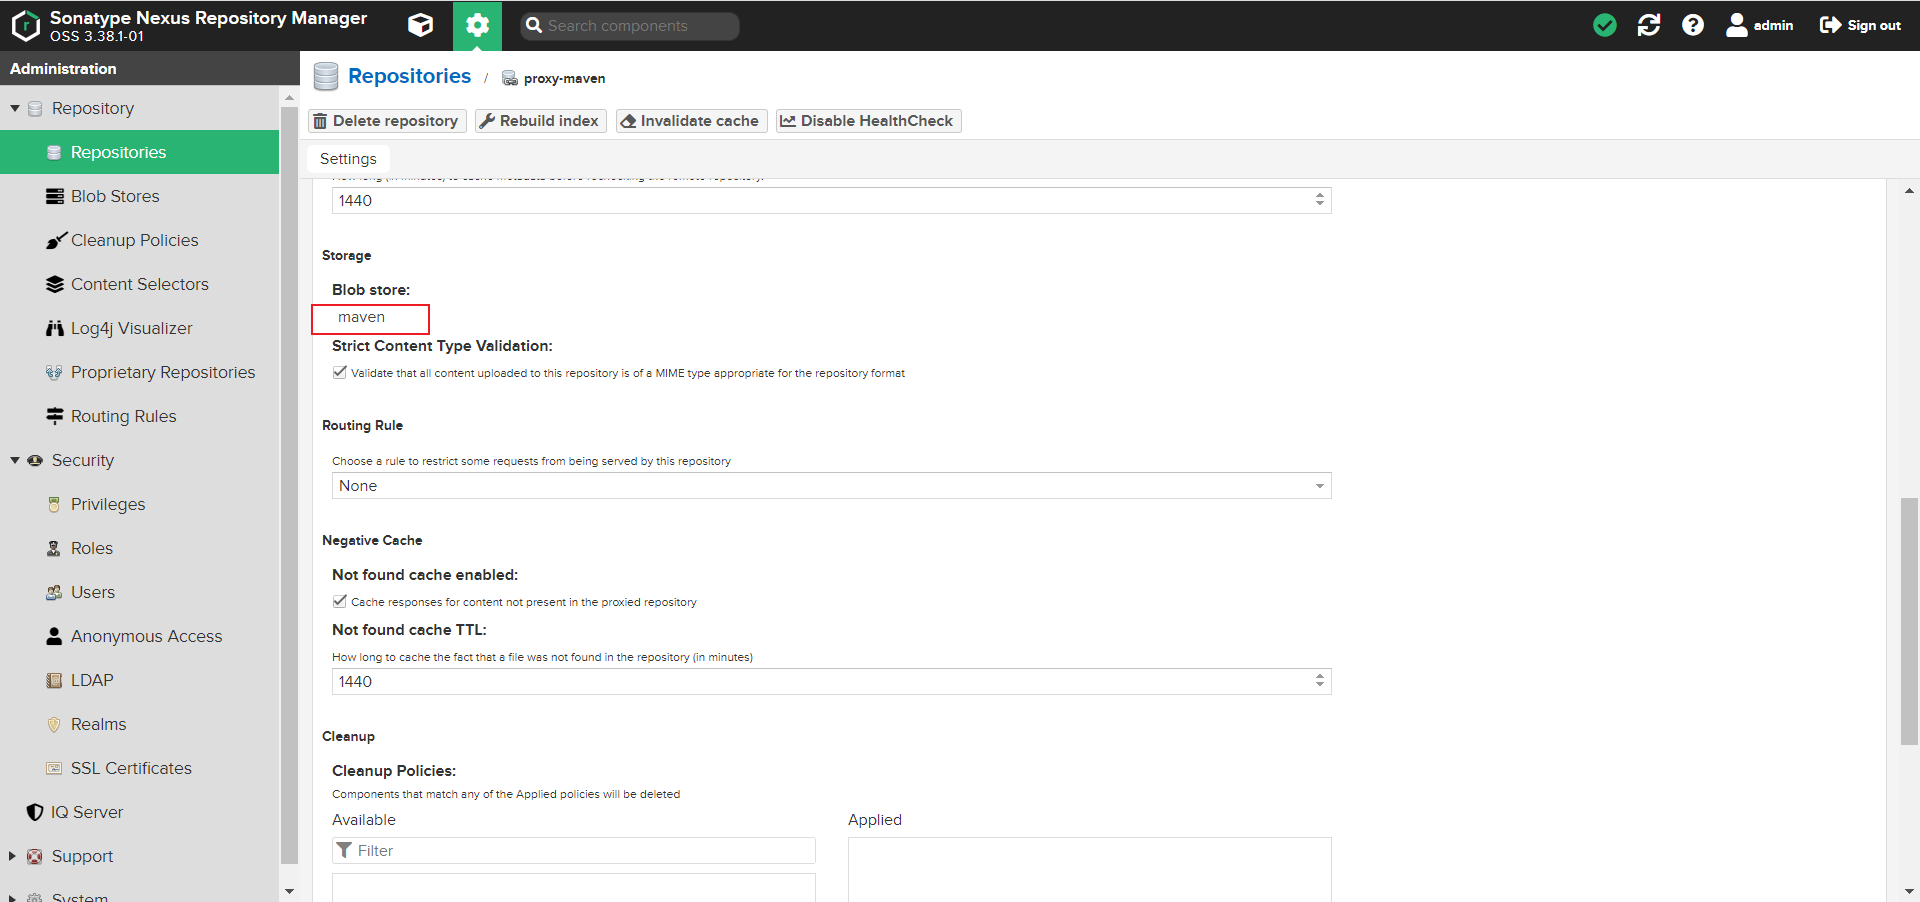
2、添加阿里云镜像
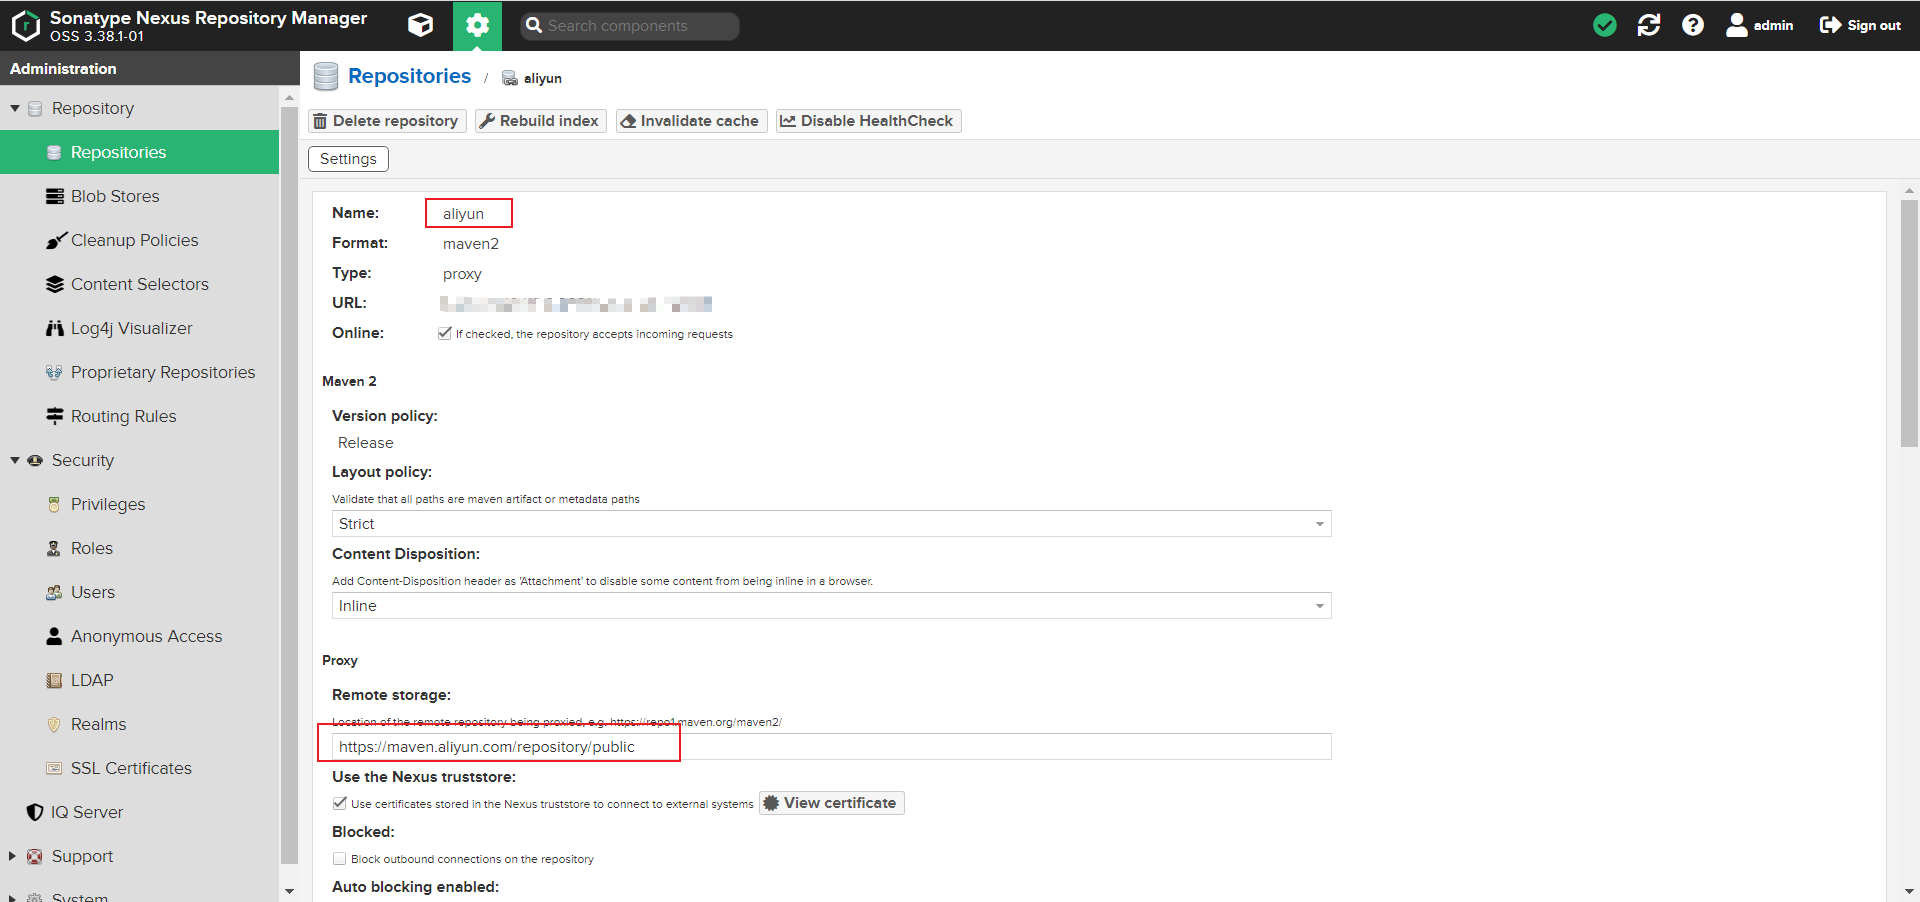
| name | aliyun |
|---|---|
| Remote storage | https://maven.aliyun.com/repository/public |
| Type | proxy |
3、添加本地仓库
用于存放公司自研包
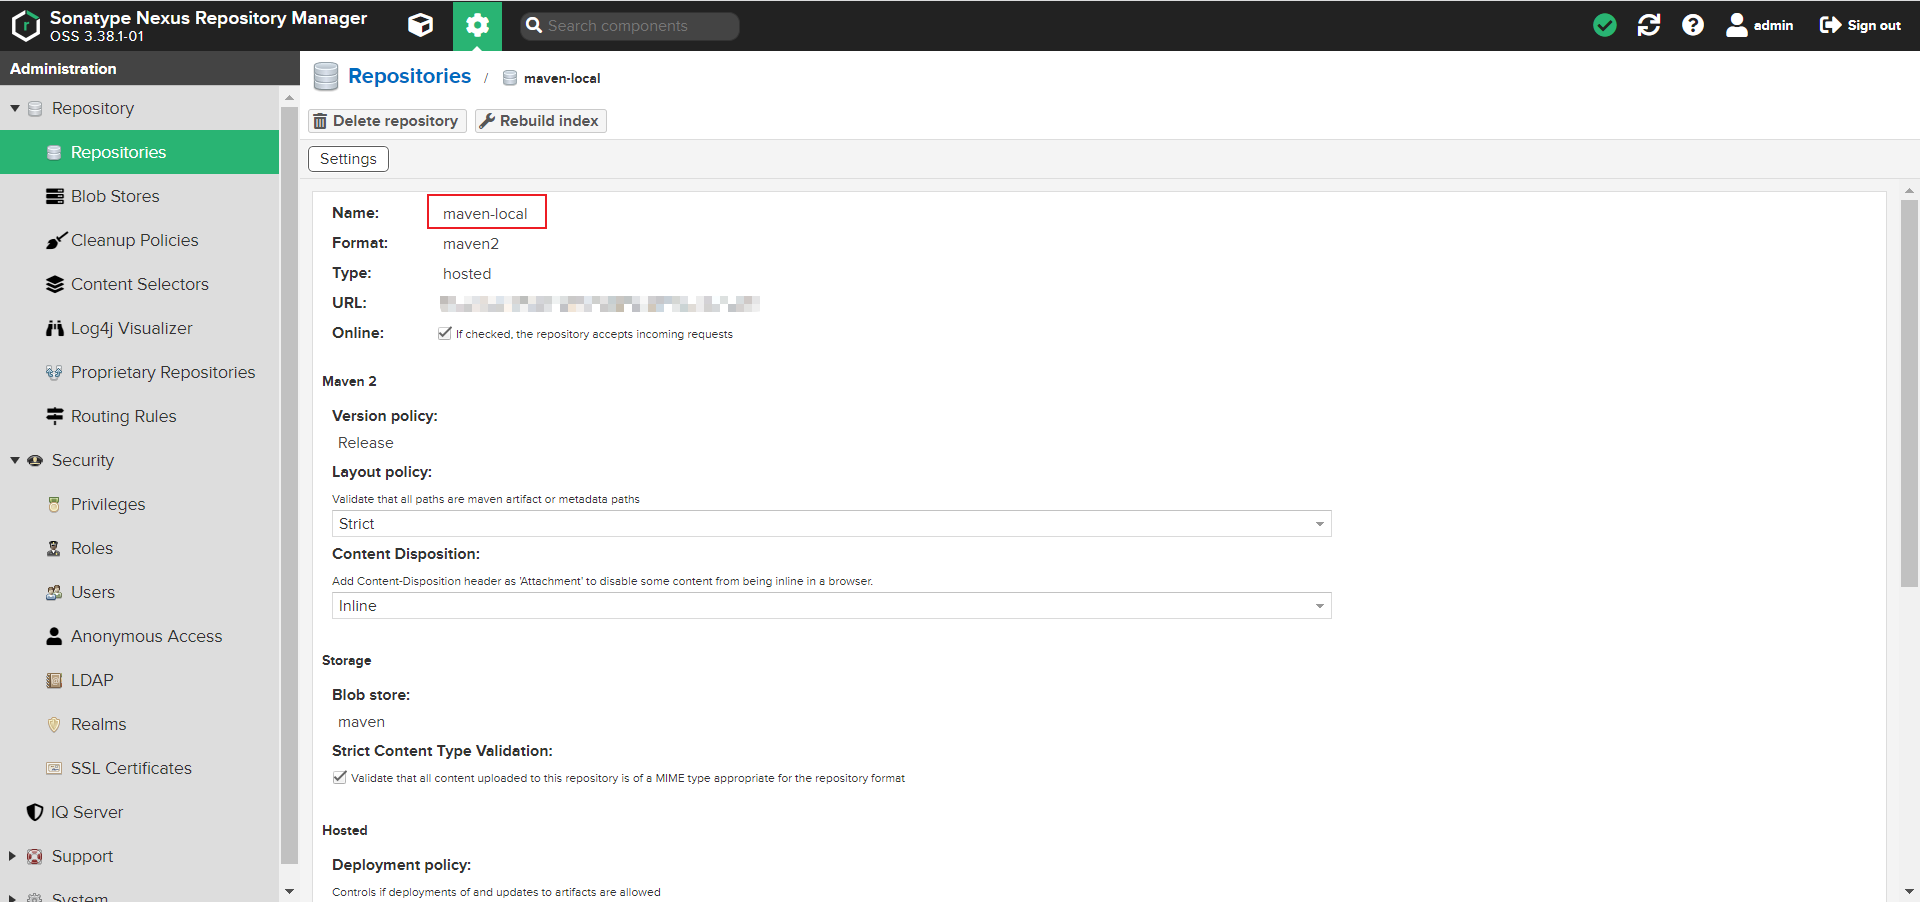
| name | maven-local |
|---|---|
| Type | hosted |
Nexus3中的Deployment Policy(部署策略)主要定义了如何处理对仓库中组件的部署和重新部署。以下是几个可用的策略及其区别:
| 策略 | 含义 | 说明 | 适用场景 |
|---|---|---|---|
| Allow Redeploy | 允许重新部署 | 允许用户重新部署相同坐标(groupId, artifactId, version)的组件,这意味着可以覆盖已存在的组件版本。这对于持续集成/持续部署(CI/CD)流程非常有用,开发团队可能需要频繁地发布新的构建版本,并替换旧版本 | 开发环境或短期构建存储库,在这些环境中允许覆盖以前发布的版本是合理的 |
| Disable Redeploy | 禁止重新部署 | 禁止对已经存在于仓库中的组件进行重新部署。一旦一个组件版本被上传,后续尝试上传相同版本将会失败 | 生产或正式的发布仓库,为了保证仓库中的组件版本一致性以及审计追踪,通常不希望同一个版本被多次覆盖 |
| Read-Only | 只读 | 不允许任何形式的部署操作,无论是新组件还是现有组件的重新部署都不行 | 只用于下载依赖而不用于任何部署活动的仓库,例如代理了中央仓库或其他第三方仓库内容的仓库 |
| Deploy by Replication Only | 只允许通过复制机制来部署组件 | 组件不能直接在这个仓库上部署,而必须先在其他仓库部署,然后通过配置的复制规则将组件同步到这个仓库 | 分布式系统中作为远程镜像或者备份的目的,确保所有内容都是通过受控的复制过程从中心或主仓库安全传输过来 |
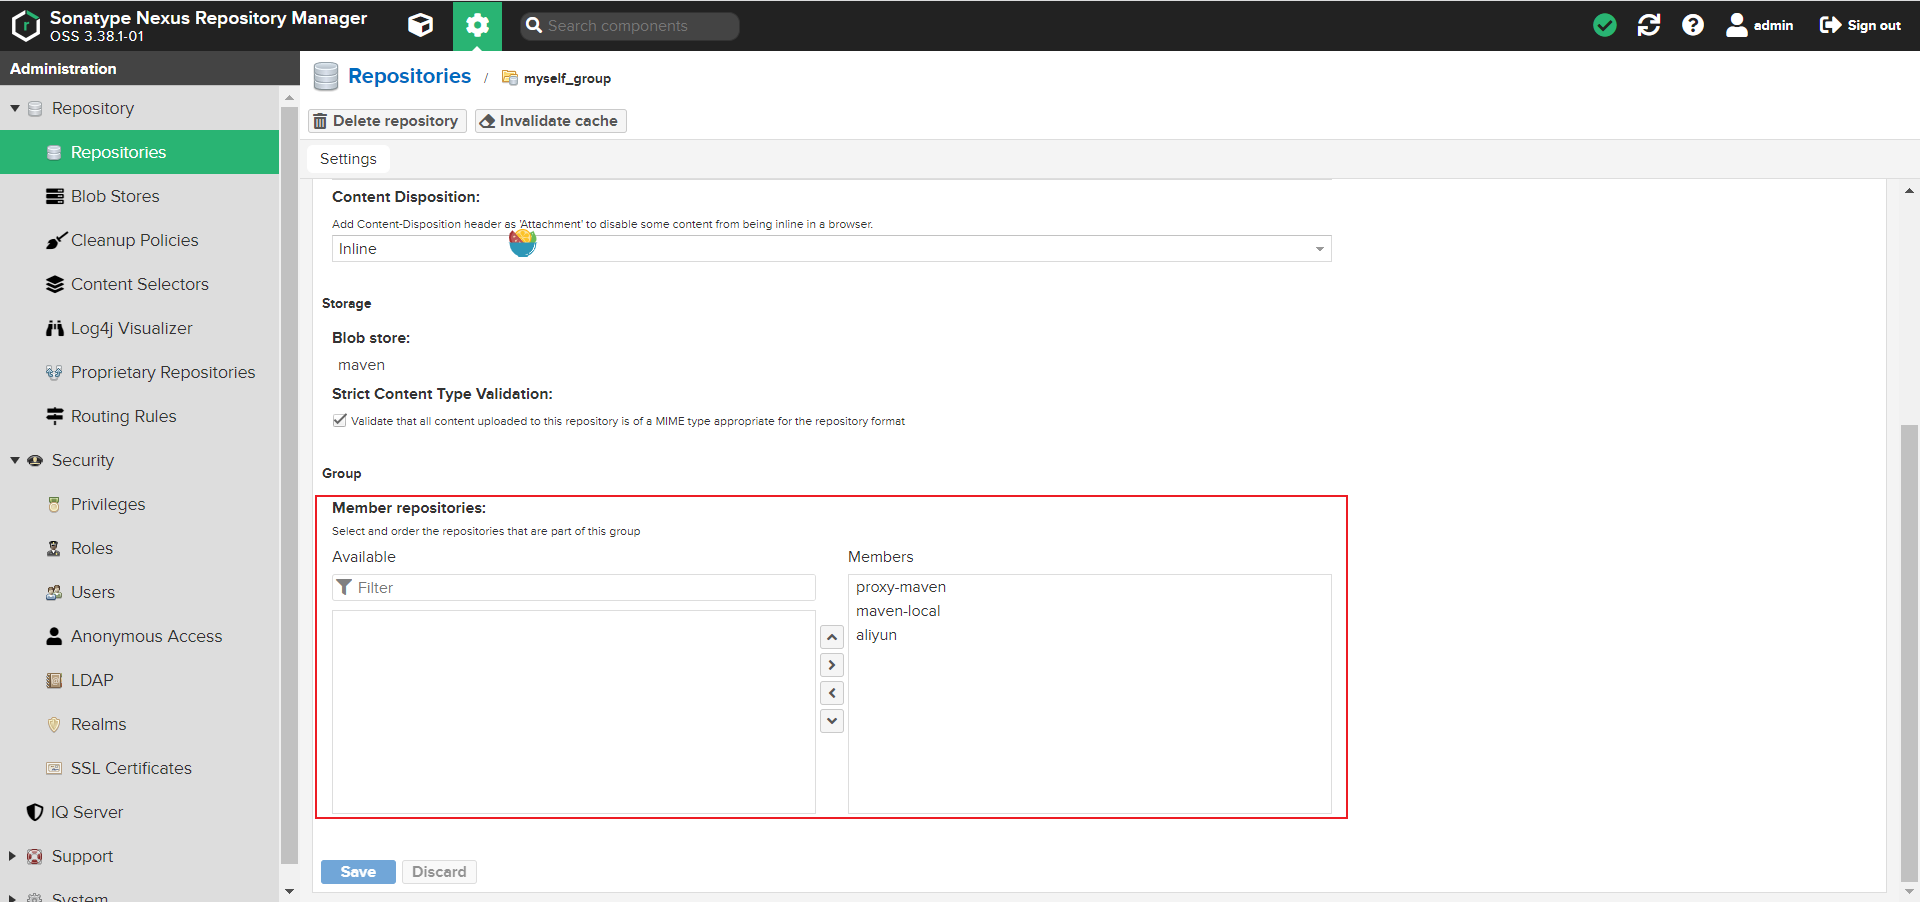
4、加入组中
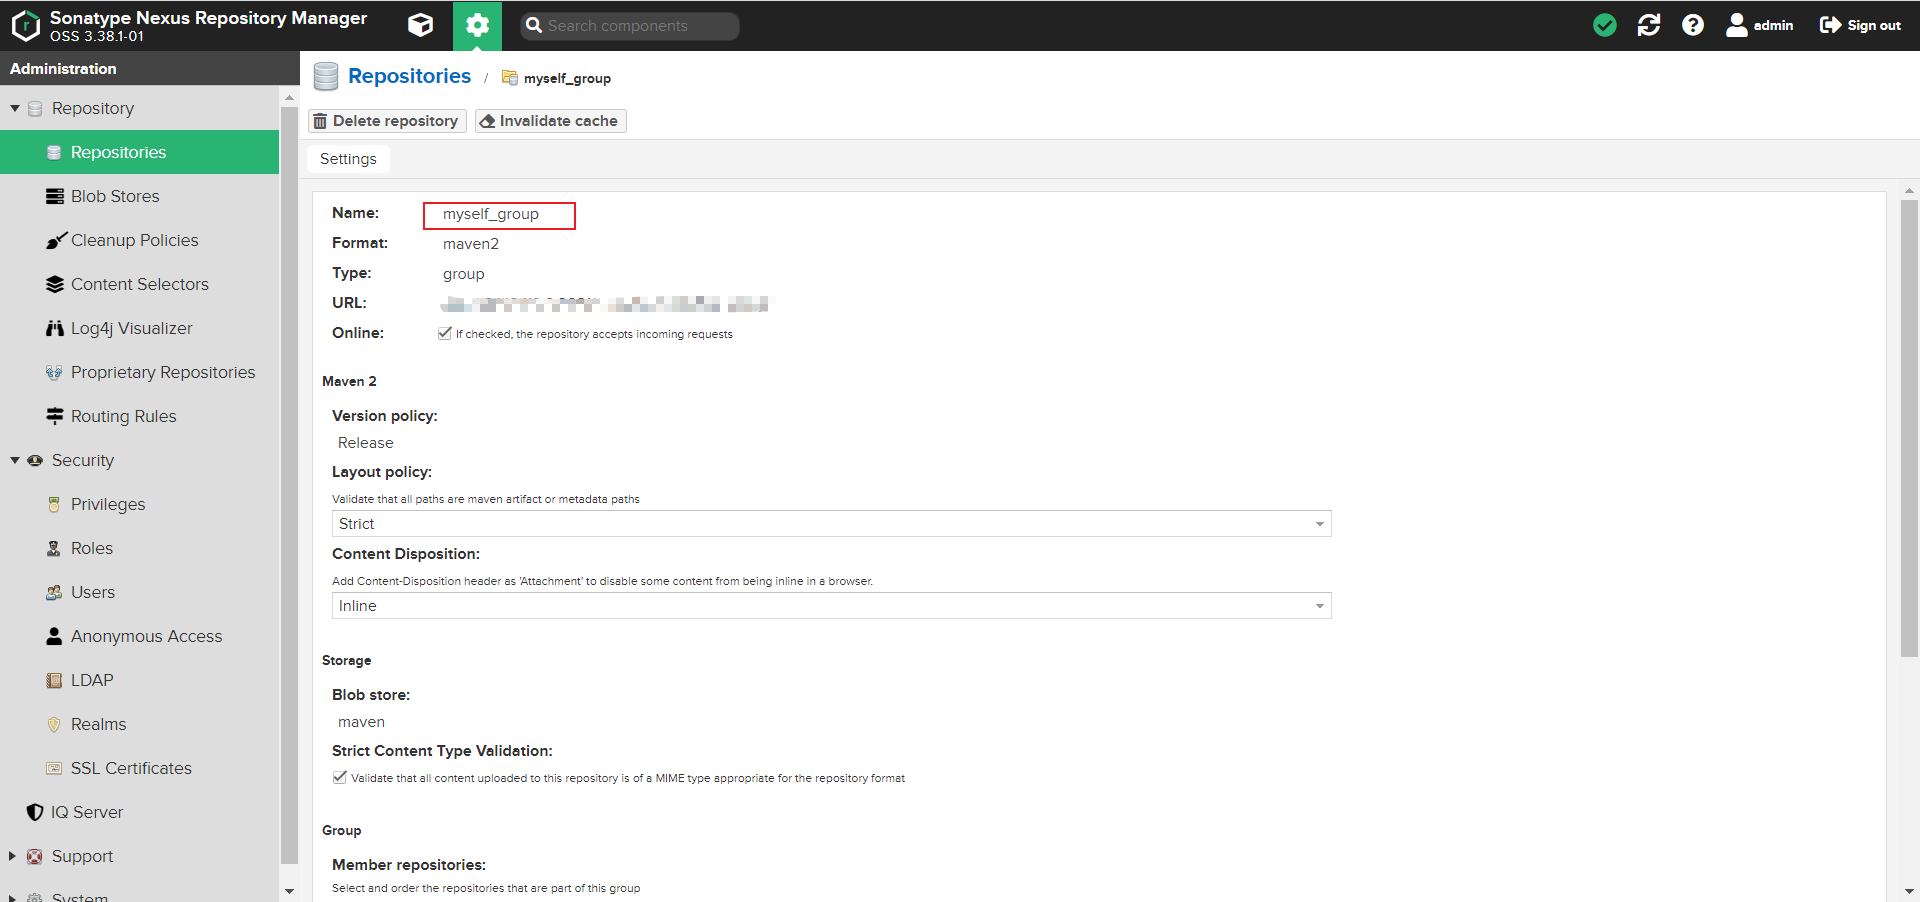
| name | myself_group |
|---|---|
| Type | group |
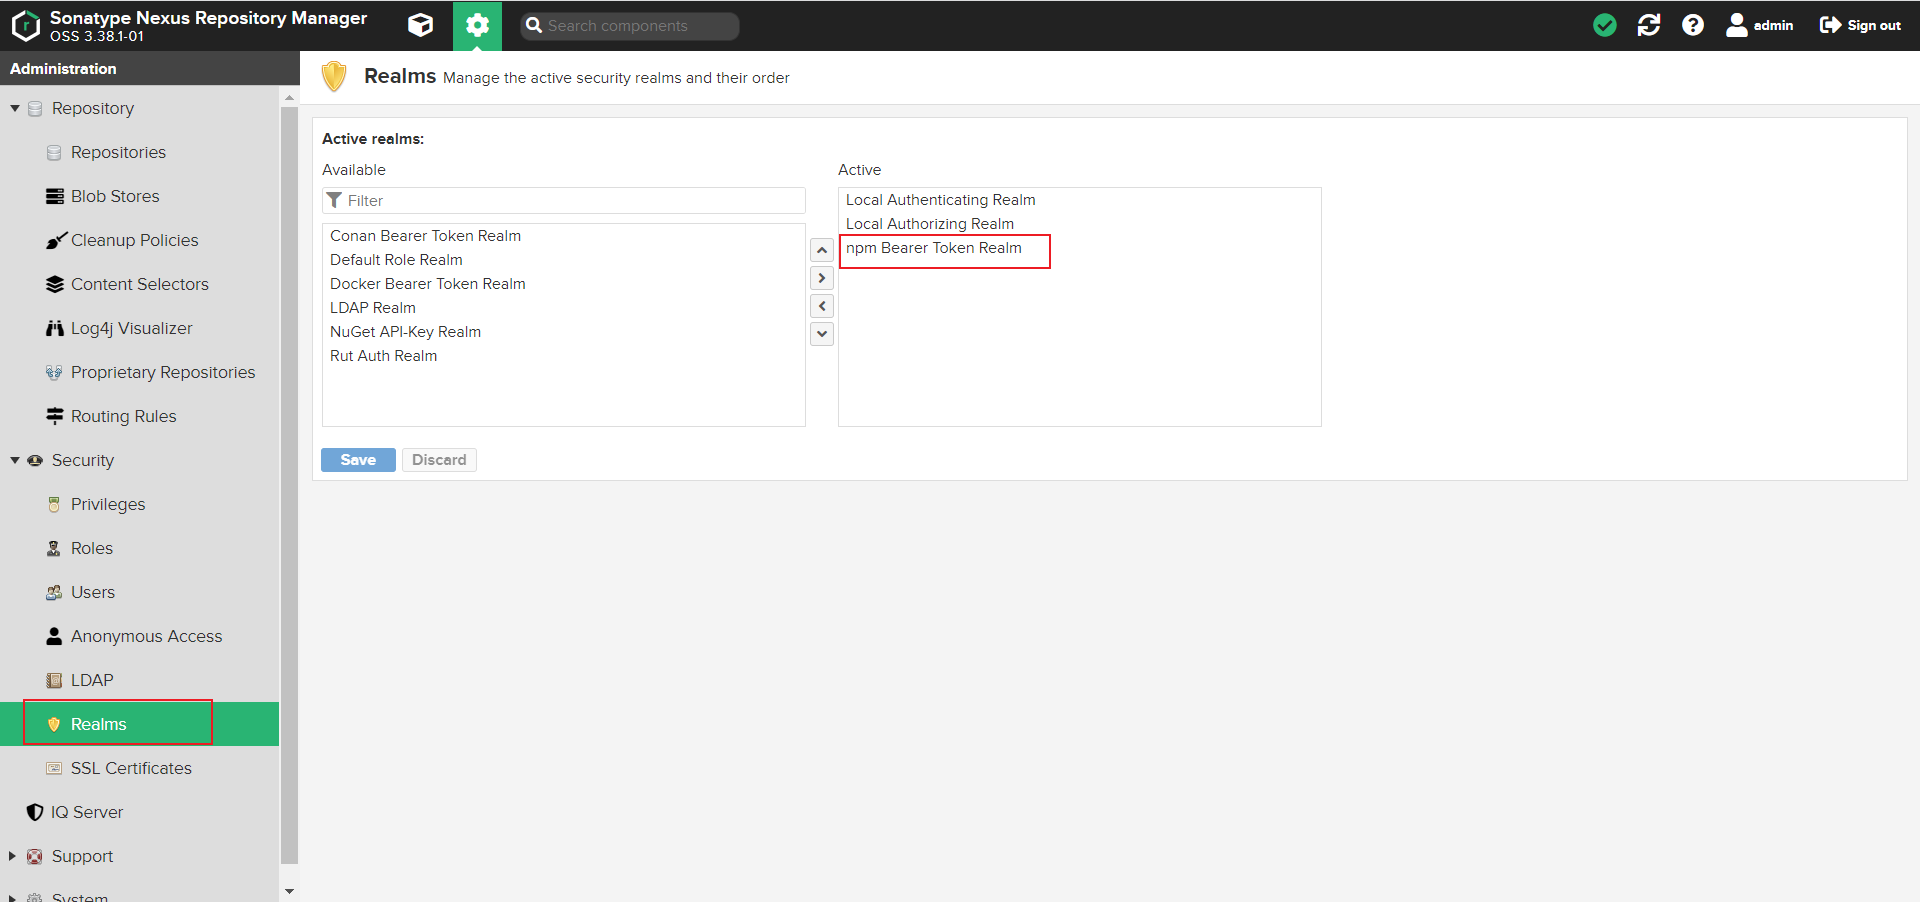
3、打开NPM安全规则
4、使用方法
配置settings.xml
<?xml version="1.0" encoding="UTF-8"?>
<settings xmlns="http://maven.apache.org/SETTINGS/1.2.0"
          xmlns:xsi="http://www.w3.org/2001/XMLSchema-instance"
          xsi:schemaLocation="http://maven.apache.org/SETTINGS/1.2.0 https://maven.apache.org/xsd/settings-1.2.0.xsd">
  <pluginGroups>
  </pluginGroups>
  <proxies>
  </proxies>
  <servers>
   <server>
      <id>mvn</id>			# 仓库ID
      <username>admin</username>			# nexus用户
      <password>**********</password>			# nexus密码
    </server>
   <server>
      <id>myself_group</id>			# 组名
      <username>admin</username>			# nexus用户
      <password>**********</password>			# nexus密码
    </server>
  </servers>
  <mirrors>
    <mirror>
    <id>mvn</id>
    <mirrorOf>*</mirrorOf>
    <name>nexus</name>
    <url>http://192.168.1.10:8081/repository/myself_group/</url>
    </mirror>
    </mirrors>
  <profiles>
   <profile>
    <repositories>
        <repository>
            <id>maven-central</id>
            <name>myself_group</name>
            <url>http://192.168.1.10:8081/repository/myself_group/</url>
            <snapshots>
                <enabled>true</enabled>
            </snapshots>
            <releases>
                <enabled>true</enabled>
            </releases>
        </repository>
    </repositories>
  </profile>
  </profiles>
</settings>
2、设置NPM && yarn 私有仓库
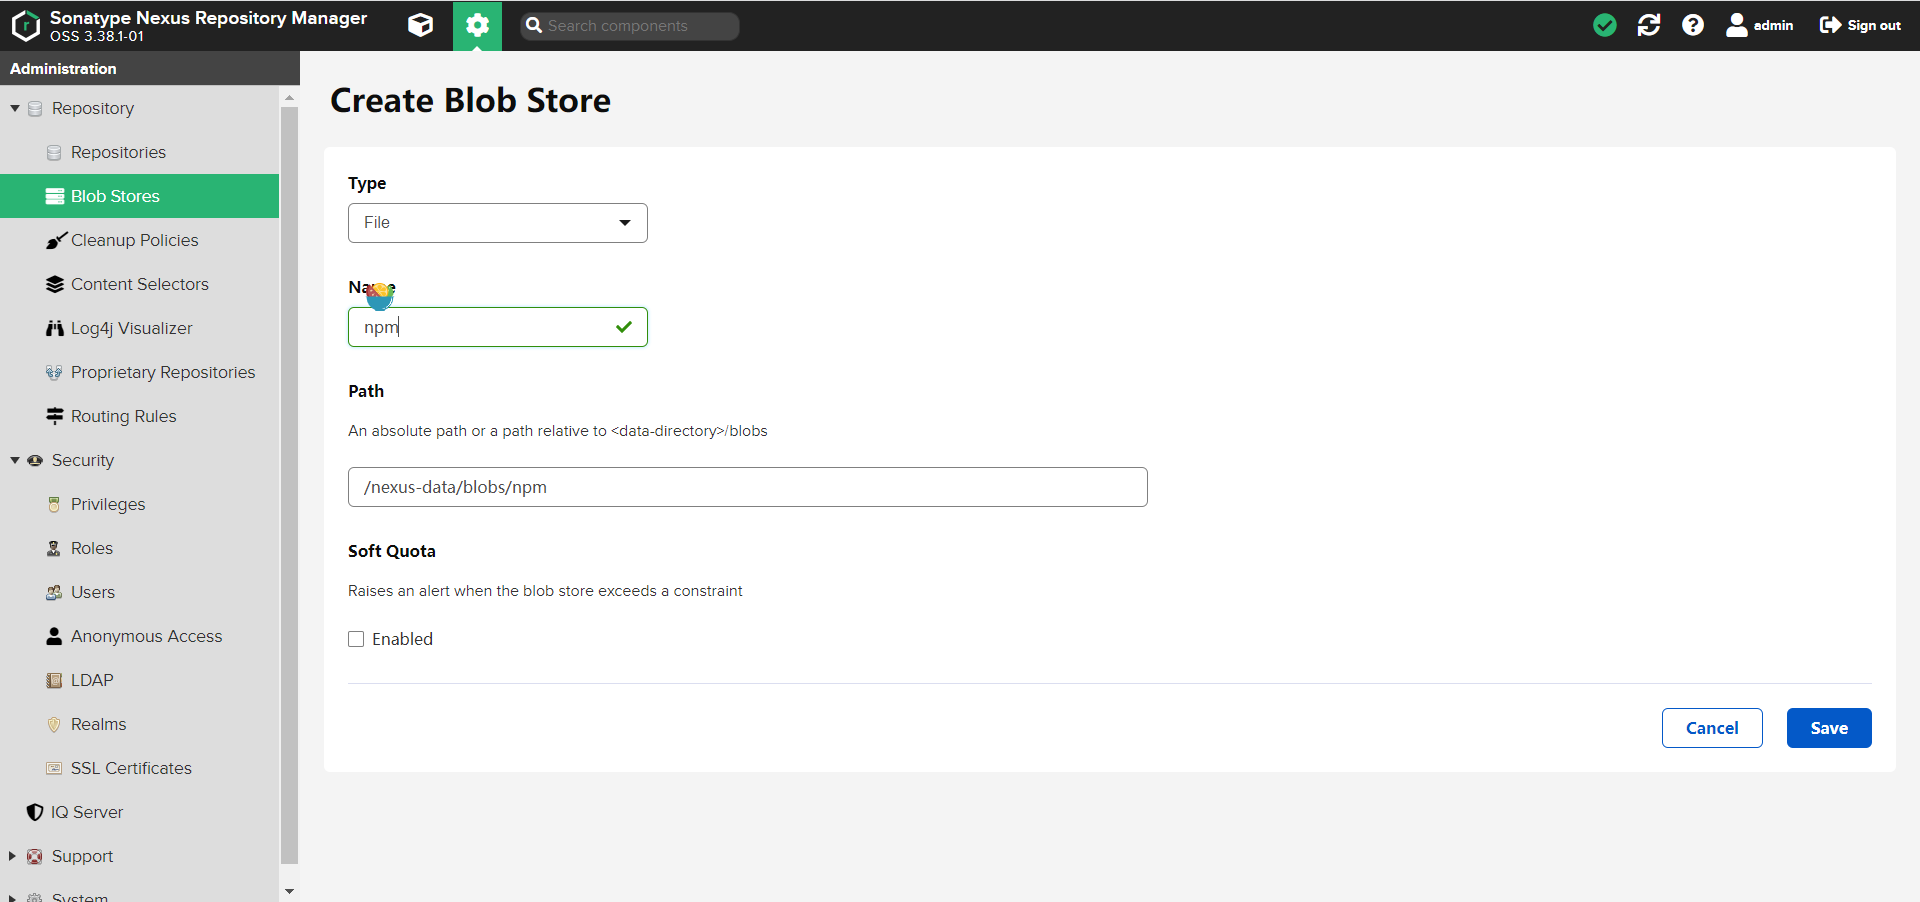
1、新建Blob Stores
2、添加仓库
1、添加官方源
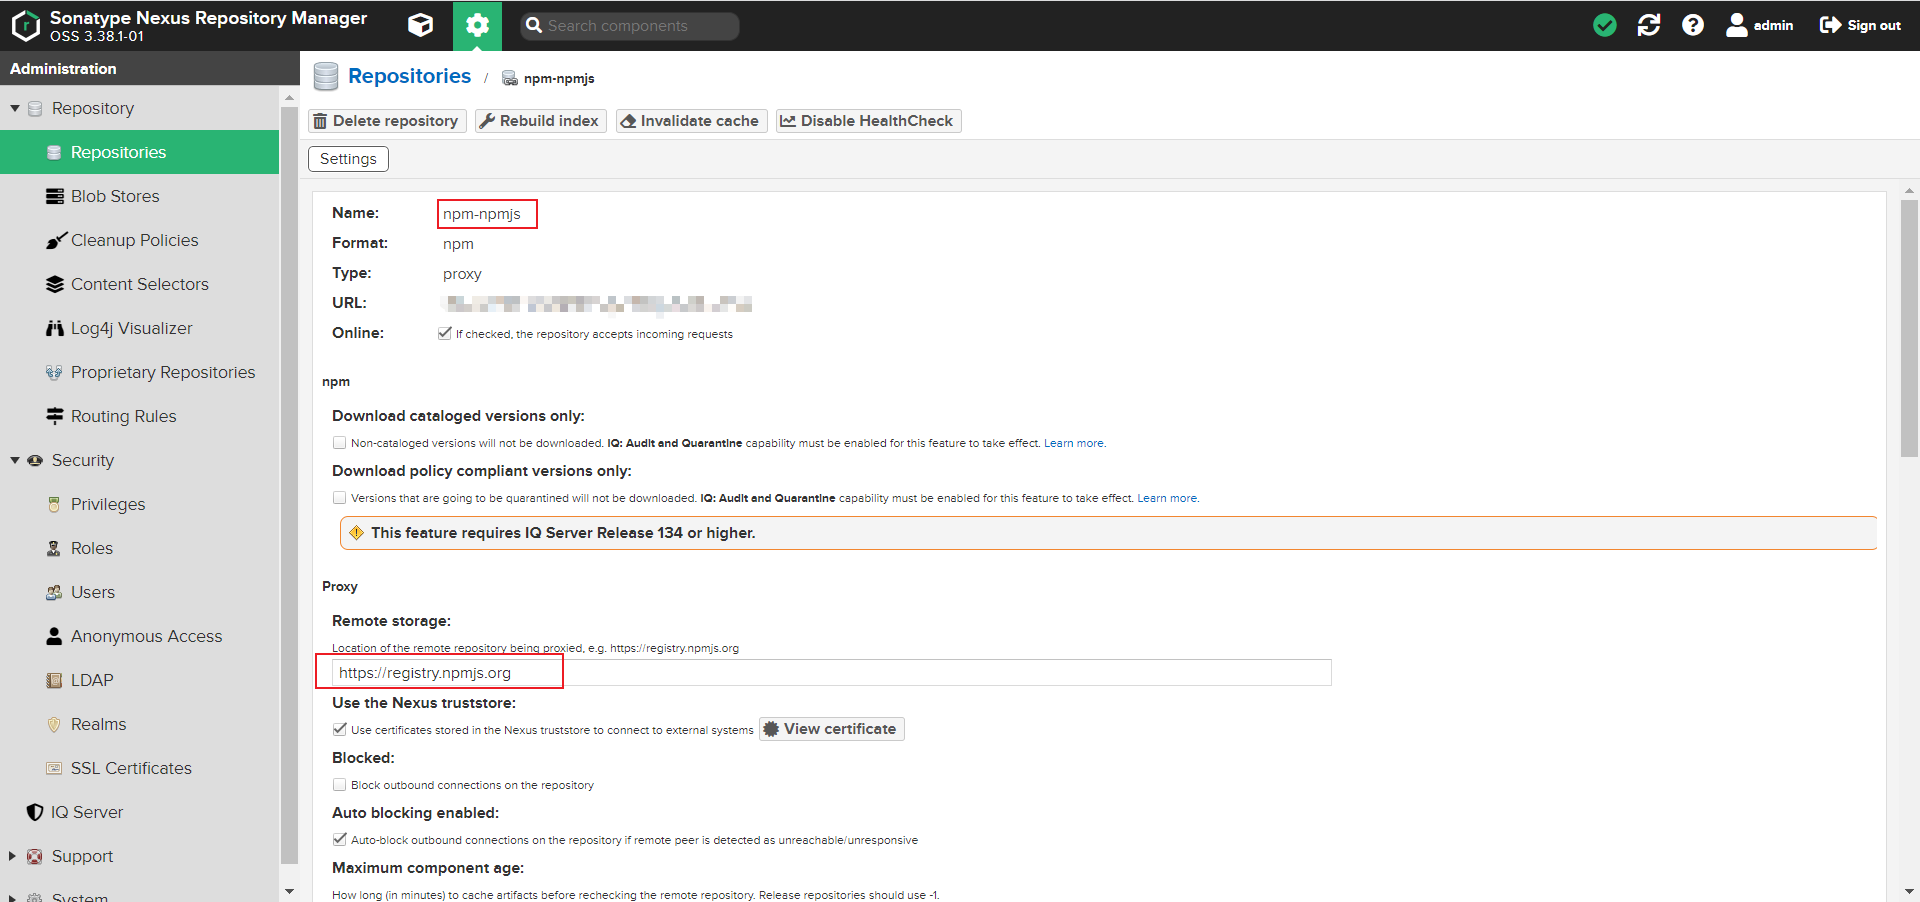
| name | npm-npmjs |
|---|---|
| Remote storage | https://registry.npmjs.org |
| Type | proxy |
2、添加淘宝源
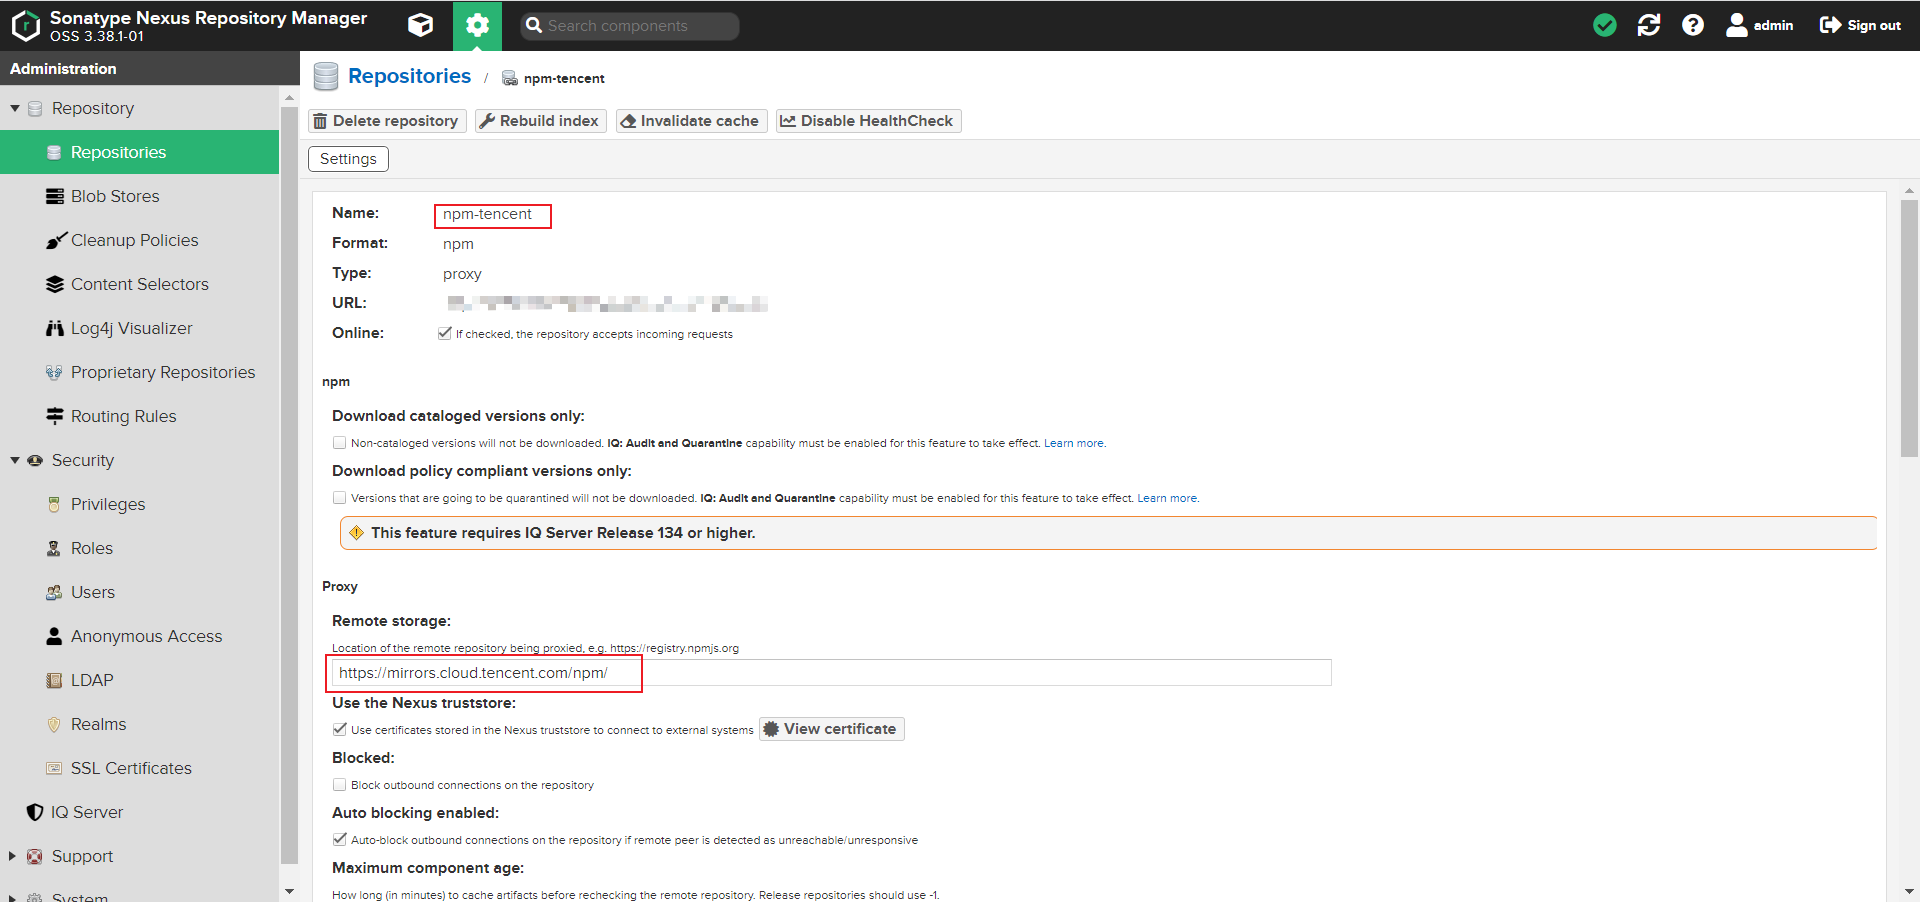
| name | npm-tencent |
|---|---|
| Remote storage | https://mirrors.cloud.tencent.com/npm/ |
| Type | proxy |
3、添加其他源
| name | npm-npmmirror |
|---|---|
| Remote storage | https://registry.npmmirror.com |
| Type | proxy |
| name | npm-yarnpkg |
| Remote storage | https://registry.yarnpkg.com |
| Type | proxy |
4、加入组中
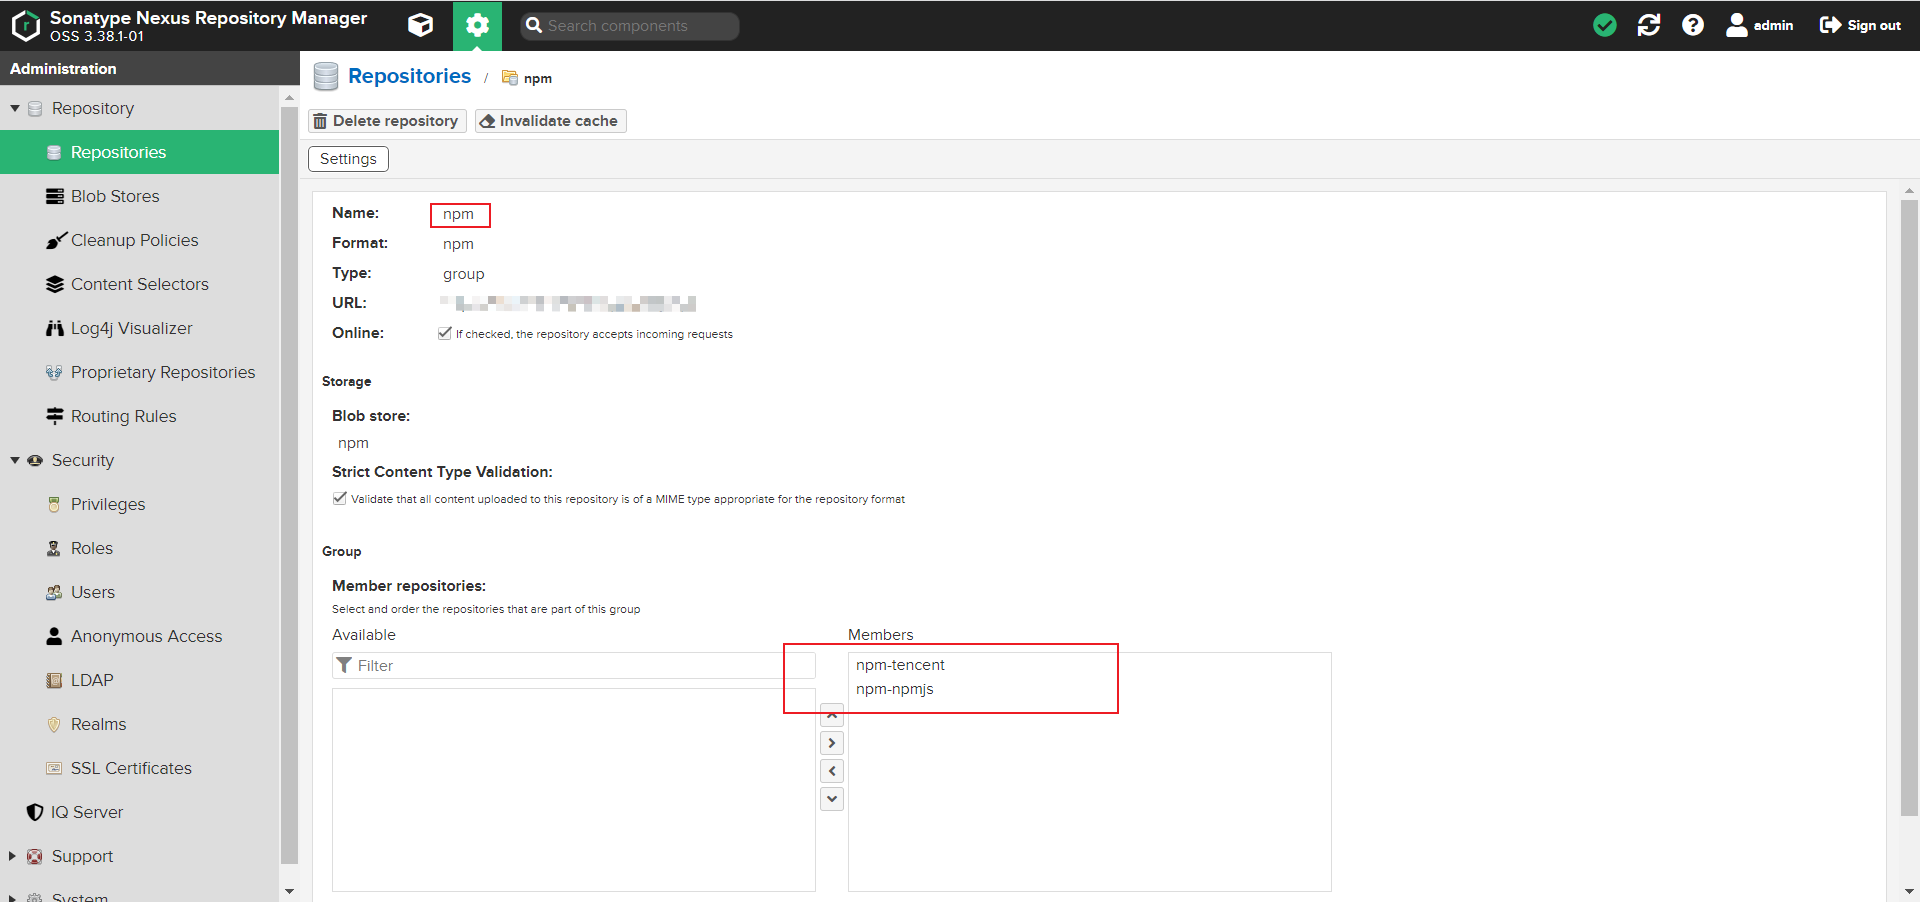
| name | npm |
|---|---|
| Type | group |
5、使用方法
yarn
yarn config set registry http://192.168.1.10:8081/repository/npm/ -g
npm
npm config set registry http://192.168.1.10:8081/repository/npm/ -g
3、设置Ubuntu apt 私有仓库
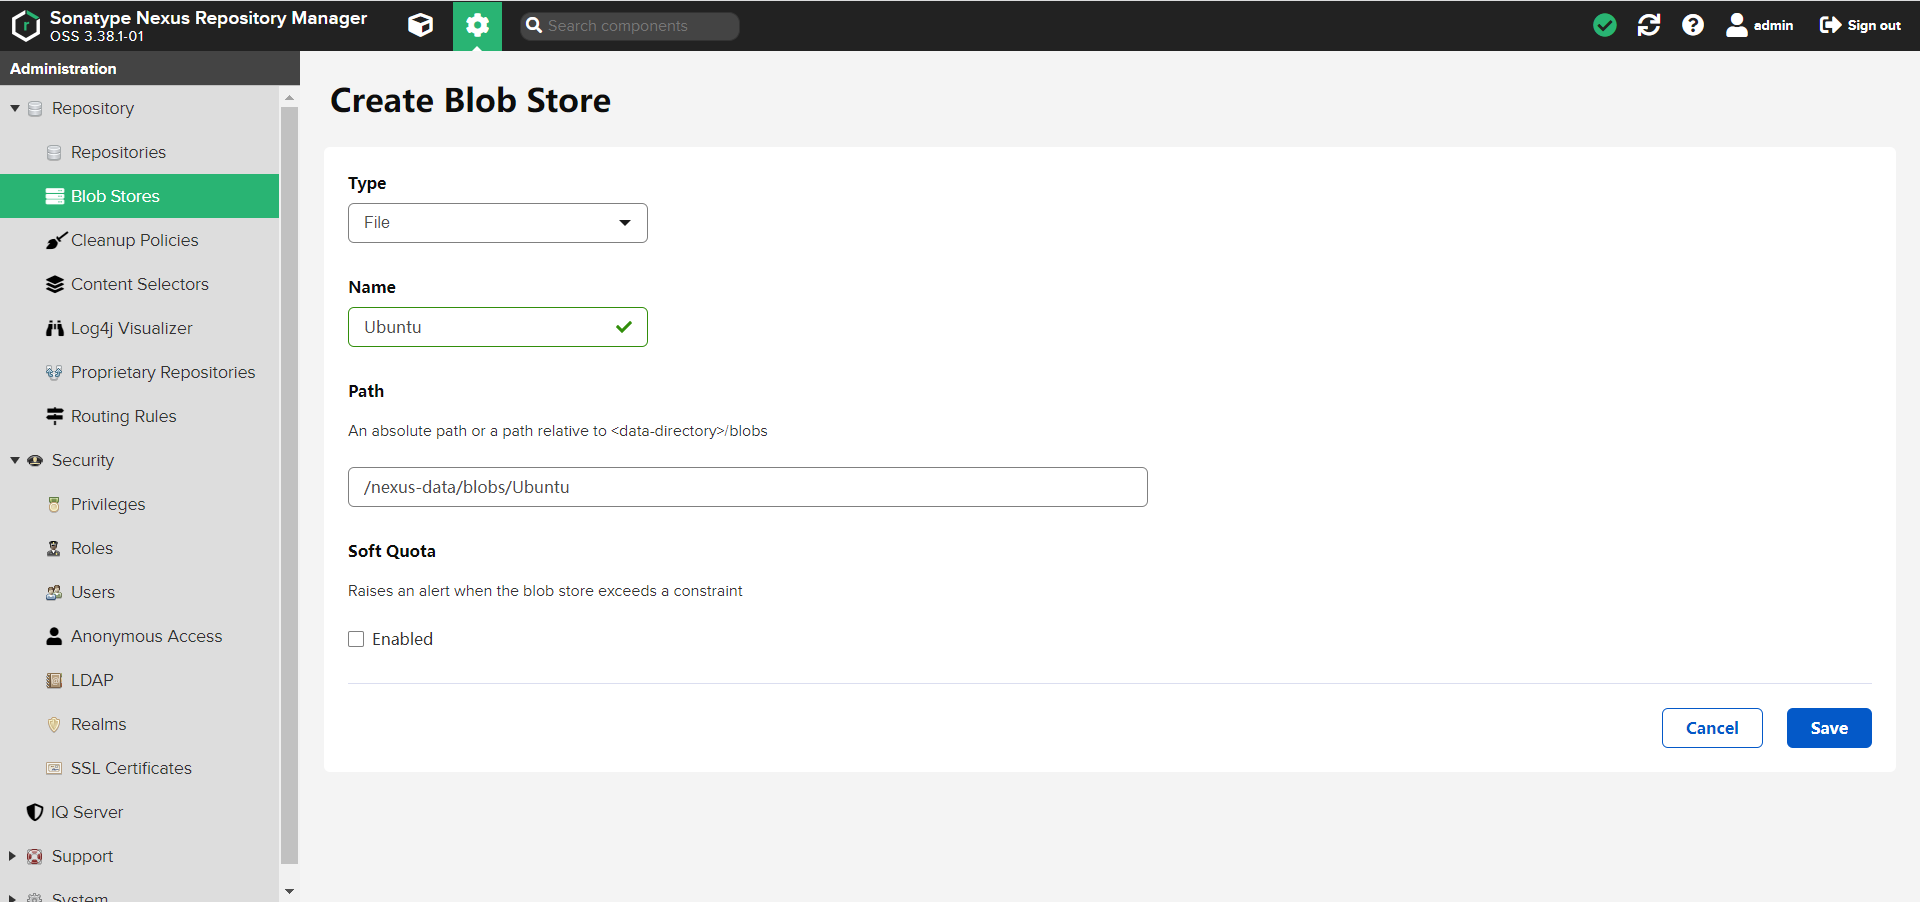
1、新建BlobStores
2、添加仓库
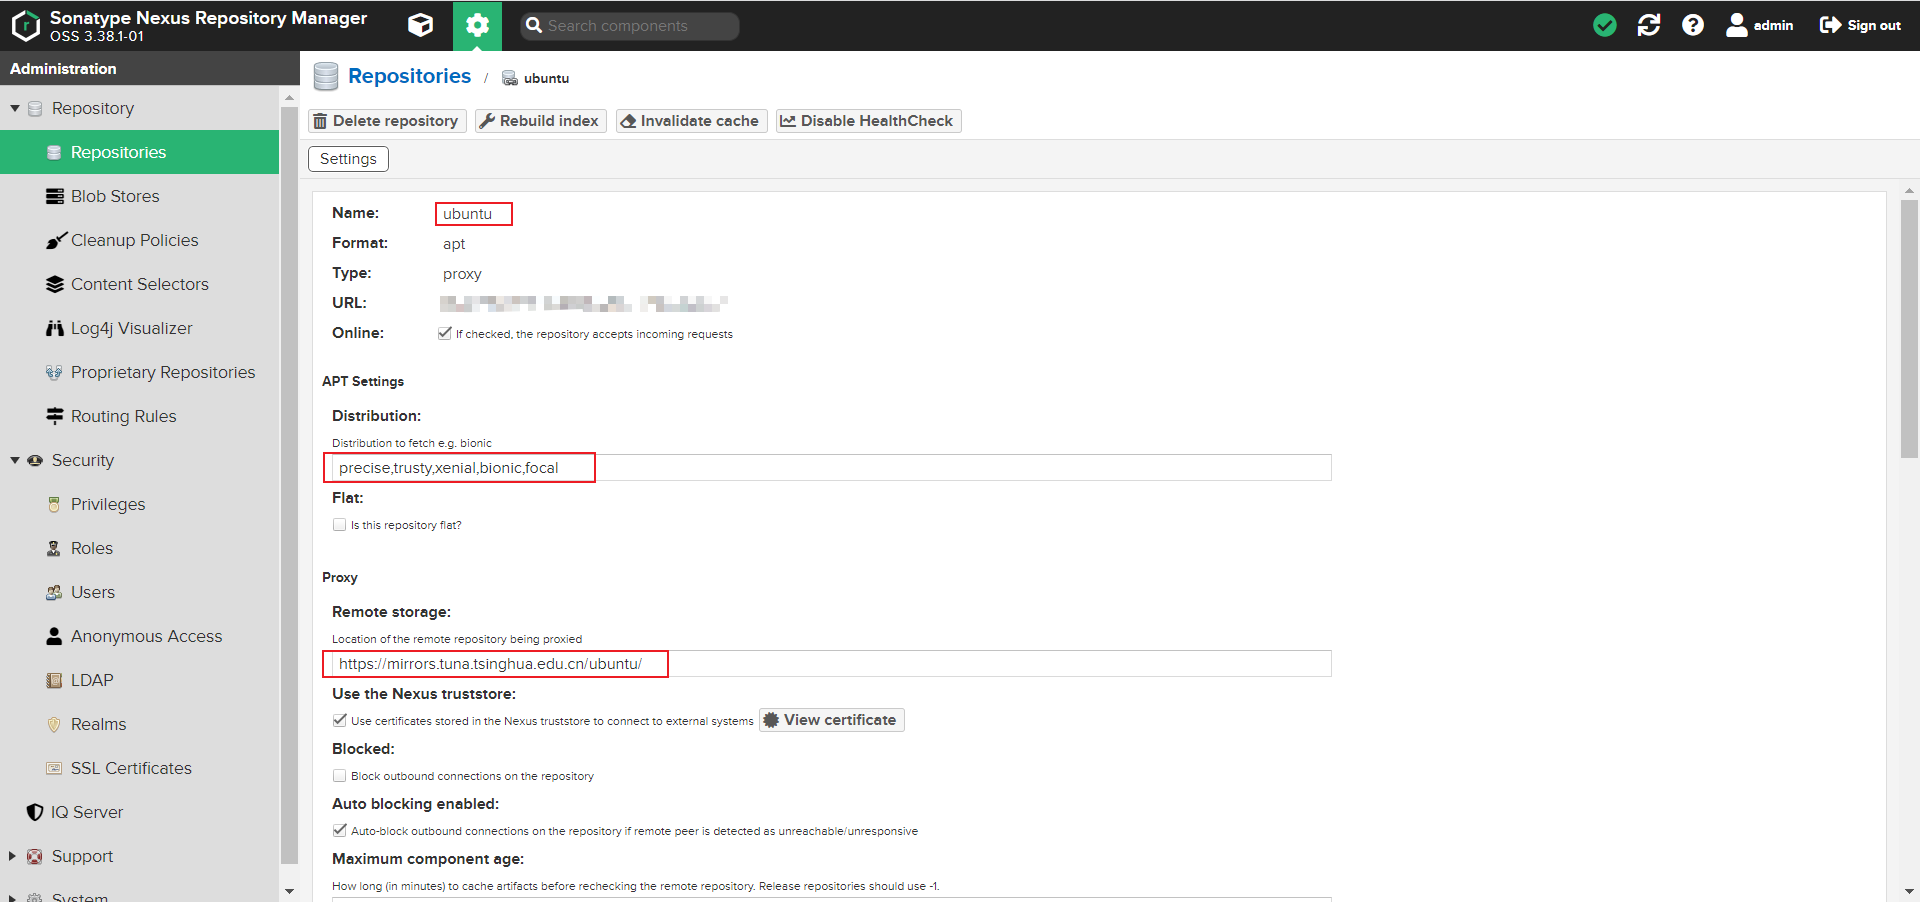
| name | ubuntu |
|---|---|
| Remote storage | https://mirrors.tuna.tsinghua.edu.cn/ubuntu/ |
| Type | proxy |
| Distribution | precise,trusty,xenial,bionic,focal |
| precise | ubuntu系统12.04 |
| trusty | ubuntu系统14.04 |
| xenial | ubuntu系统16.04 |
| bionic | ubuntu系统18.04 |
| focal | ubuntu系统20.04 |
3、使用方法
RUN sed -i 's/archive.ubuntu.com/192.168.1.10:8081\/repository\/ubuntu/g' /etc/apt/sources.list \
    && sed -i 's/security.ubuntu.com/192.168.1.10:8081\/repository\/ubuntu/g' /etc/apt/sources.list
4、设置debian apt 私有仓库
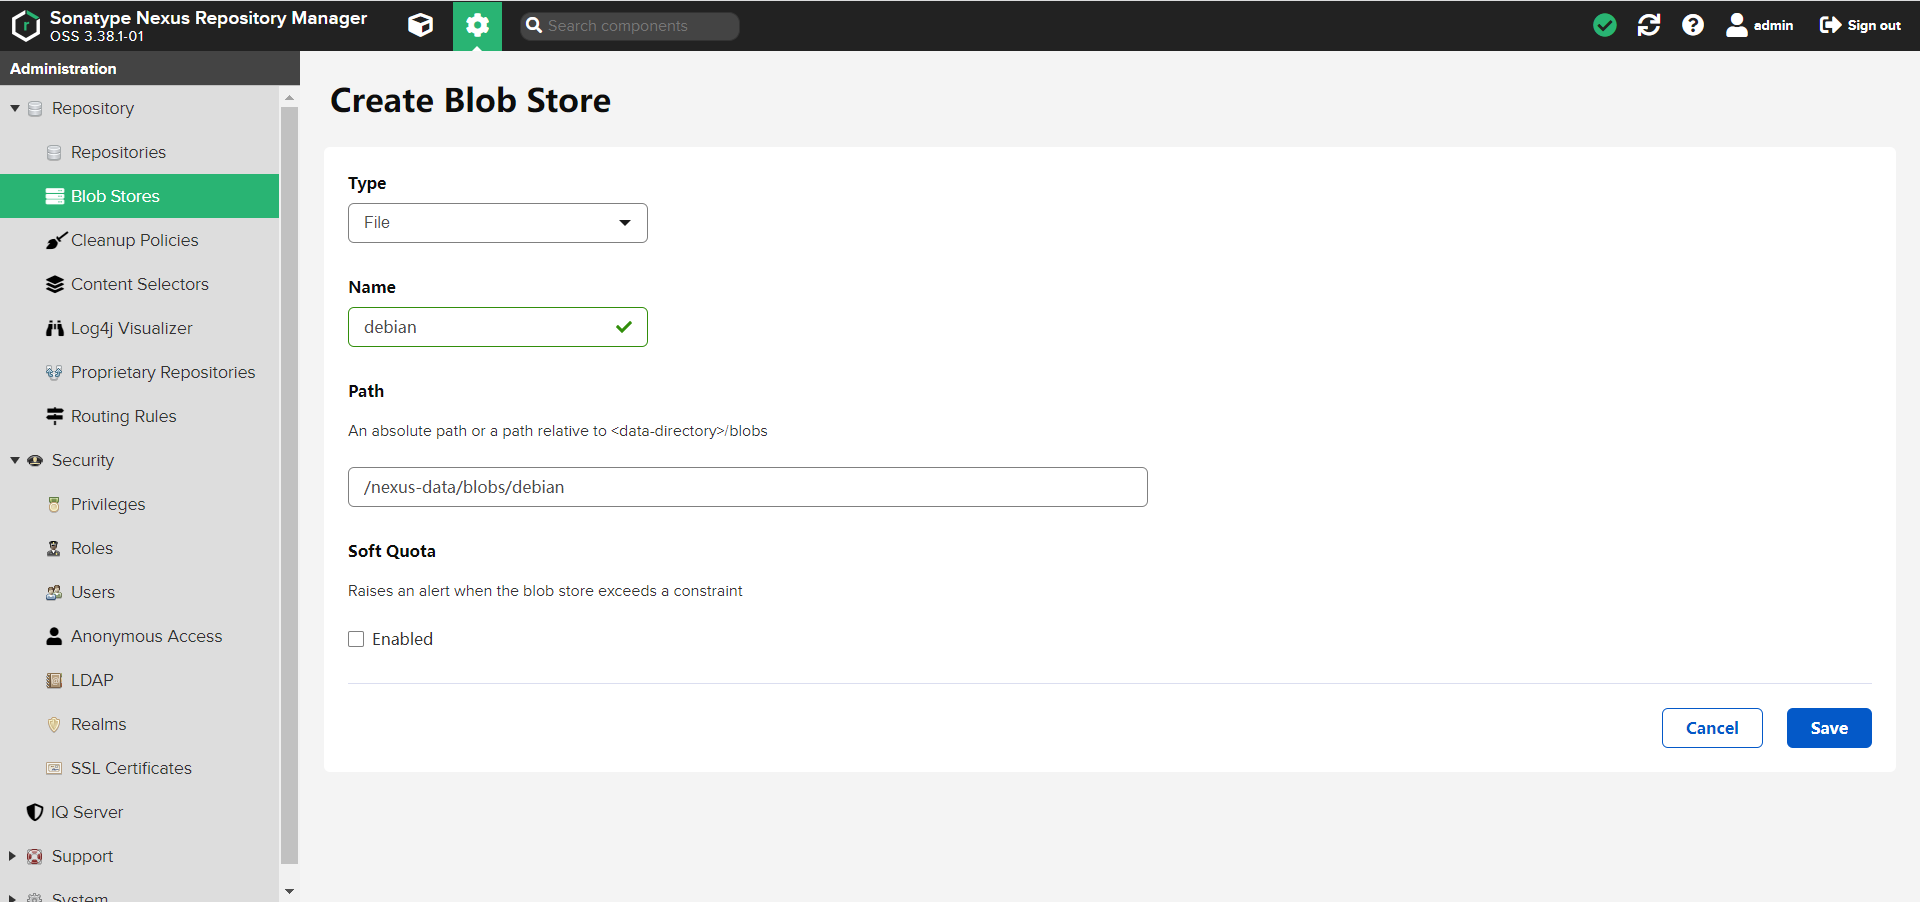
1、新建Blob Stores
2、添加仓库
1、添加软件源
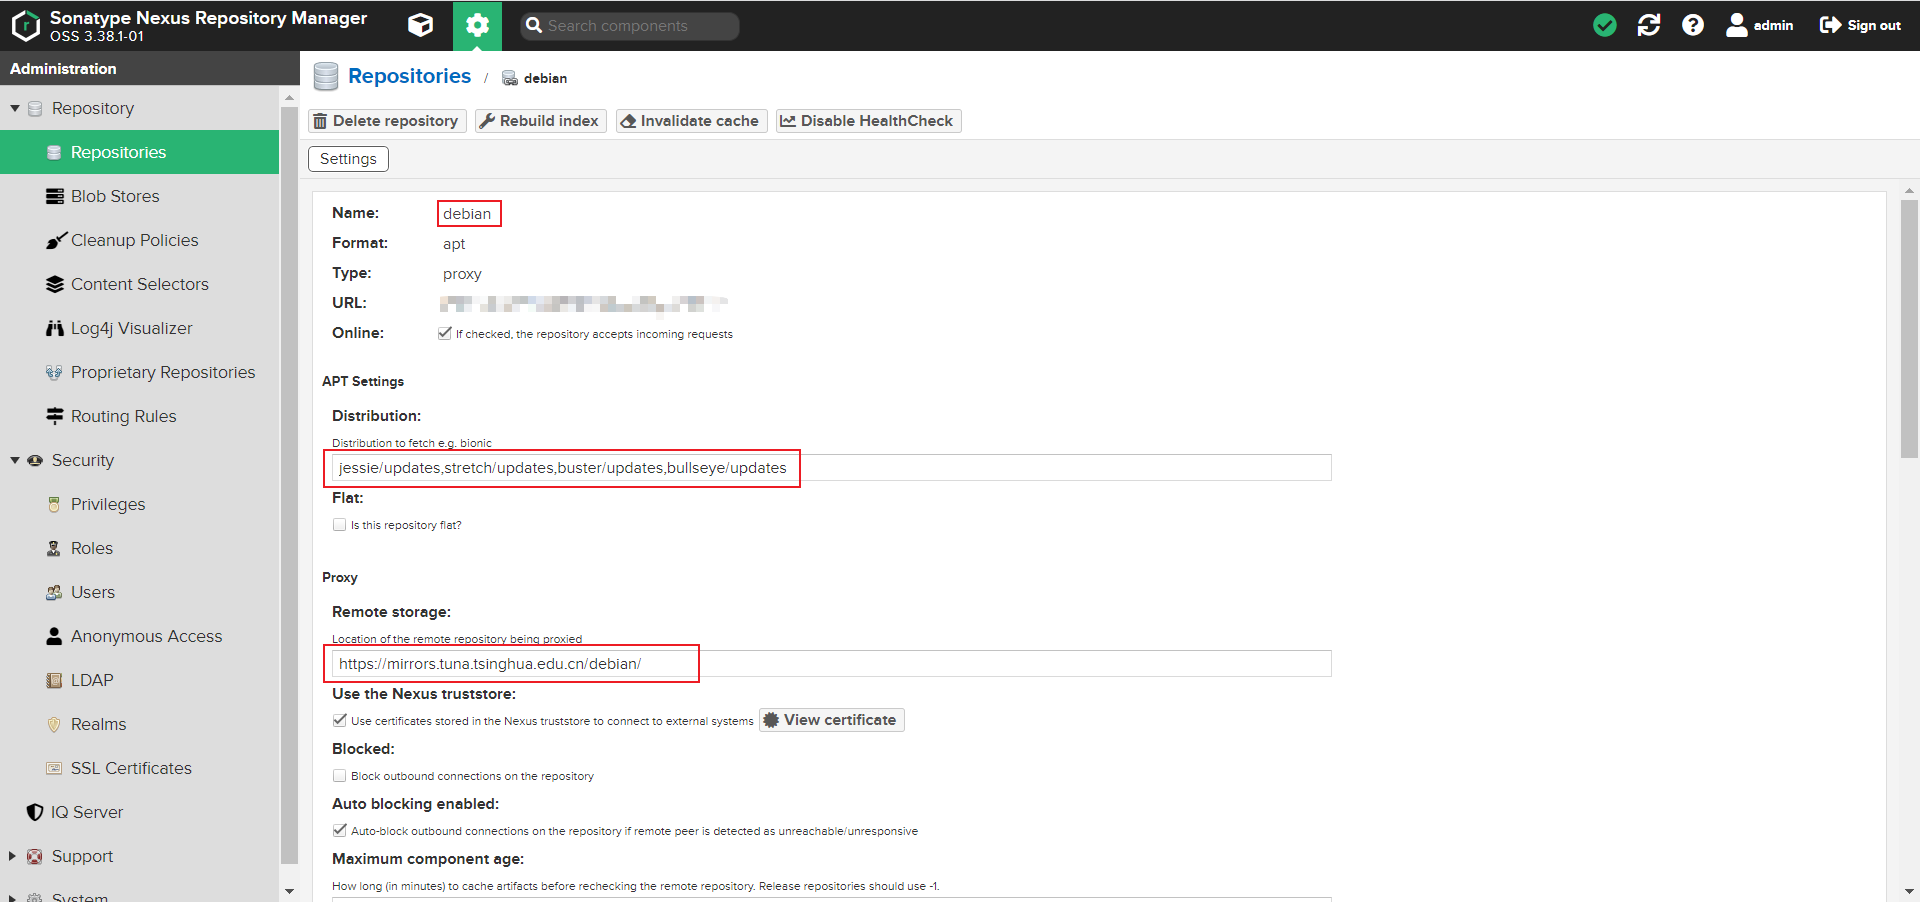
| name | debian |
|---|---|
| Remote storage | https://mirrors.tuna.tsinghua.edu.cn/debian/ |
| Type | proxy |
| Distribution | jessie/updates,stretch/updates,buster/updates,bullseye/updates |
| jessie/updates | debian8 |
| stretch/updates | debian9 |
| buster/updates | debian10 |
| bullseye/updates | debian11 |
2、添加安全更新源
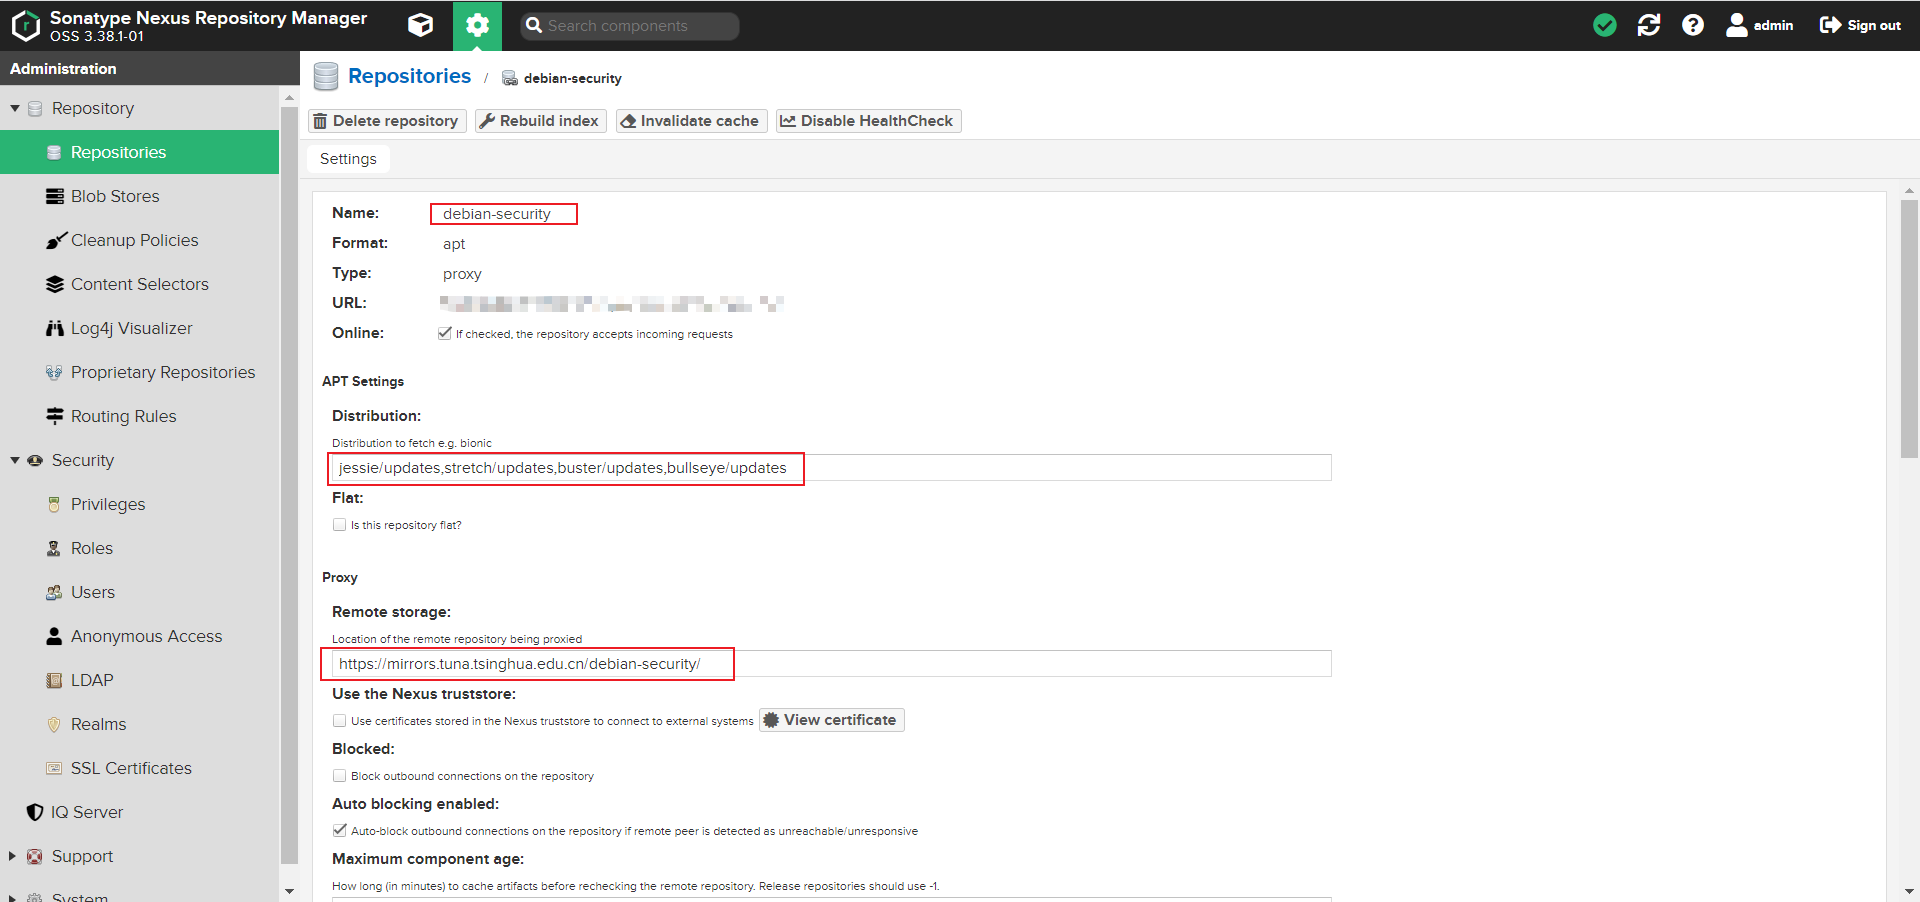
| name | debian |
|---|---|
| Remote storage | https://mirrors.tuna.tsinghua.edu.cn/debian-security/ |
| Type | proxy |
| Distribution | jessie/updates,stretch/updates,buster/updates,bullseye/updates |
3、使用方法
RUN sed -i 's/deb.debian.org/192.168.1.10:8081\/repository/g' /etc/apt/sources.list \
    && sed -i ' s/security.debian.org/192.168.1.10:8081\/repository/g' /etc/apt/sources.list
5、设置apline apk 私有仓库
1、新建Blob Stores
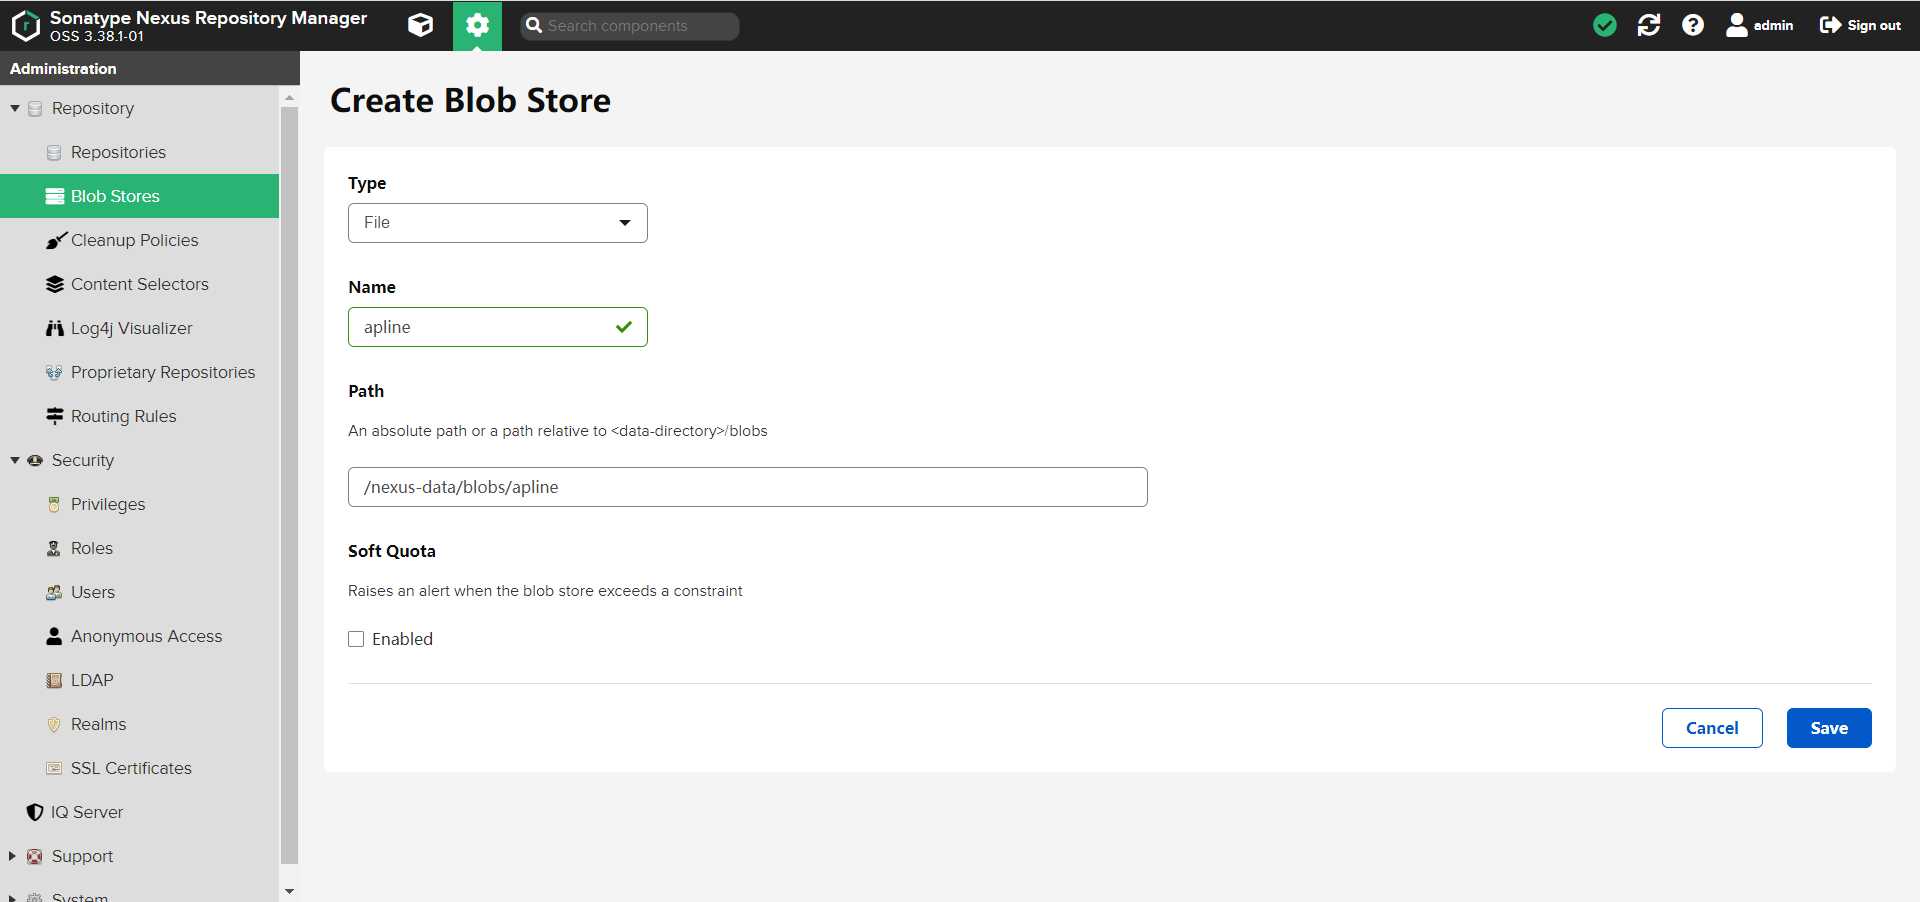
2、添加仓库
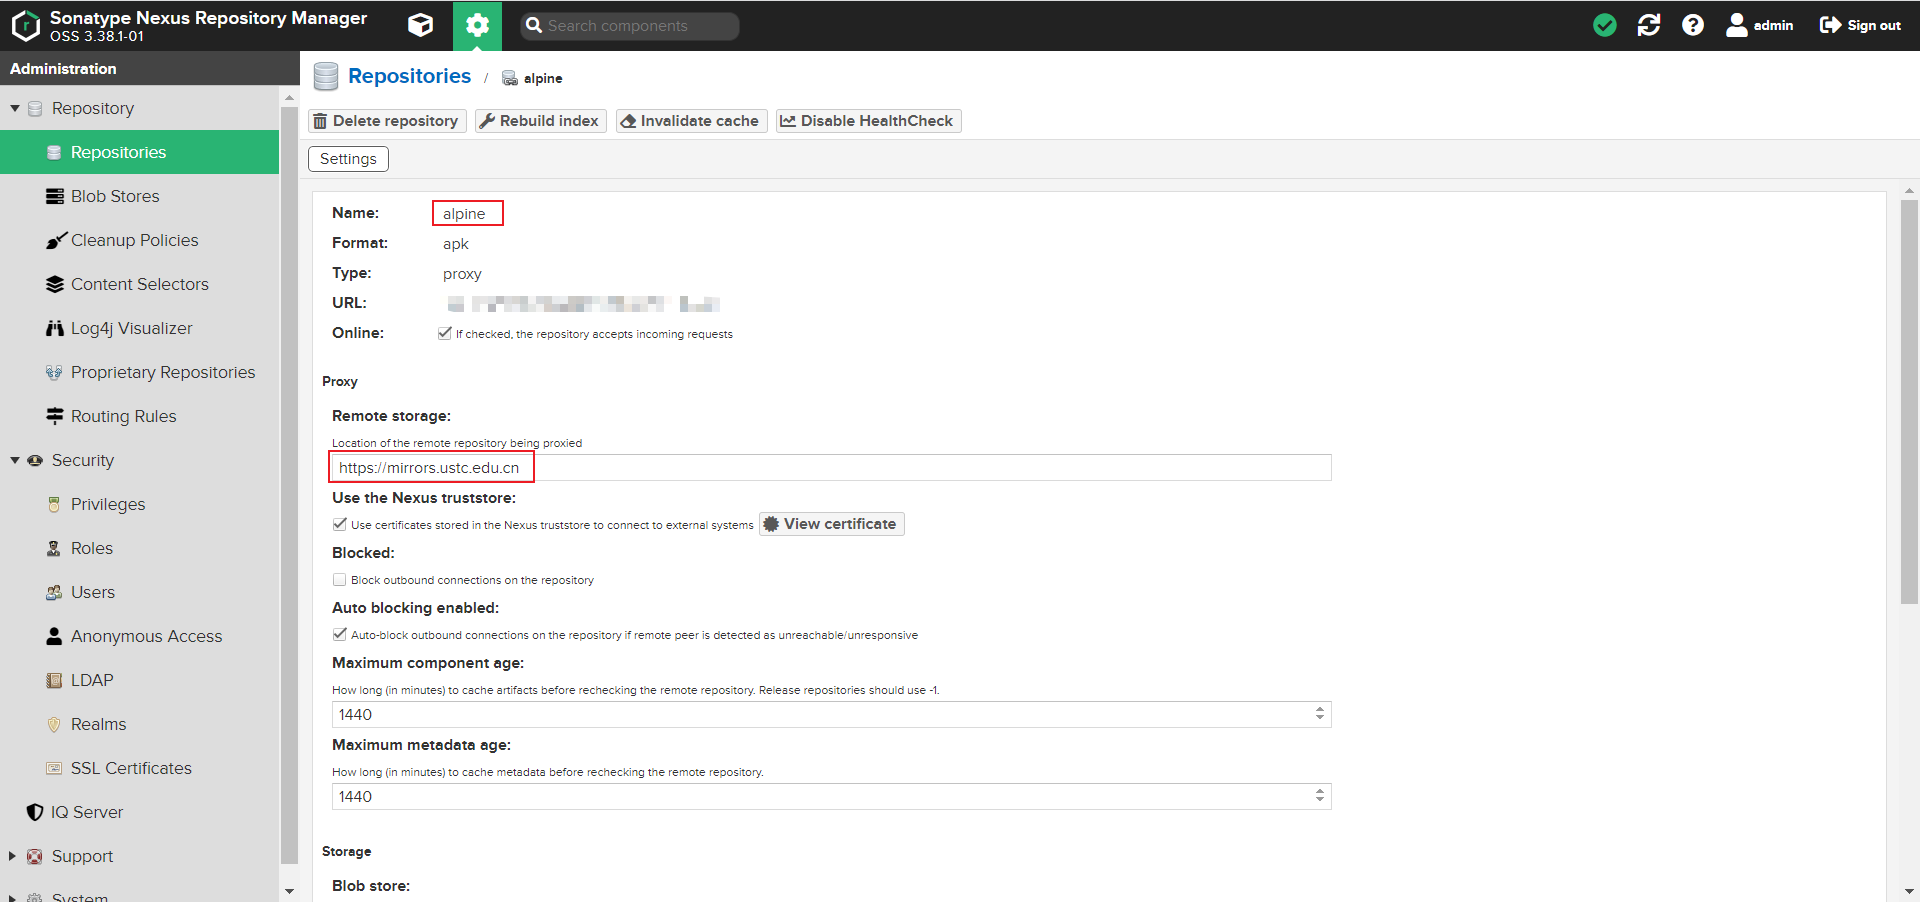
| name | alpine |
|---|---|
| Remote storage | https://mirrors.ustc.edu.cn |
| Type | proxy |
3、使用方法
RUN sed -i 's/https:\/\/dl-cdn.alpinelinux.org/http:\/\/192.168.1.10:8081\/repository\/alpine/g' /etc/apk/repositories
4、关于alpine私有仓库初次无法使用的解决办法
问题出在仓库内没有APKINDEX.tar.gz文件,所以需要在本地提前拉取
先创建两个文件
# vim dockerfile
FROM alpine
RUN sed -i 's/https:\/\/dl-cdn.alpinelinux.org/http:\/\/192.168.1.10:8081\/repository\/alpine/g' /etc/apk/repositories
RUN apk update \
    && apk add --no-cache build-base
# vim Makefile
build:
        docker build -t mirrors-demo:apk .
然后执行
# make build
docker build -t mirrors-demo:apk .
Sending build context to Docker daemon  3.072kB
Step 1/3 : FROM alpine
latest: Pulling from library/alpine
59bf1c3509f3: Pull complete
Digest: sha256:21a3deaa0d32a8057914f36584b5288d2e5ecc984380bc0118285c70fa8c9300
Status: Downloaded newer image for alpine:latest
 ---> c059bfaa849c
Step 2/3 : RUN sed -i 's/https:\/\/dl-cdn.alpinelinux.org/http:\/\/192.168.1.10:8081\/repository\/alpine/g' /etc/apk/repositories
 ---> Running in c8f59adac91a
Removing intermediate container c8f59adac91a
 ---> a75f98a6c517
Step 3/3 : RUN apk update     && apk add --no-cache build-base
 ---> Running in 2b82b3cb3af5
fetch http://192.168.1.10:8081/repository/alpine/alpine/v3.15/main/x86_64/APKINDEX.tar.gz
fetch http://192.168.1.10:8081/repository/alpine/alpine/v3.15/community/x86_64/APKINDEX.tar.gz
v3.15.6-98-gc05f68e80a [http://192.168.1.10:8081/repository/alpine/alpine/v3.15/main]
v3.15.6-94-gbcf1bd4598 [http://192.168.1.10:8081/repository/alpine/alpine/v3.15/community]
OK: 15864 distinct packages available
fetch http://192.168.1.10:8081/repository/alpine/alpine/v3.15/main/x86_64/APKINDEX.tar.gz
fetch http://192.168.1.10:8081/repository/alpine/alpine/v3.15/community/x86_64/APKINDEX.tar.gz
..........
6、设置golang 私有仓库
1、新建Blob Stores
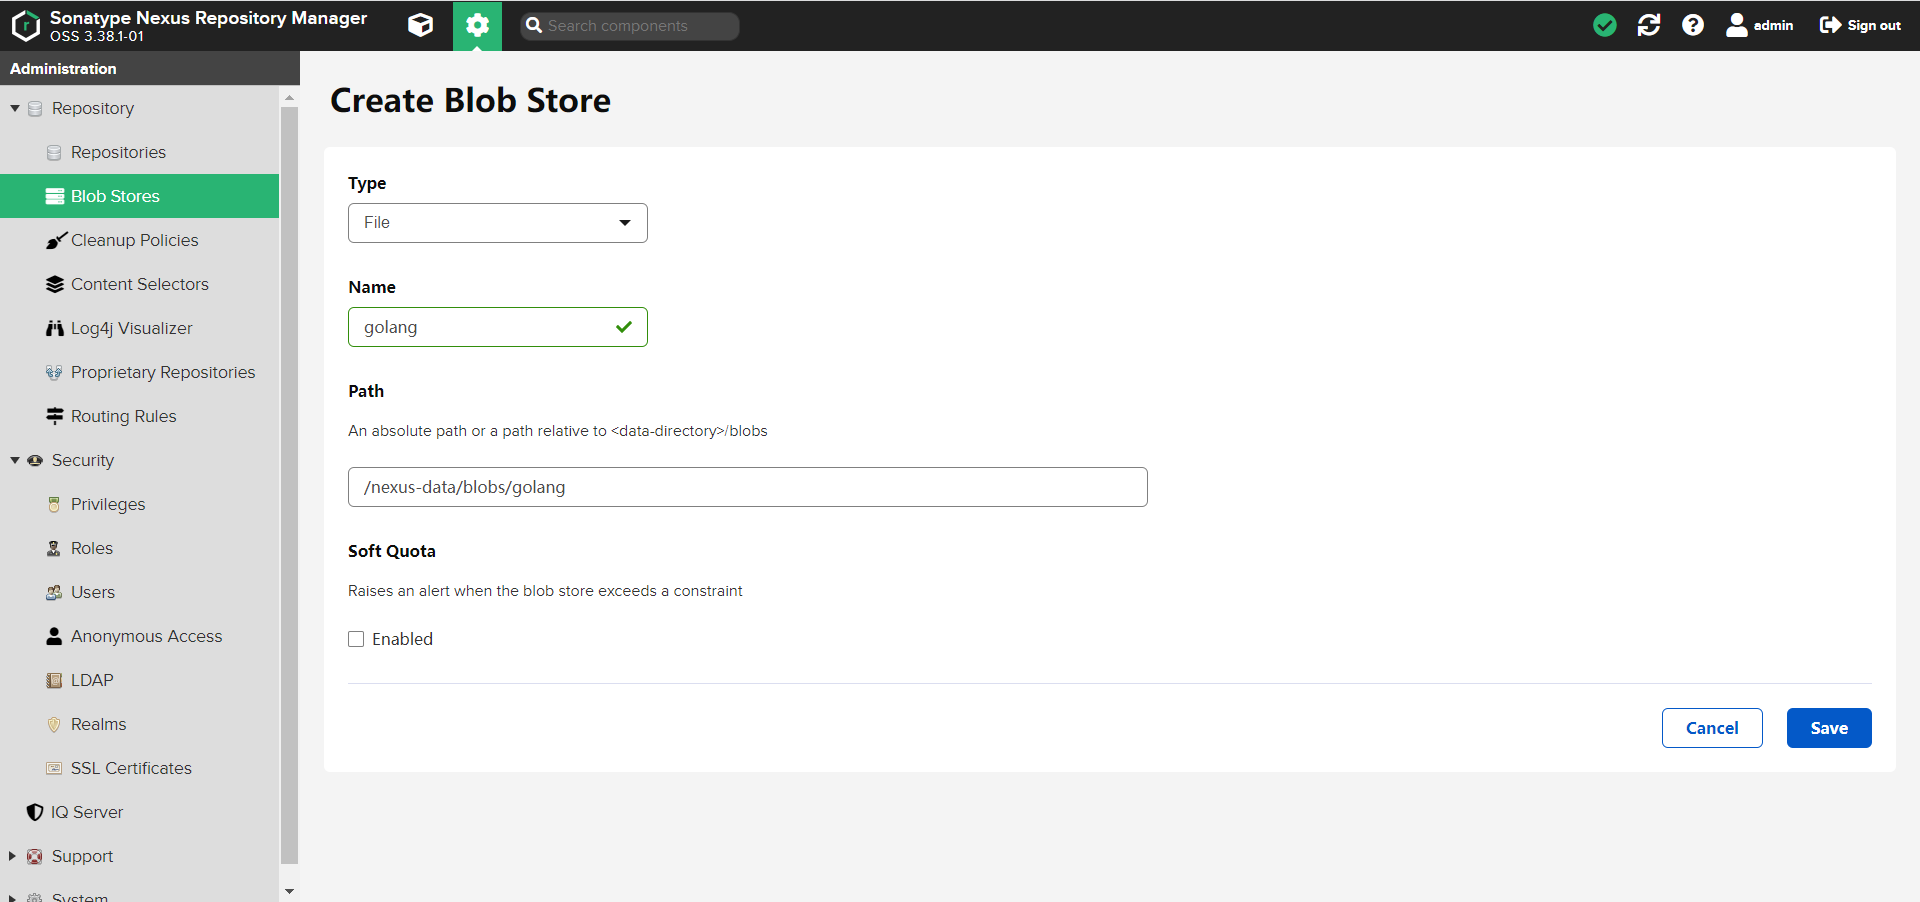
2、添加仓库
1、添加官方镜像
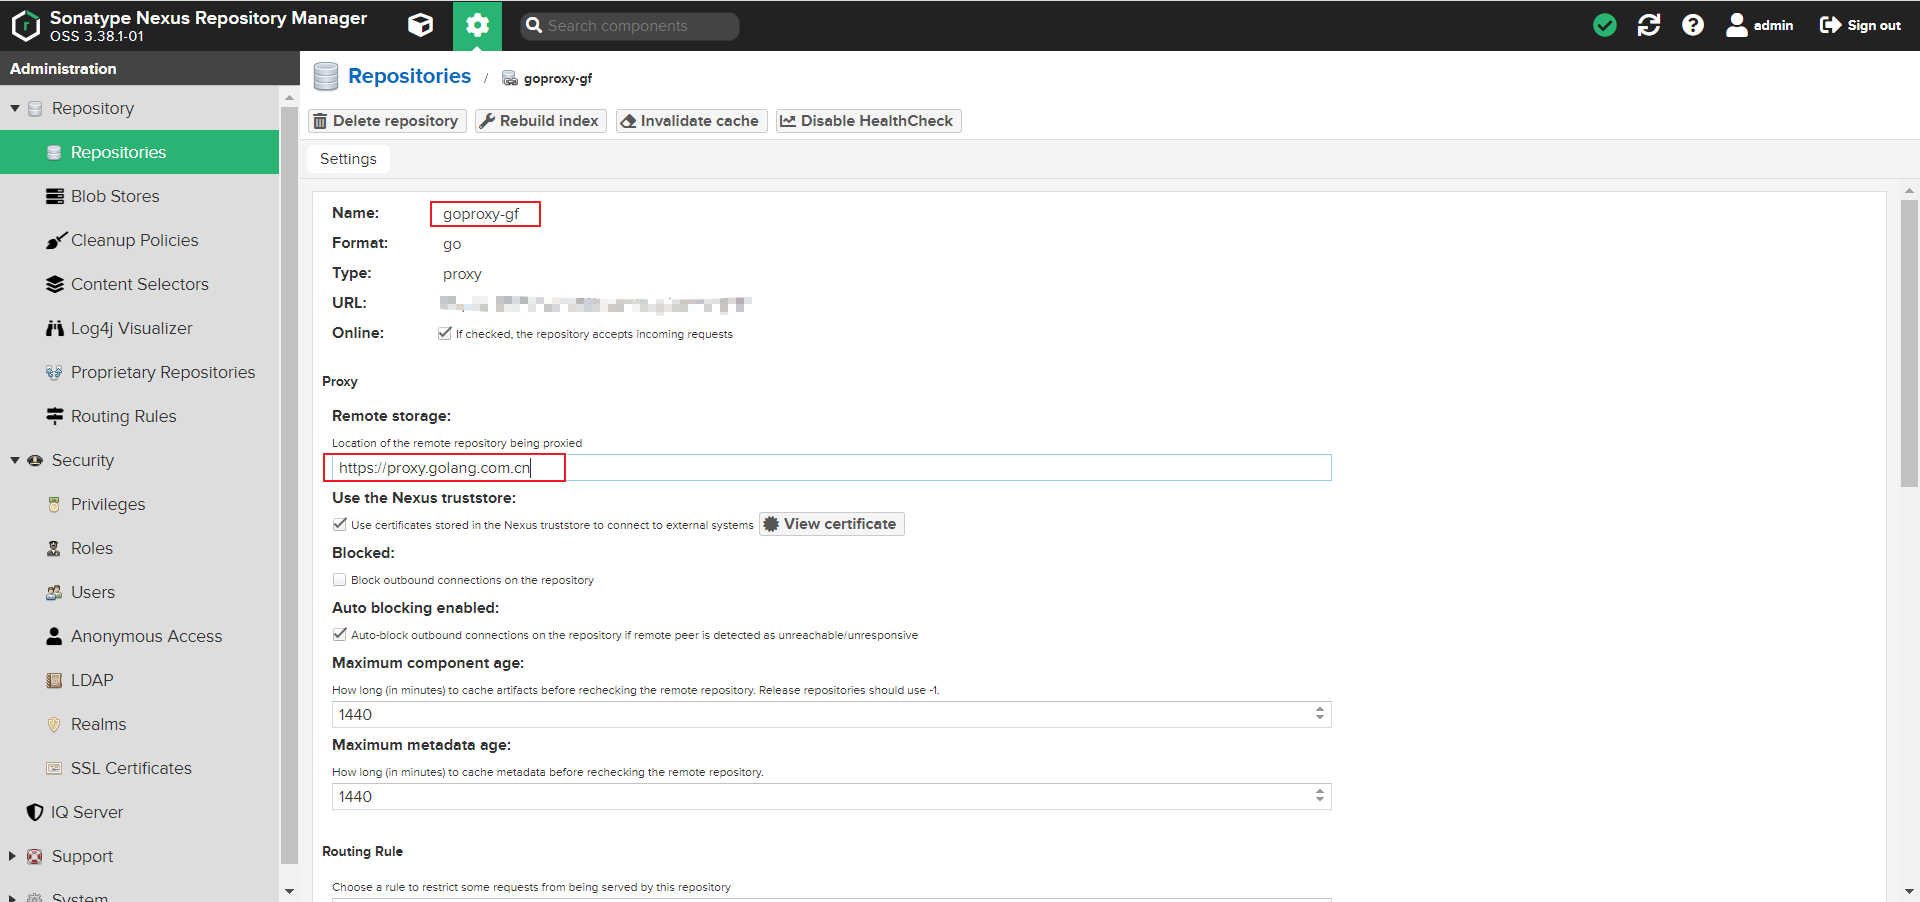
| name | goproxy-gf |
|---|---|
| Remote storage | https://proxy.golang.com.cn |
| Type | proxy |
2、添加七牛云镜像
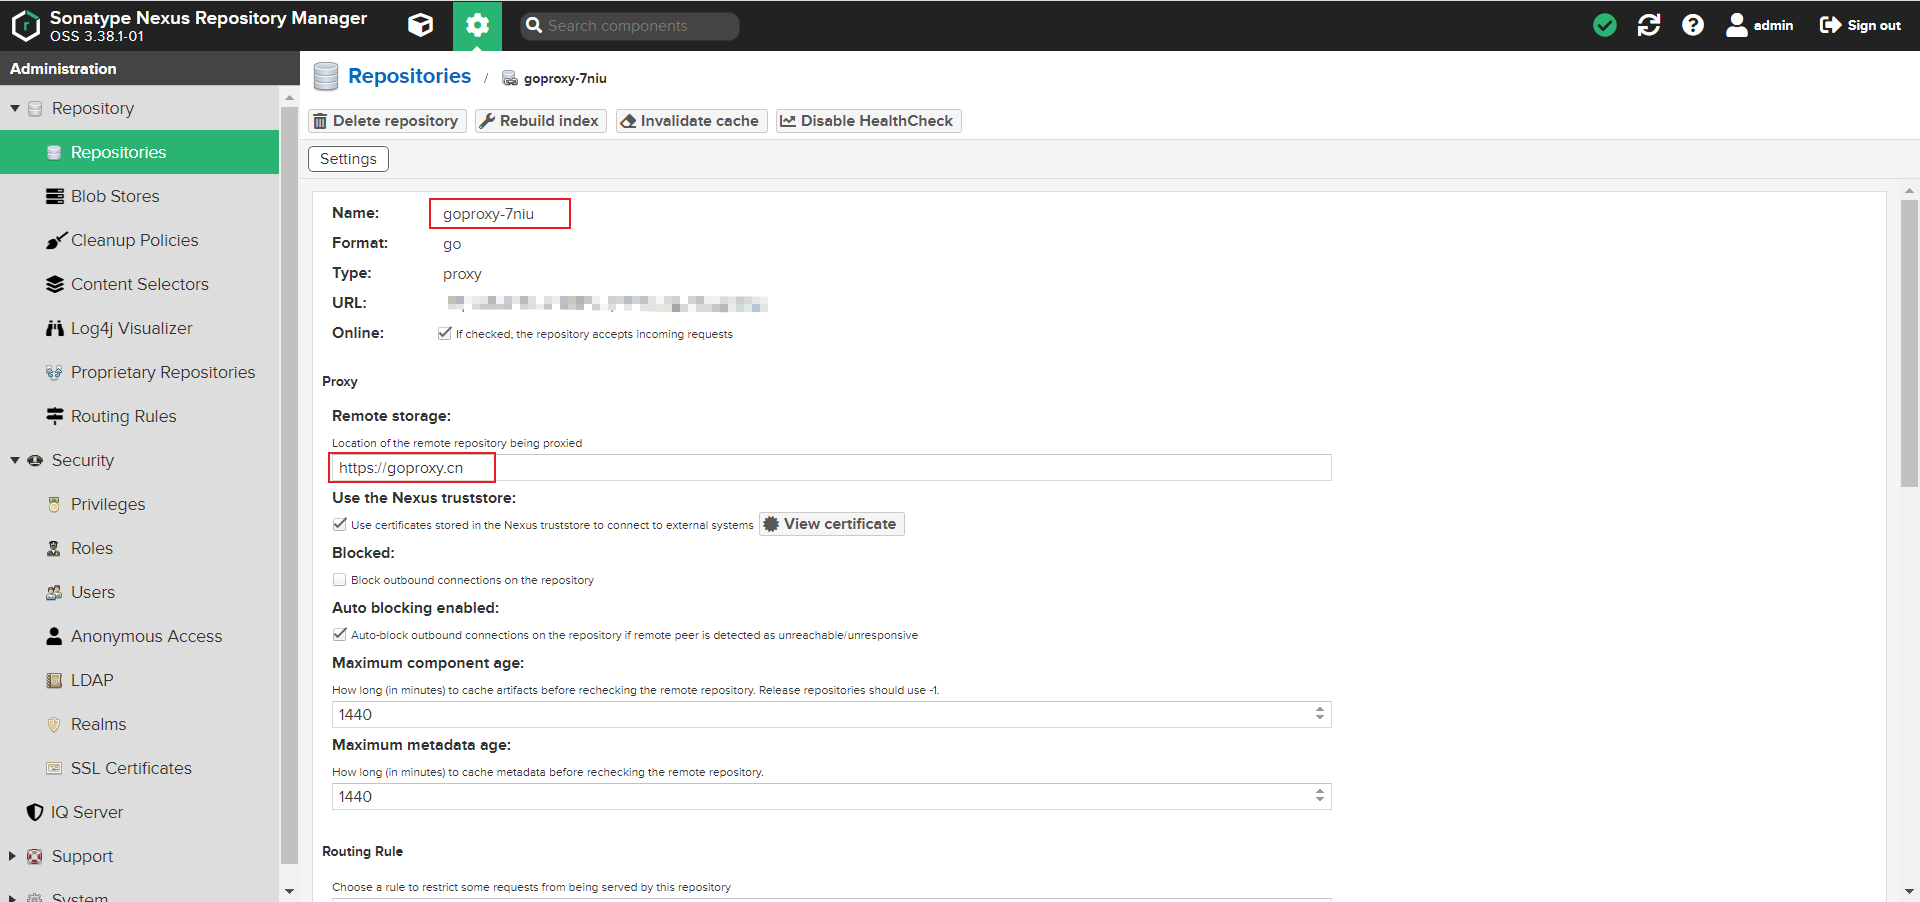
| name | goproxy-7niu |
|---|---|
| Remote storage | https://goproxy.cn |
| Type | proxy |
3、加入组中
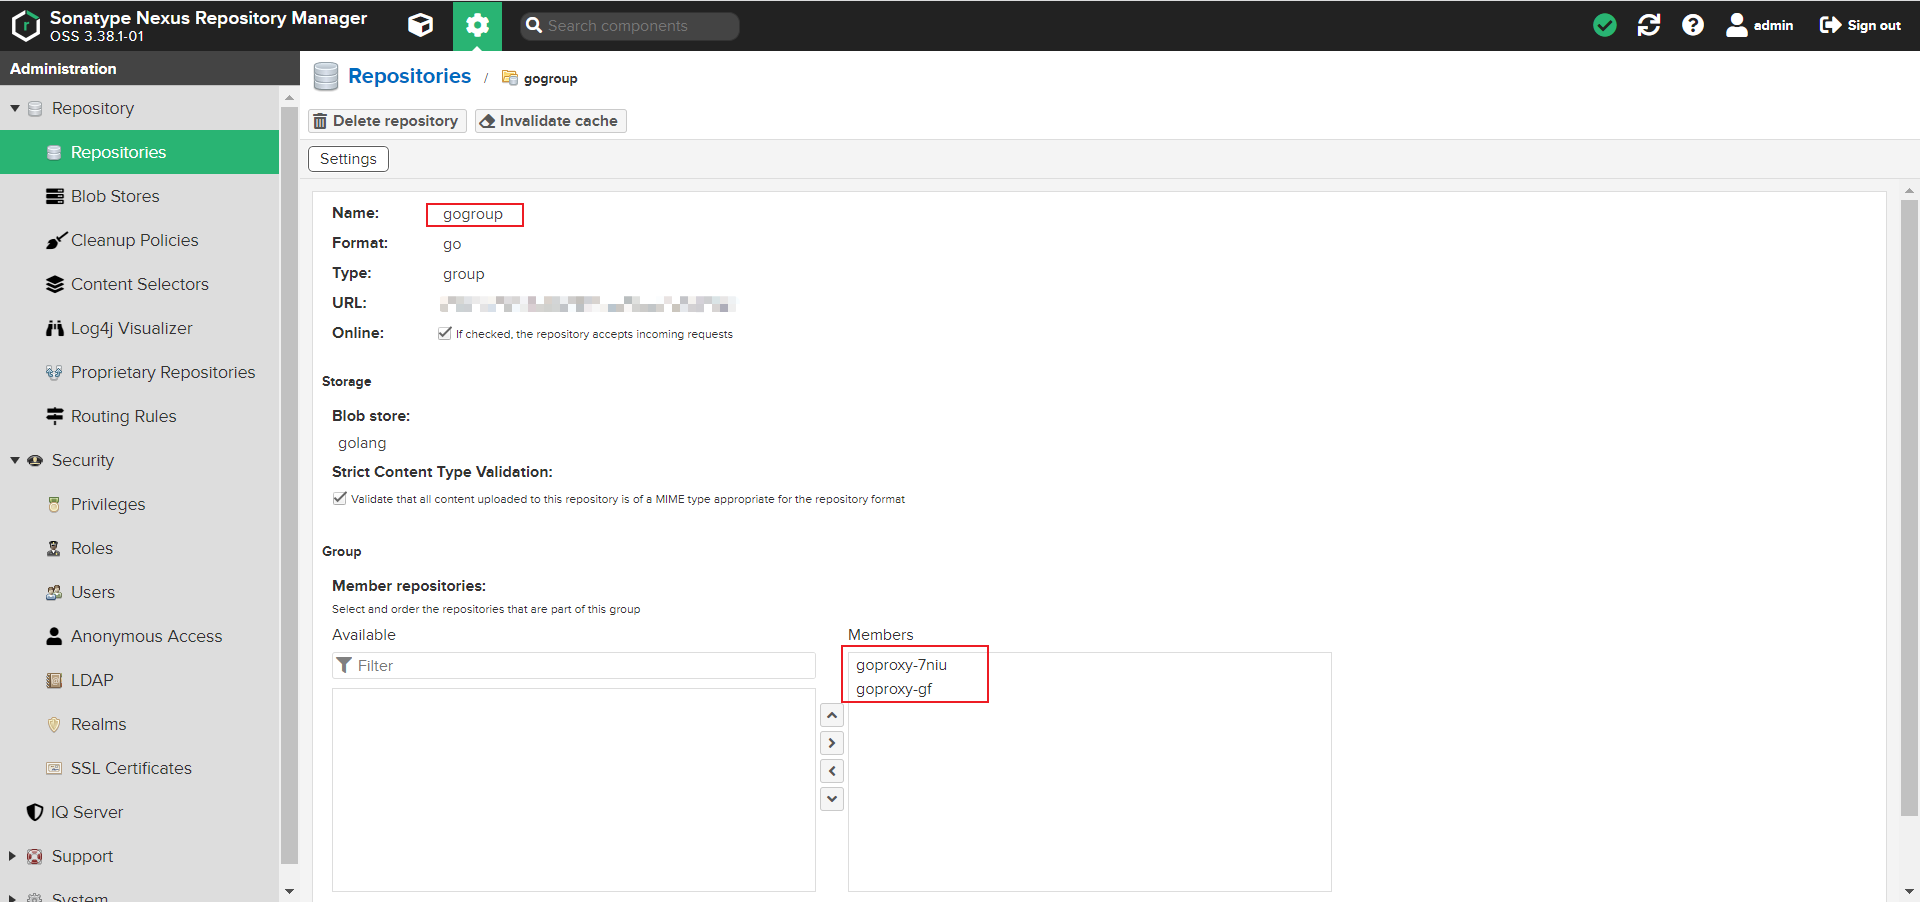
| name | gogroup |
|---|---|
| Type | group |
4、使用方法
# vim /etc/profile
export GO111MODULE=on
export GOPROXY=http://192.168.1.10:8081/repository/gogroup/
# source /etc/profile
7、设置 Helm 私有仓库
Nexus从3.21.1开始正式支持Helm charts仓库的管理。之前一直是使用第三方插件的形式支持的。
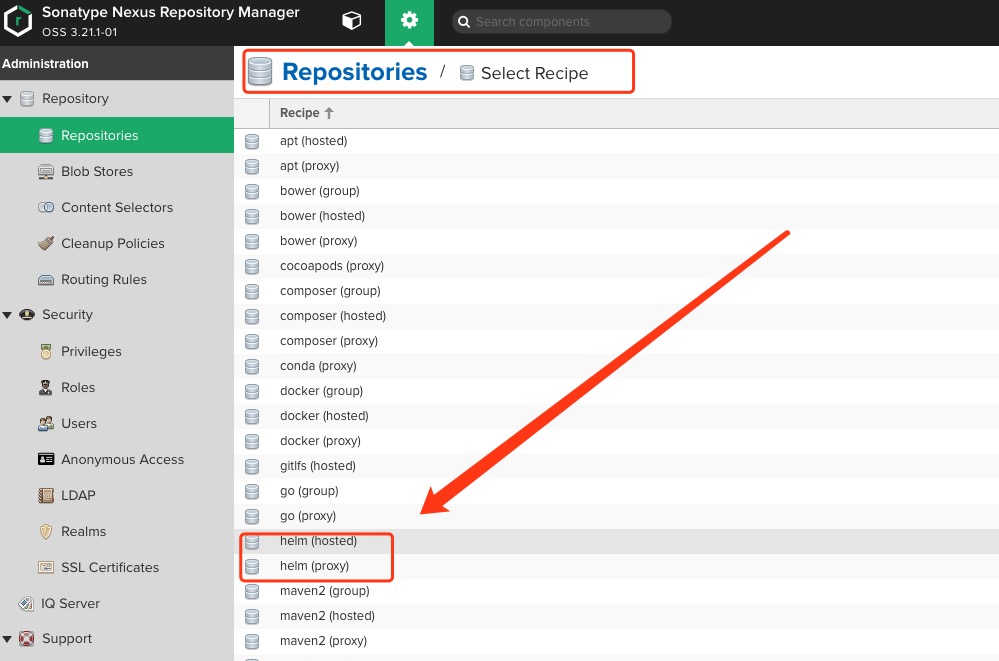
目前暂时支持Hosted和Proxy类型的Helm仓库
1、配置
Proxy
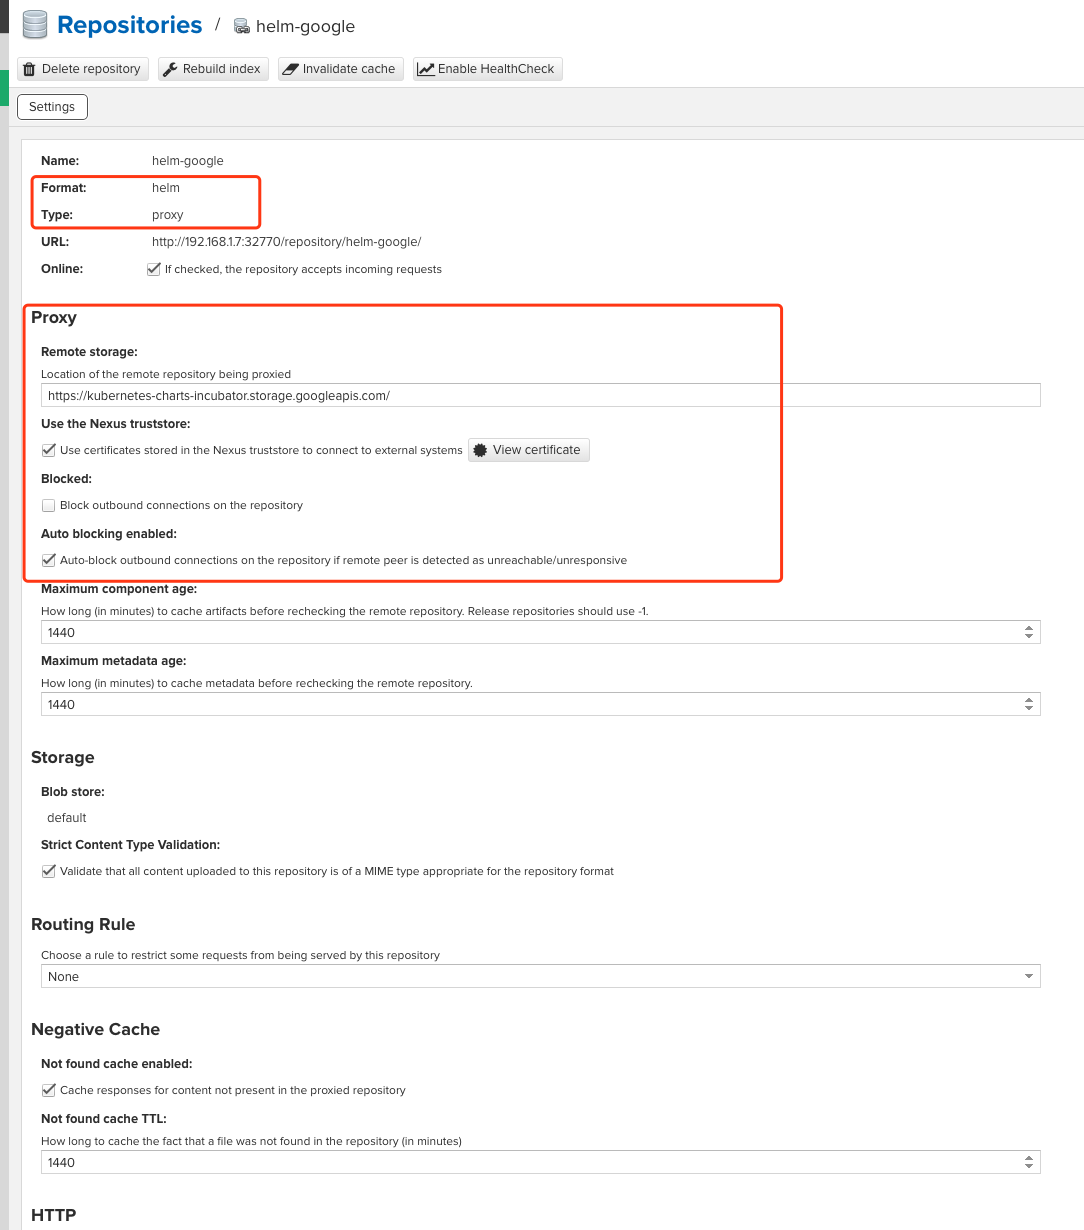
Hosted
- helm-hosted
2、Helm客户端添加Nexus上Proxy类型的远程charts仓库
添加Nexus上的Helm代理类型的仓库
helm repo add 远程Charts仓库别名 http://nexus-ip:8081/repository/helm-google/ --username admin --password="*****"
查看添加的远程仓库
helm repo list
搜索远程仓库
helm search repo
从远程仓库中下载charts到本地,并解压
helm pull 远程Charts仓库别名/chart名 --untar
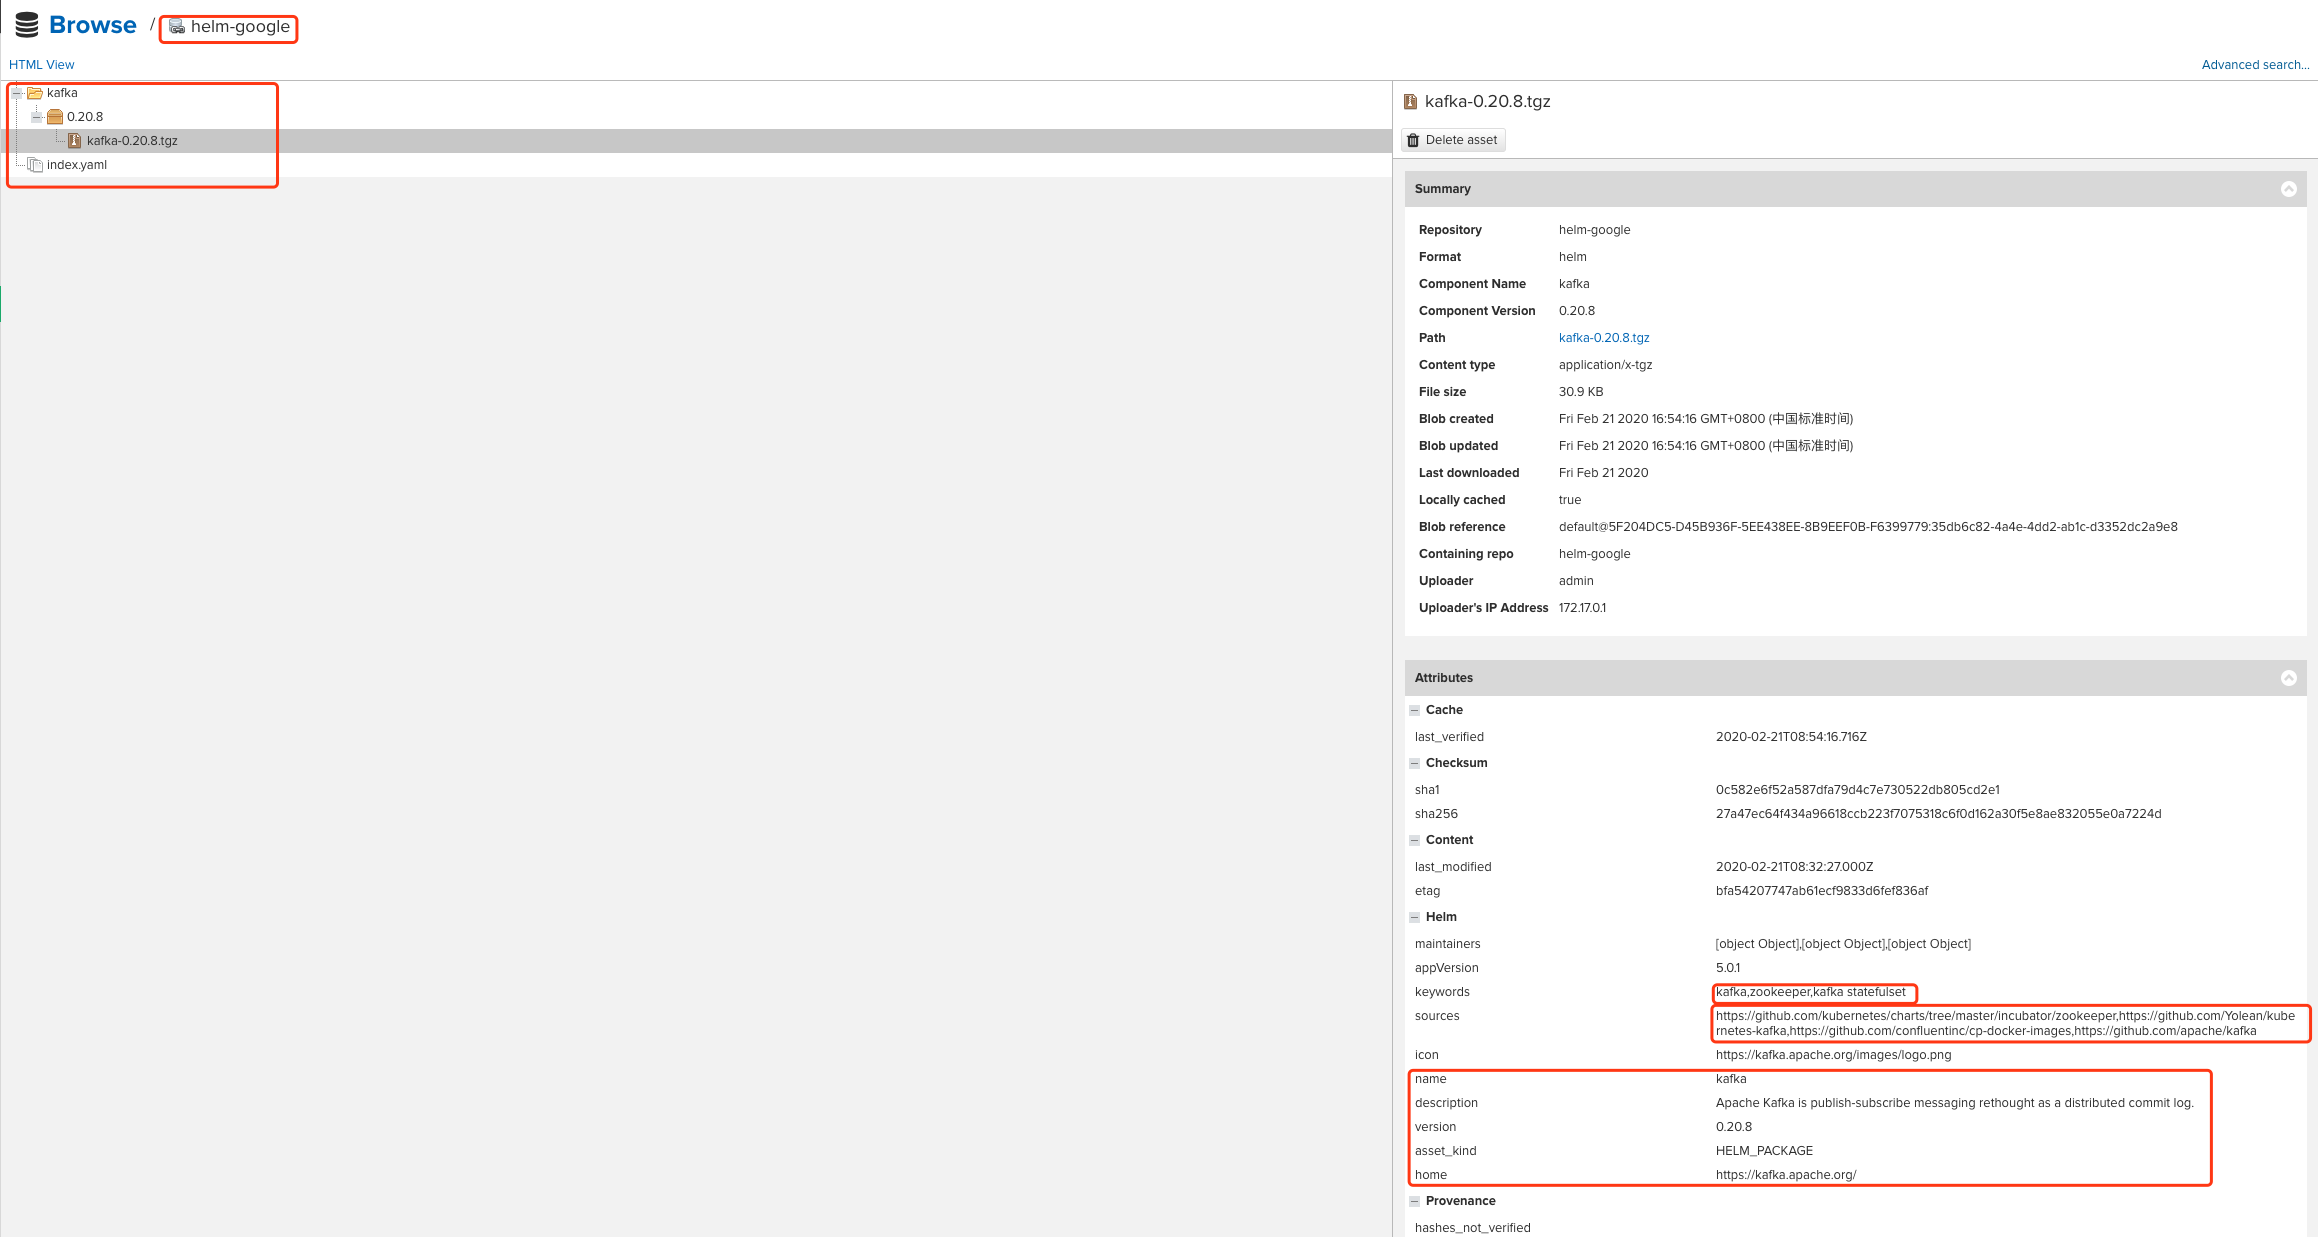
从远程仓库中下载指定版本的charts到本地
helm fetch 远程Charts仓库别名/chart名 --version 1.3.0
3、上传Helm charts到Nexus上Hosted类型的仓库
curl -u 用户名:密码 http://nexus-ip:8081/repository/helm-hosted/ --upload-file sentry-kubernetes-0.2.3.tgz
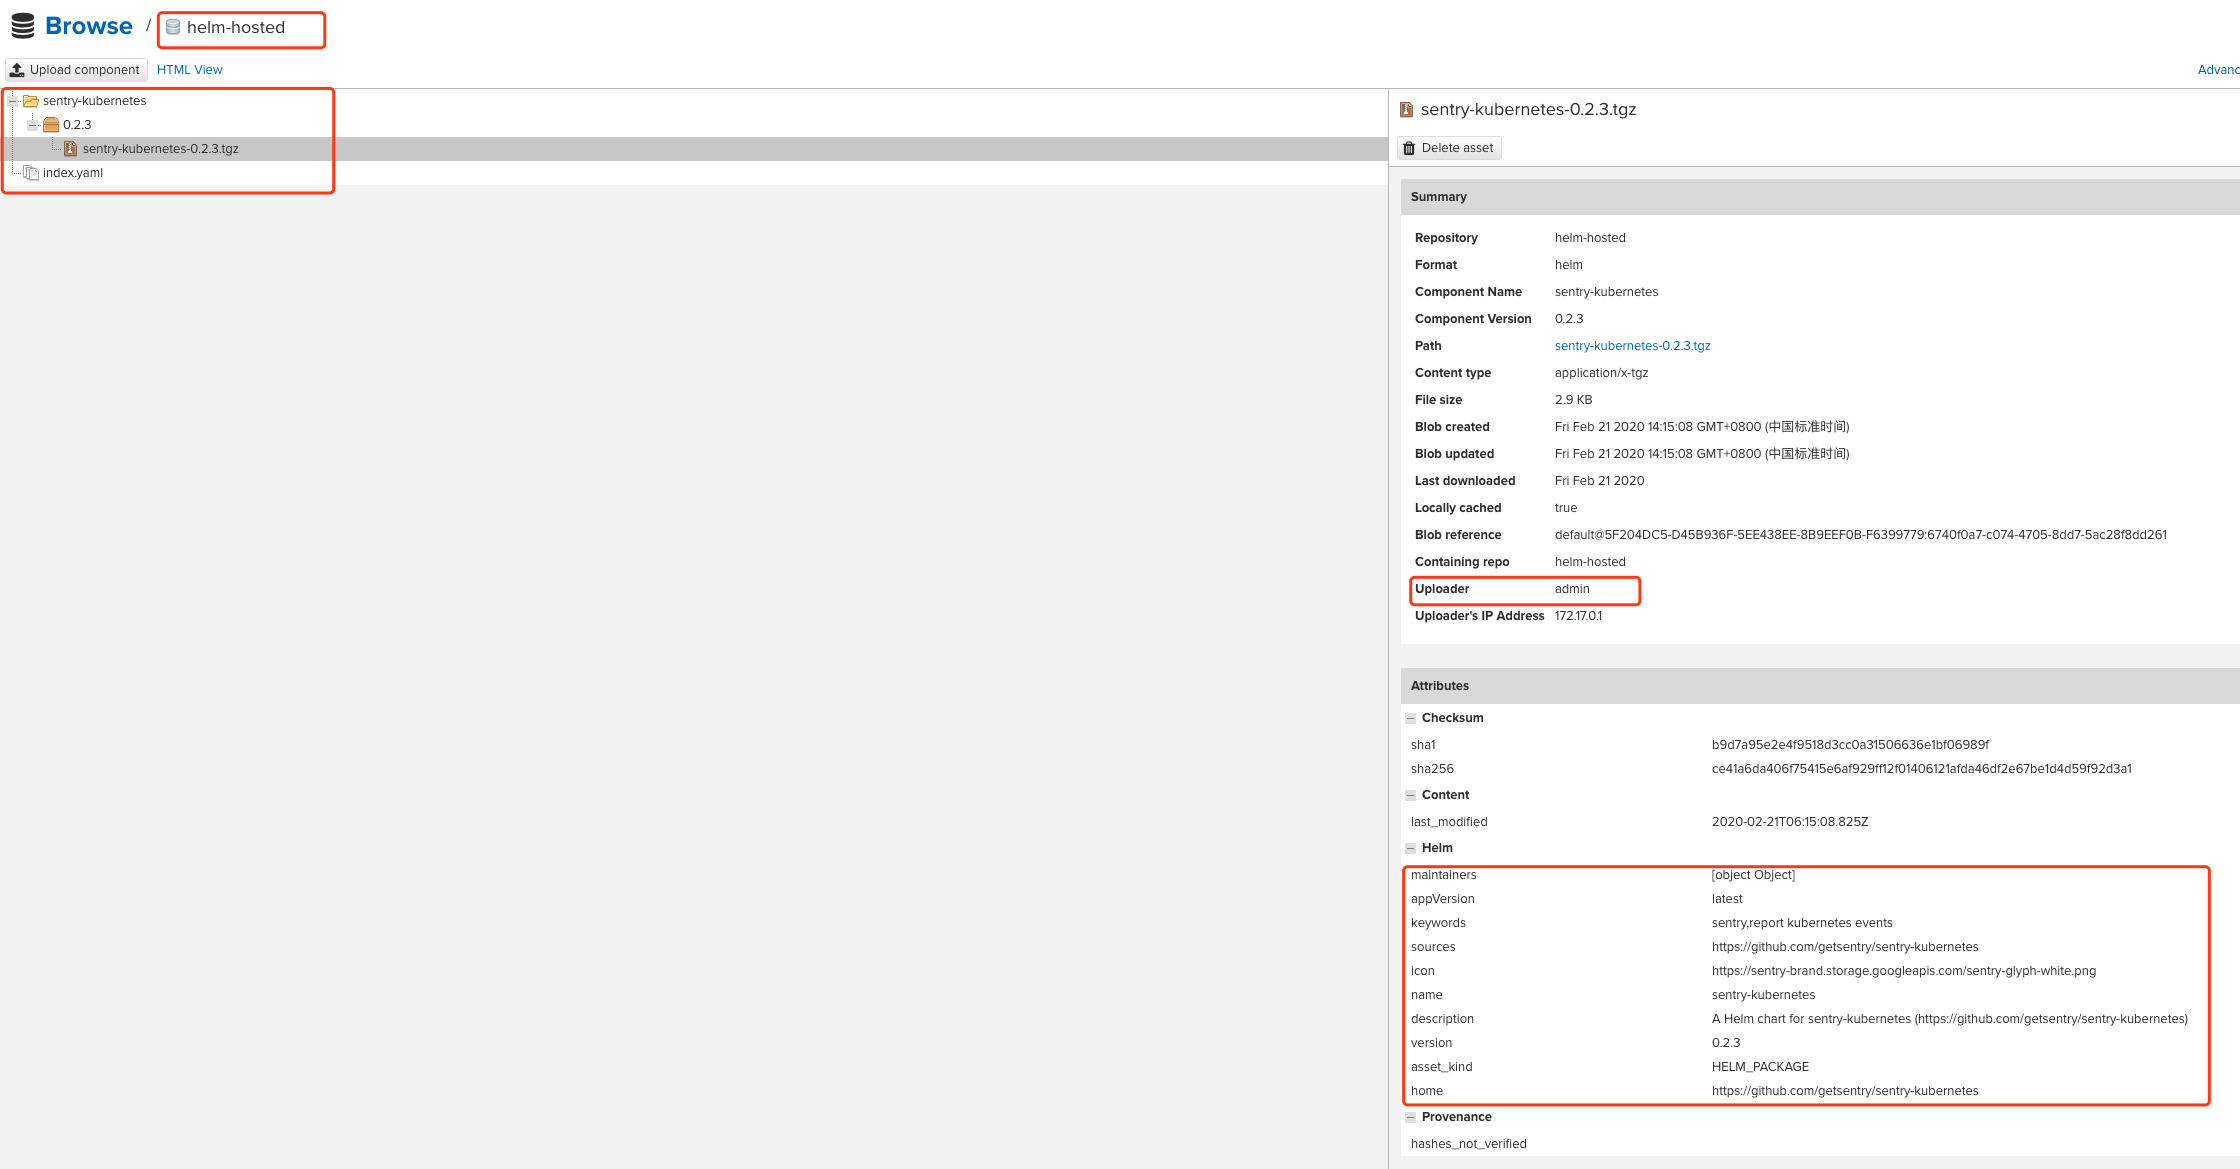
4、手动在Nexus UI界面上传.gz格式的Chart到Helm Hosted仓库
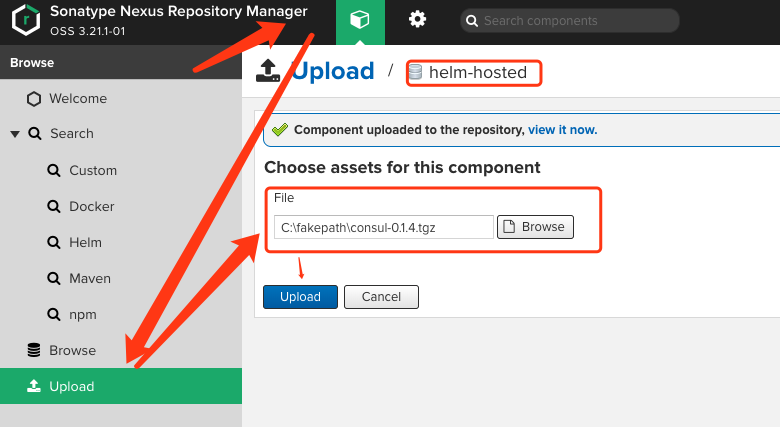
8、设置 Pypi 私有仓库
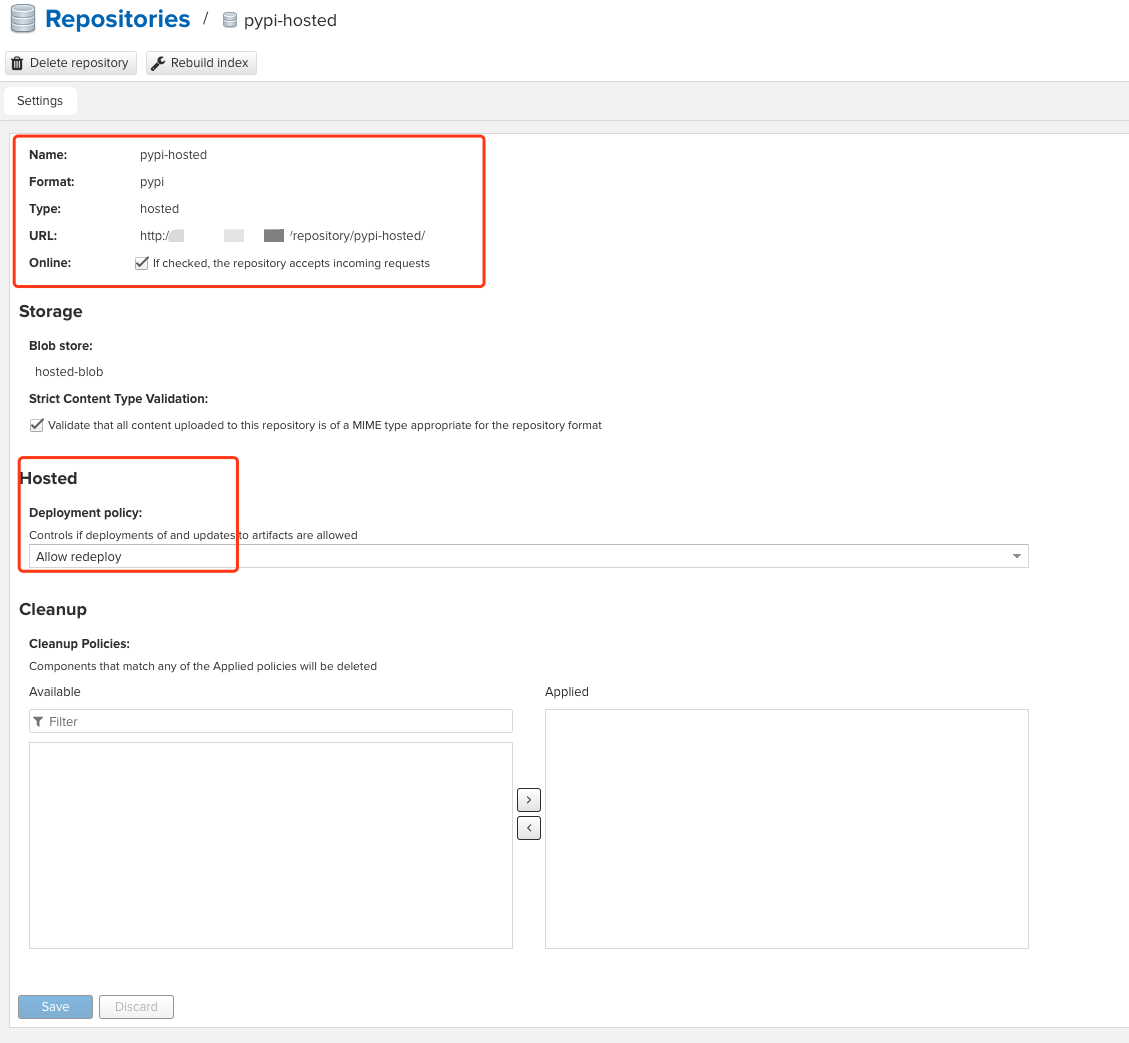
1、配置
Nexus针对Python制品仓库的管理与使用
官方文档:https://help.sonatype.com/repomanager3/formats/pypi-repositories
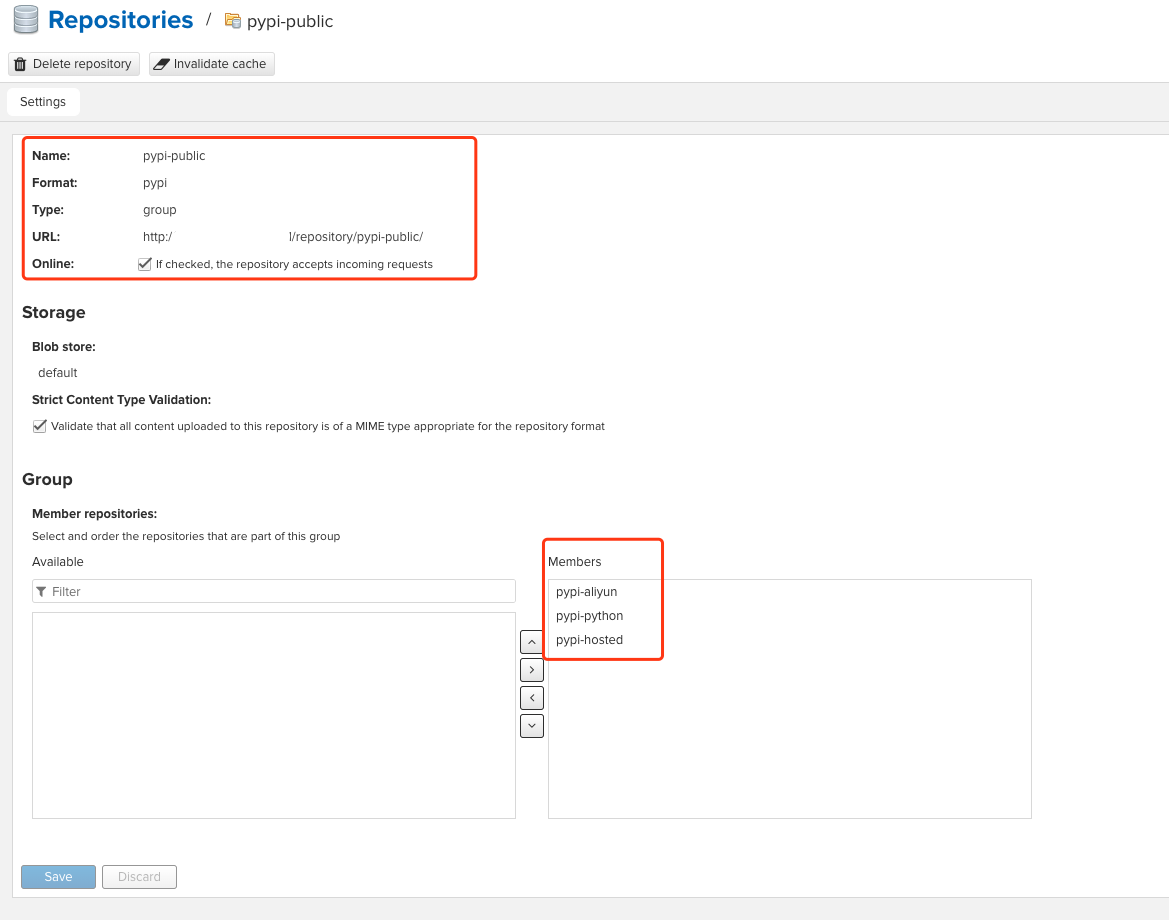
Group类型仓库
- pypi-public
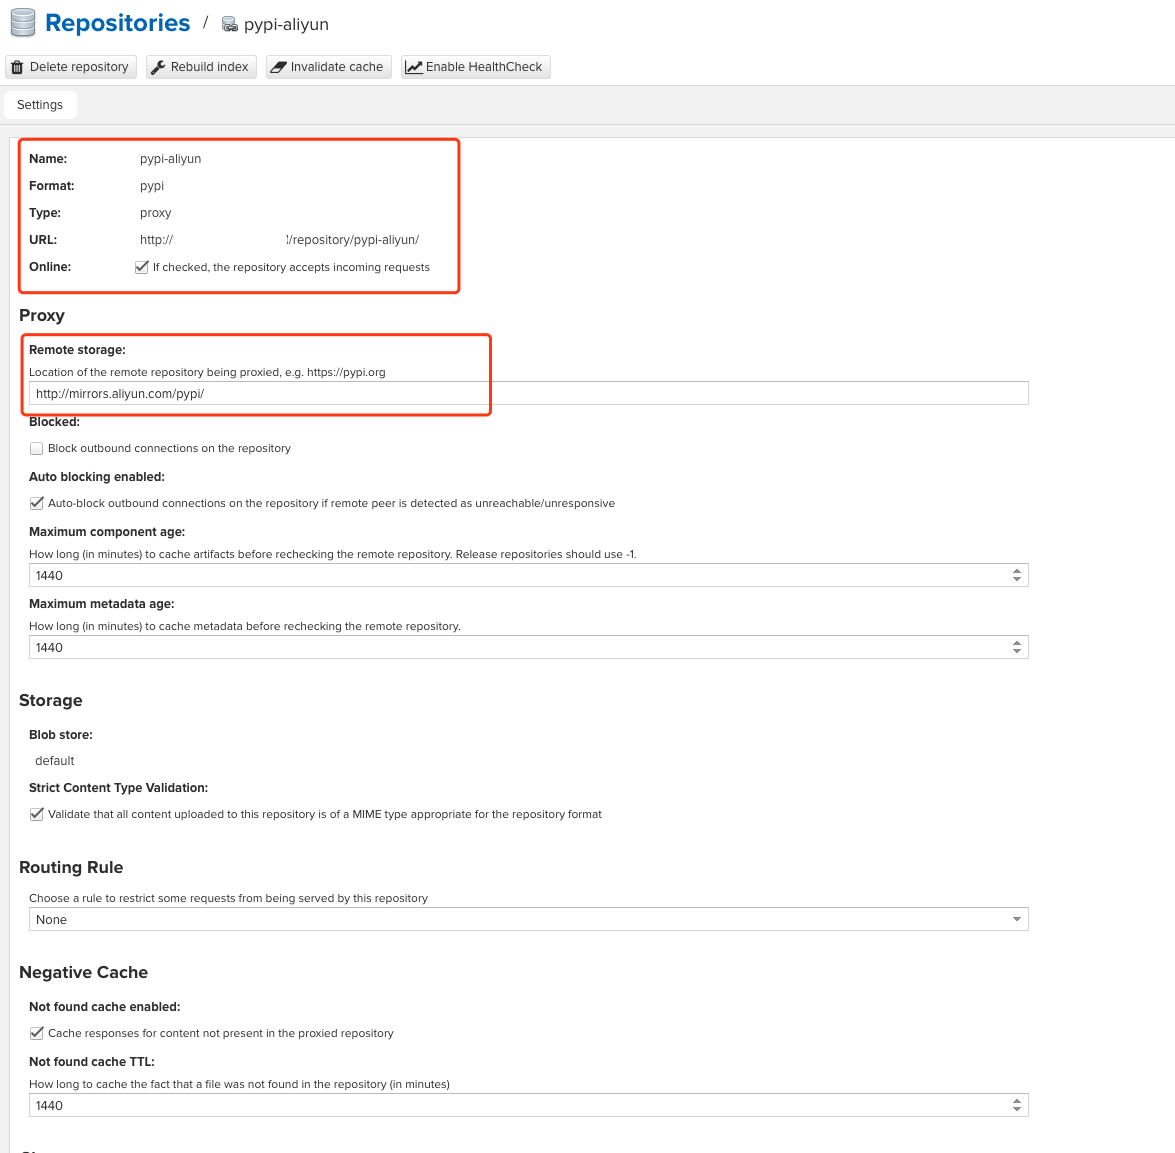
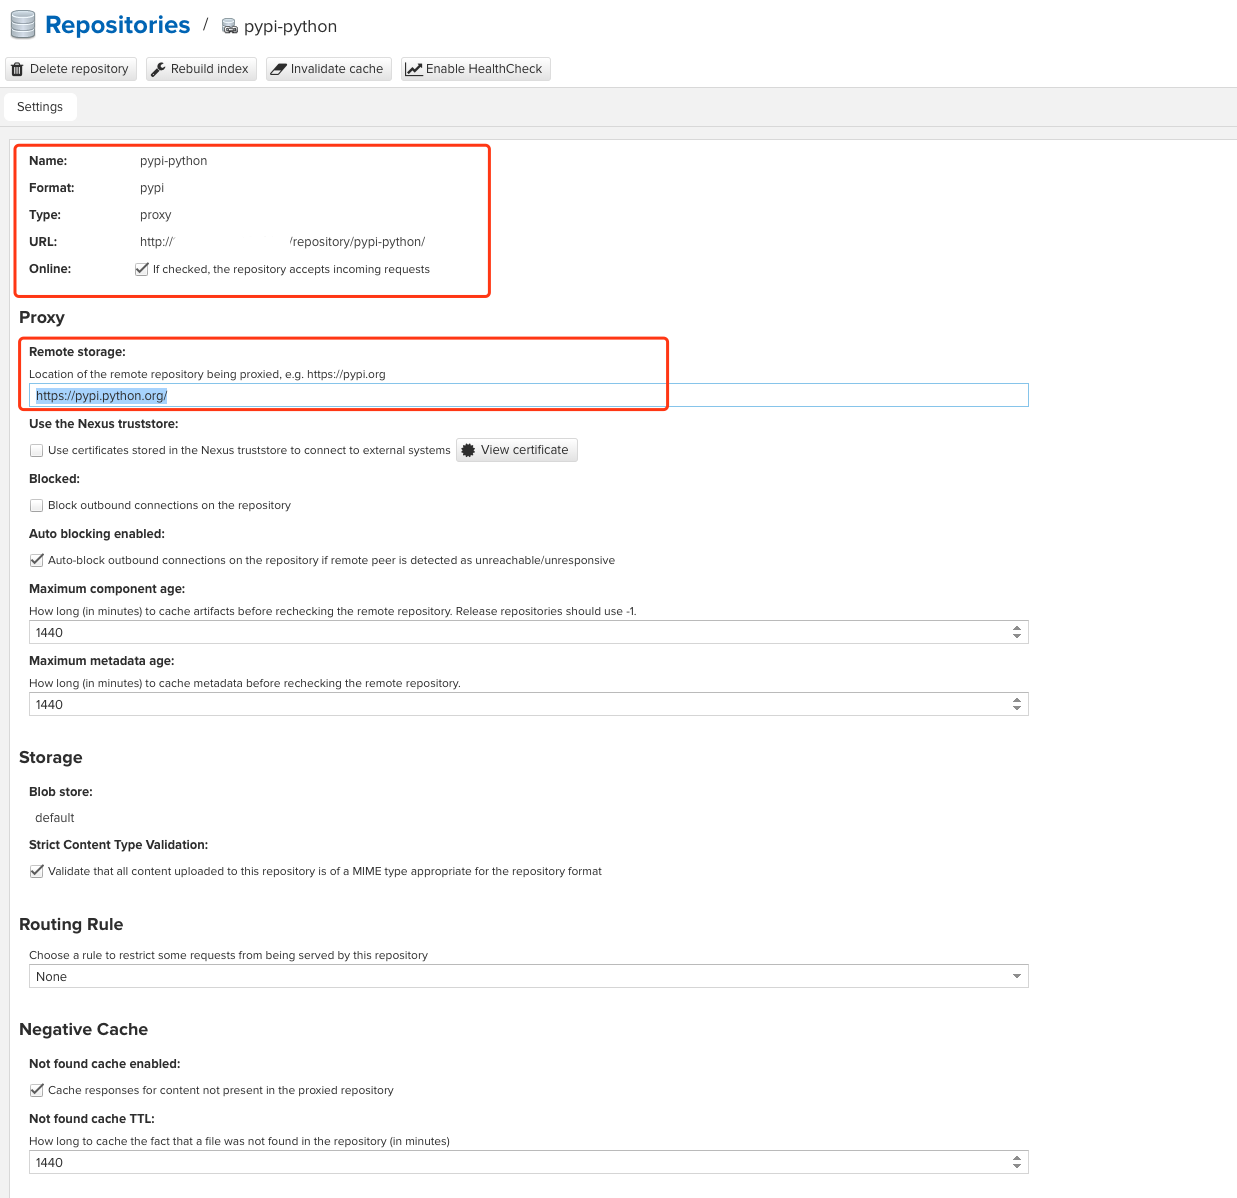
Proxy类型仓库
- pypi-aliyun:http://mirrors.aliyun.com/pypi/
- pupi-python:https://pypi.python.org/
Hosted类型仓库
- pypi-hosted
2、客户端使用
1、pip3配置仓库源
1、全局配置
编辑 ~/.pip/pip.conf
[global]

# 用户名密码已配置在URL中。如果密码中包含特殊字符,使用特殊字符对应ASCII码的16进制进行代替。例如:密码中包含的“#”的ASCII为35,对应的16进制表示%23。密码中包含的“/”的ASCII为47,对应的16进制表示%2F。

index-url = http://pypi:******@nexus-ip:8081/repository/pypi-public/simple
trusted-host =  192.168.150.88
2、临时配置
pip3 install flask \
-i http://pypi:******@nexus-ip:8081/repository/pypi-public/simple \
--trusted-host 192.168.150.88
注意
-
使用
pip3 config list可查看pip配置 -
官方已不再推荐支持
easy_install,详见一下链接
2、使用twine上传python制品到私有仓库
1、安装twine
pip3 install twine \
-i http://pypi:******@nexus-ip:8081/repository/pypi-public/simple \
--trusted-host 192.168.150.88
2、编写setup.py
import setuptools
import os
import requests

# 将README.md中的描述文字作为制品的详细描述
with open("README.md", "r") as fh:
    long_description = fh.read()

# 将requirements.txt中依赖模块的版本信息作为制品的依赖描述
if os.path.exists("requirements.txt"):
    install_requires = io.open("requirements.txt").read().split("\n")
else:
    install_requires = []

setuptools.setup(
    # 项目命名
    name="demotest",
    # 版本
    version="0.0.1",
    # 作者
    author="curiouser",
    # 作者邮箱
    author_email="*******@163.com",
    # 项目制品包的简要描述
    description="test",
    # 项目制品包的详细描述
    long_description=long_description,
    # 制品包详细描述的格式
    long_description_content_type="text/markdown",
    # 项目代码仓库地址
    url="https://github.com/test",

    packages=setuptools.find_packages(),

    classifiers=[
        "Programming Language :: Python :: 3",
        "License :: OSI Approved :: MIT License",
        "Operating System :: OS Independent",
    ],
    install_requires = install_requires,
    # 是否打包文件夹内的所有数据
    include_package_data=true,
    package_data = {
            # If any package contains *.txt or *.rst files, include them:
            'chinesename': ['source/*.txt', "source/*.json"],
    },
    # 如果需要支持脚本方法运行,可以配置入口点
    entry_points={
       'console_scripts': [
           'chinesename = chinesename.run:main'
       ]
    }
)
编写README.md
setuptools官方文档:https://packaging.python.org/guides/distributing-packages-using-setuptools/
setup.py推荐规则:https://github.com/pypa/sampleproject/blob/master/setup.py
3、打包项目
python3 setup.py sdist bdist_wheel

# 打完包,会在当前目录下的dist目录下产生源文件tar.gz,分发文件.whl两个项目包
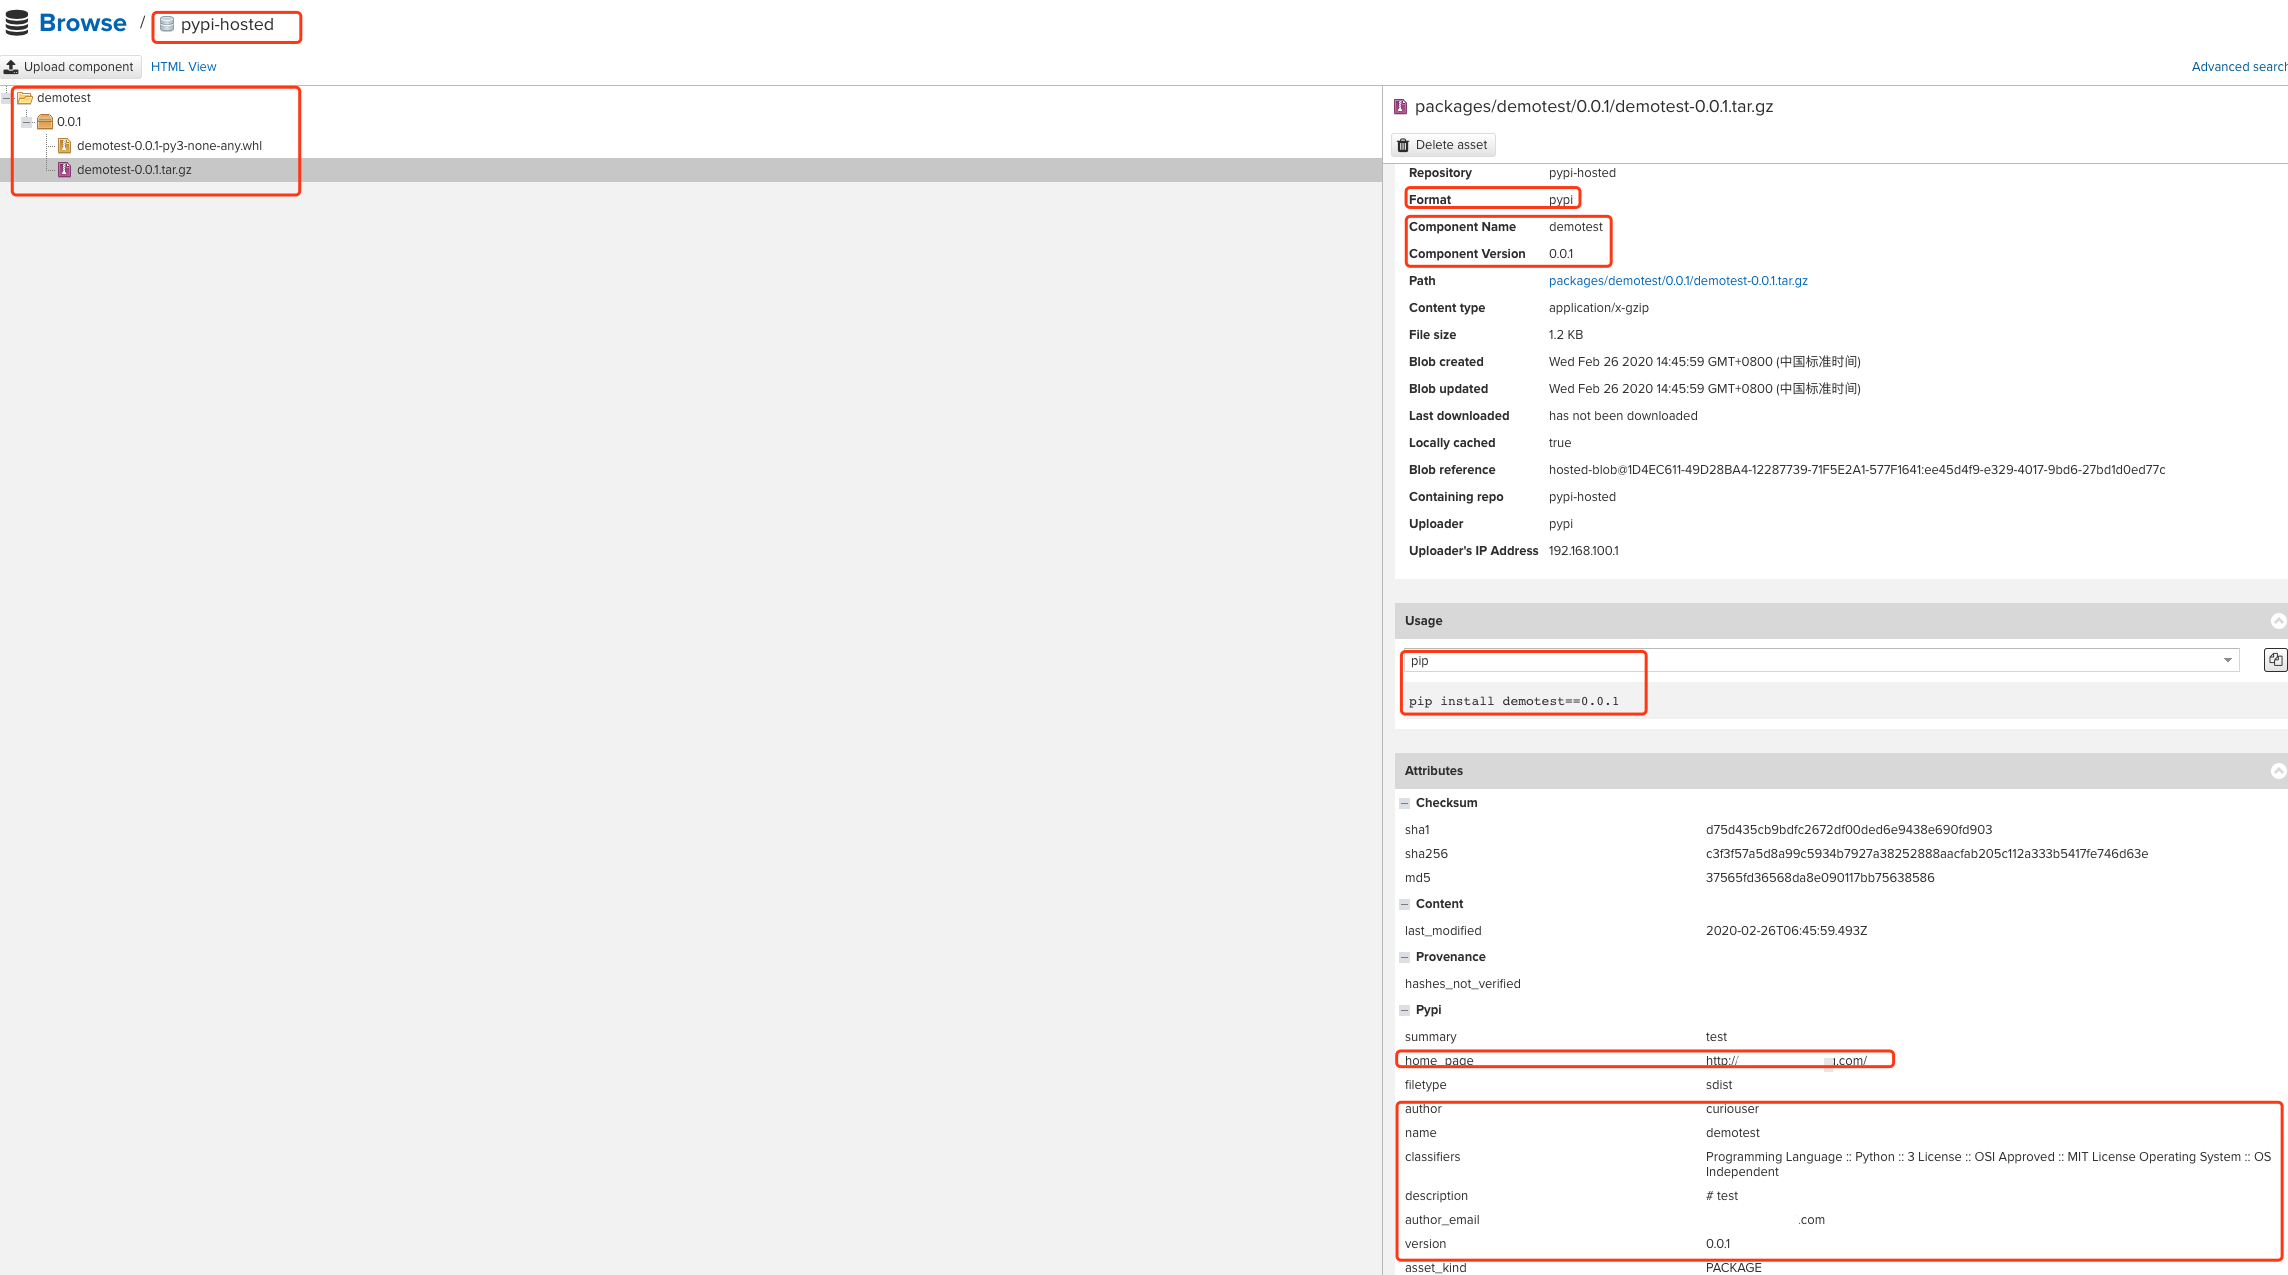
4、上传项目包到hosted仓库
# 检测包
twine check dist/*

# 上传包
twine upload dist/* \
--repository-url http://nexus-ip:8081/repository/pypi-hosted/
5、验证
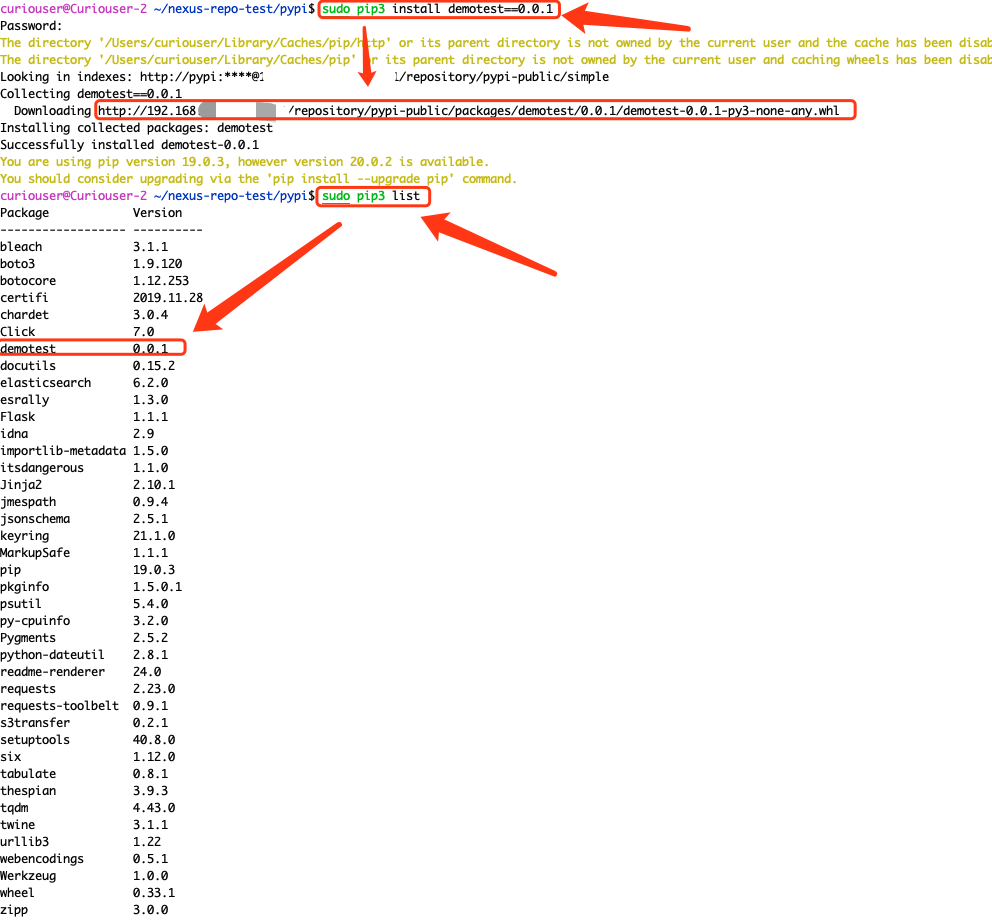
6、下载使用
sudo pip3 install demotest==0.0.1
# 或者
sudo pip3 install demotest==0.0.1 \
-i http://pypi:******@nexus-ip:8081/repository/pypi-public/simple \
--trusted-host 192.168.150.88
六、Nexus的数据备份与恢复
Nexus的备份分为两个部分。一个是元信息和配置信息数据库的备份,一个是Blob存储的备份
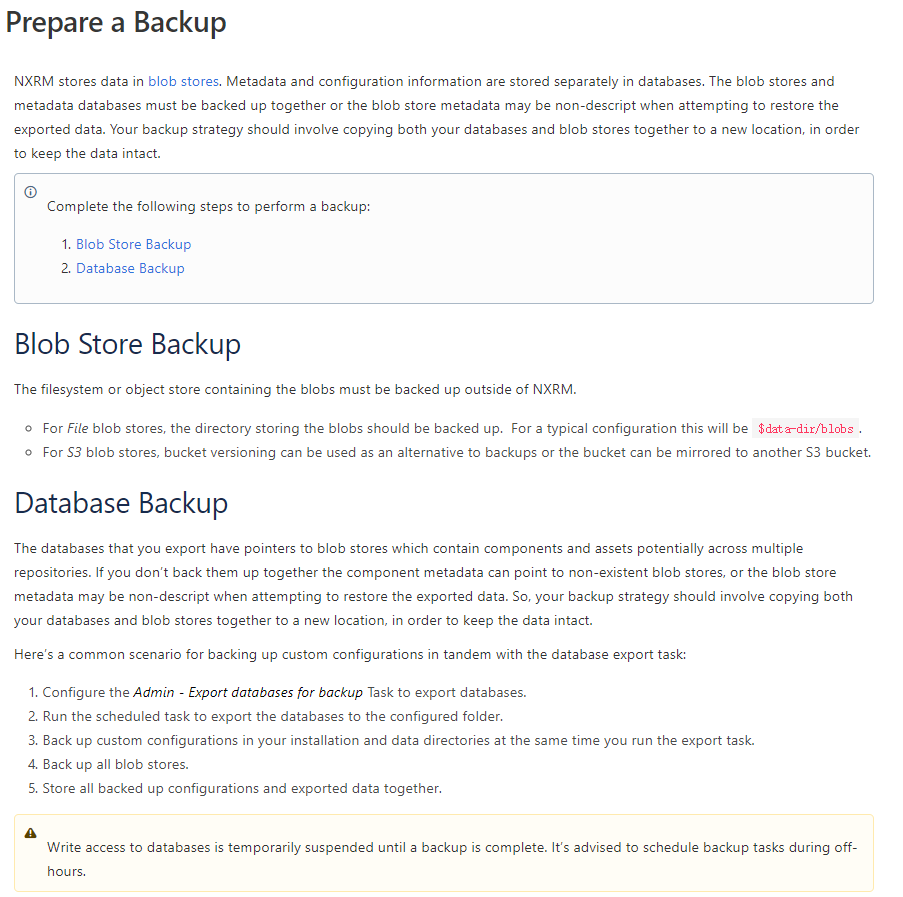
1、配置DB的备份操作
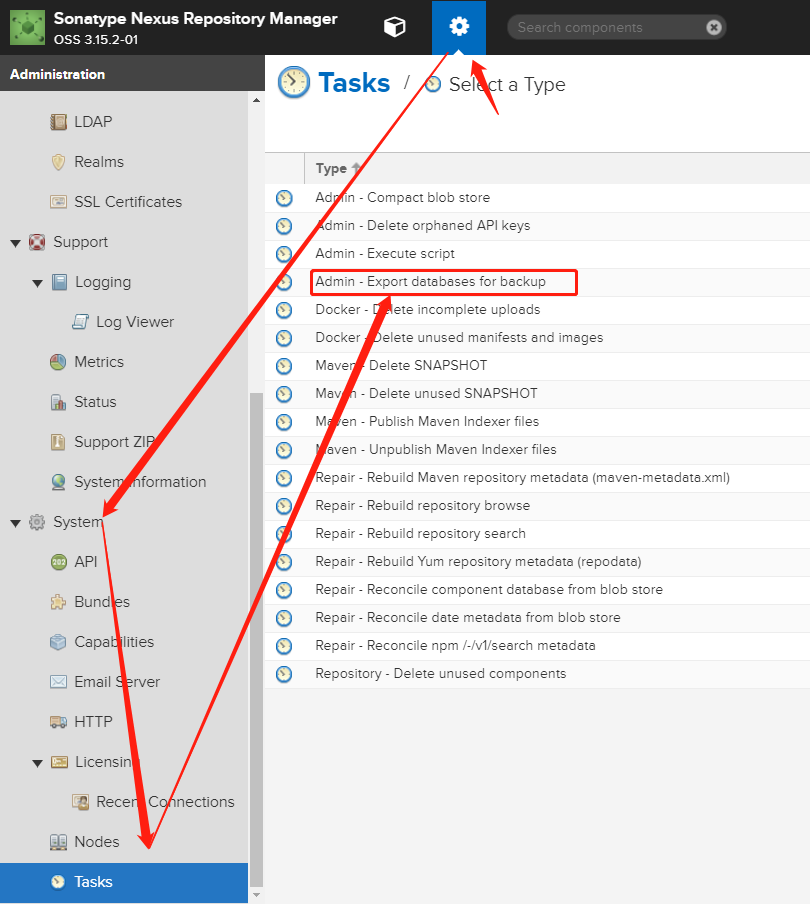


2、Blob存储的备份操作
Nexus的blob stores可以简单的理解为一个文件夹,存放着各种制品的原始文件,例如原始的Java制品Jar包,POM文件,War包等文件。Blob的类型可以是文件系统的一个文件夹,也可以是S3对象存储的一个存储Buckets。(默认是文件系统类型,仅支持S3对象存储)一个blob存储可以被一个或者多个仓库组使用



评论区